Tenant Preferences
Configure Tenant Display Preferences
You can configure the display preferences for all the users of the tenant.
Before You Begin
Procedure
- As needed, enter the values in the following fields.
Field Names Description Asset Display Name Displays the name of the asset based on the following options: - GE: Displays the asset name. By default, this option is selected.
- Customer: Displays the alias name of the asset that you provided. This name appears on the Asset page. Select the (
 ) button to switch between GE and Customer name.
Culture Setting Identifies the preferred culture of the user. This setting determines the date and number formats that are displayed when the user signs in to Predix Essentials. Language Determines the display language. By default, US English is selected. You can select the preferred language from the following options: - Chinese (Simplified)
- Dutch (Netherlands)
- French (France)
- German (Germany)
- Italian (Italy)
- Japanese
- Polish
- Portuguese (Brazil)
- Russian
- Spanish (Spain)
- US English
System of Measure Determines the system of measure. You can select your preferred system of measure in the drop-down list box. Note: The values in the drop-down list box appear based on the values that you configure in the Systems of Measure Configuration section. None and Metric are the system-provided system of measures, and by default, None is selected.TimeZone Determines the time zone of your location. You can select your preferred time zone from the drop-down list box. If you select Site Local as your preferred time zone, all the date or time values will be converted to the time zone of your asset.
Note:- The selected time zone affects only this application.
- Any selected time zone that observes Daylight Savings Time automatically observes the local time.
What To Do Next
Configure the Systems of Measures
You can add new systems of measures for a tenant.
Before You Begin
Procedure
- In the Systems of Measure section, select
 .The
.The button appears in the page.
 - Select , and then enter the name for the new system of measure.
Results
Configure the Module Navigation Menu Using Navigation Profiles
A navigation profile contains information about the set of menu items that should appear in the module navigation menu.
About This Task
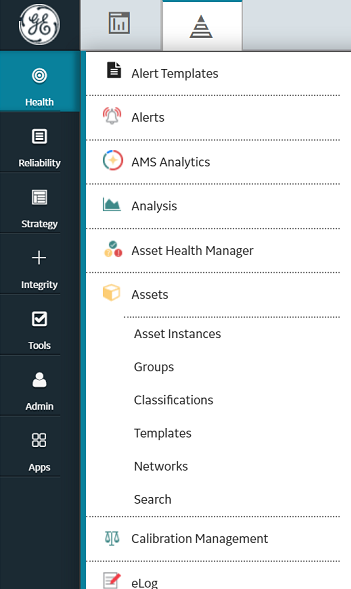
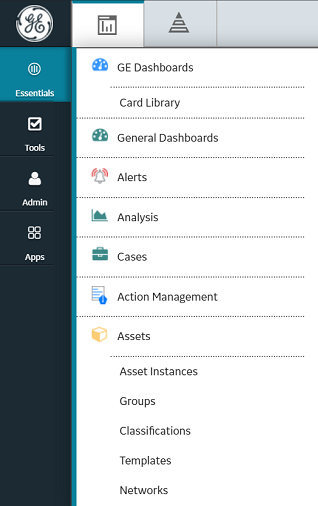
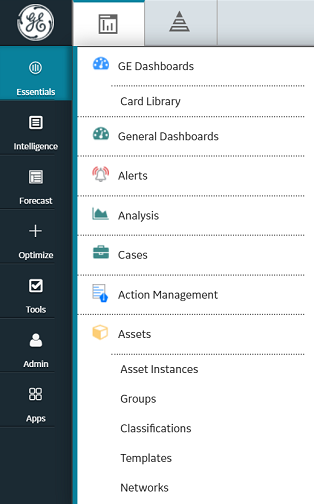
The following images display the different sets of menu items that appear based on the navigation profiles that you select:
- Module navigation menu that appears when you select the APM navigation profile.
- Module navigation menu that appears when you select the Predix Essentials navigation profile.
- Module navigation menu that appears when you select the Predix Essentials & OPM navigation profile.
Procedure
Configure SmartSignal Chart and Marker Preferences
You can configure the SmartSignal chart and marker preferences for all the SmartSignal users of the tenant.
Before You Begin
Procedure
- As needed, select
 to enable or disable settings for the following options.
Option Description SmartSignal Chart and Marker Settings Customizes the SmartSignal markers and applies the changes to all templates in their possessions. You can select marker, color, or position from the drop-down list. You can also select the stacking order number. The order numbers are one through five. One being the top-most position in the stack, and five being the bottom-most in the stack. More than one type of marker can be placed in a lane.
For more information on each of the options, see the Reference section in the SmartSignal documentation. You can select from the following options:- Diagnostic Rule
- Adaptation Successful
- Adaptation Inhibit
- NaN
- Outlier
- VSG
- Single Point Excursion
- Tag Level Rules Default
- As needed, select to enable or disable settings for the following options.
Option Description - Diagnostic Rule
- Adaptation Successful
- Adaptation Inhibit
- NaN
- Outlier
- VSG
- Single Point Excursion
- Tag Level Rules Default
- Actual
- Estimate
- Residual
- Smooth Actual
- Smooth Residual
For more information on each of the options, see the Reference section in the SmartSignal documentation.
What To Do Next
Enable Numeric Data for Condition Based Filters
You can use the Enable numeric data for CBF option to consider only the numeric tags when using the conditional filtering functionality. This option does not consider the incorrectly configured (string) tags. When the Enable numeric data for CBF option is selected, while using the conditional filters functionality, you can see the slider for a tag or tag expression for you to select the minimum and maximum values. When the Enable numeric data for CBF option is not selected, while using the conditional filters functionality, the data for the string tags is displayed in a drop-down list box instead of a slider.
Before You Begin
Procedure
- In the module navigation menu, select .
- Select the SmartSignal Marker Configuration tab.
- Under the Plotting Preferences section, select Enable numeric data for CBF.
- Select Apply.