Risks and Actions
About Risks and Actions
A risk identifies a way that a location or a piece of equipment can fail, as well as the consequence of the failure. This consequence is presented as a risk rank value, which is determined from the values that you select in the Risk Assessment interface that appears when you create a risk. After you have created an Asset Strategy record, you can begin adding risks to the asset strategy.
The values that you specify in a risk are stored in a Risk record. Throughout this documentation, unless it is necessary to refer to the record itself, we use the term risk.
An action identifies the physical ways in which you maintain a piece of equipment or location. For example, an action might indicate that you want to perform a visual inspection of a piece of equipment. After you have created an Asset Strategy record, you can begin adding actions to the asset strategy.
The values you specify in an action are stored in an Action record. Throughout this documentation, however, unless it is necessary to refer to the record itself, we use the term action.
Switch the Positions of the Risks and Actions Columns
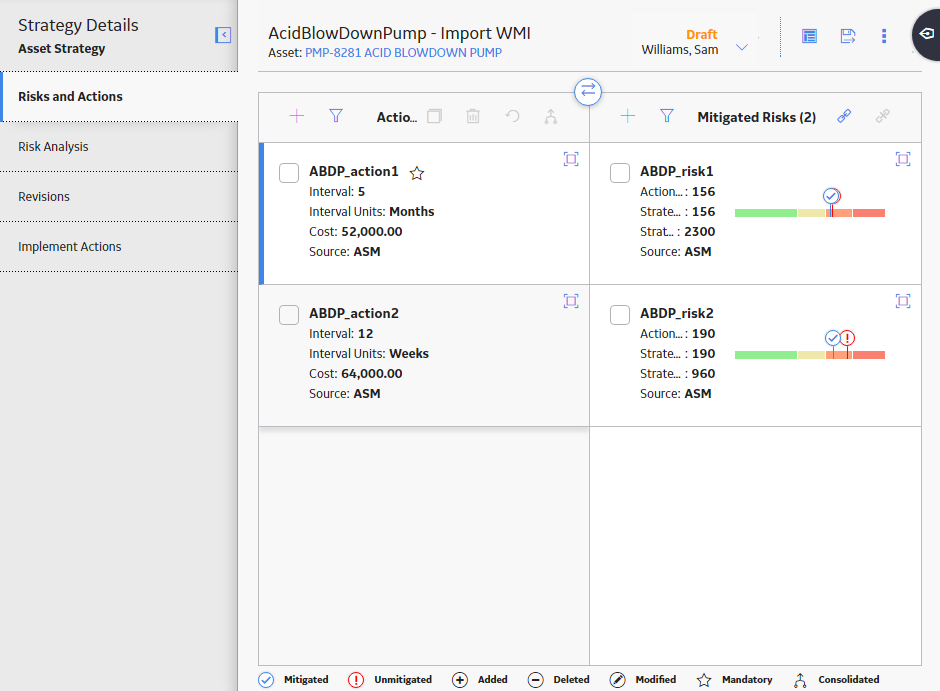
In the Risks and Actions workspace, you can switch the position of the risks and actions columns by selecting  .
.
Whichever column appears in the left side of the workspace, Risks or Actions, is in the primary position and is selectable. This means that, for example, if the Risks column is on the left and you select a particular risk, all the actions that mitigate that risk appear in the Mitigating Actions column on the right. Similarly, if the Actions column is on the left and you select a particular action, all the risks that are mitigated by that action appear in the Mitigated Risks column on the right.
Expand Risks and Actions Cards
The cards in the Risks and Actions workspace can be expanded to display more details by selecting  , and then collapsed by selecting
  .
.
When you expand an Action card, the following information is displayed:
- Datasheet for the action.
- A list of linked actions under the heading Consolidated Actions.
When you expand a Mitigating Action card, the following information is displayed:
- Datasheet for the action.
- Risk matrix with unmitigated risk assessment (not editable) and mitigated risk assessment (editable).
When you expand a Risk card, the following information is displayed:
- Datasheet for the risk.
- Risk matrix with editable unmitigated risk assessment.
When you expand a Mitigated Risk card, the following information is displayed:
- Datasheet for the risk.
- Risk matrix with the unmitigated risk assessment (not editable) and mitigated risk assessment (editable).
Sort Risks and Actions
Risks and actions can be sorted to display the items that you are most interested in viewing from a large list by selecting  .
.

In the Sort List By box, you have the following options:
-
Sort by Field: Select the individual drop-down list boxes in the control to select the fields by which you want to sort.
Note: Consult the ASM Admin section. -
Sort in Ascending or Descending Order: Select
 to toggle between ascending and descending order for each sort condition.
 -
Add Multiple Conditions to Sort by: Select
 Add Sort Condition to add a sort condition.
 -
Delete a Sort Condition: Select
 beside a sort condition to delete it.
 -
Rearrange Order of Sort Conditions: Select
 to drag-and-drop sort conditions into different positions in the sort hierarchy.
As you make selections in the Sort List By box, the grid sorts accordingly.
View Changes to a Modified Strategy
You can view a summary of the changes made to a modified strategy by selecting XX Action Changes at the upper-right area of the strategy record. When you select it, the Changed Actions window appears, listing the actions and fields that have changed on the left and the read-only Basis For Revision/Rework on the right. If a strategy is in a Pending Review state, the Basis For Revision will appear. If a strategy is in a Modified state, having gone through a rework, the Basis For Rework will appear. Only actions that have changed appear in the list of fields; not risks.

Modifying Risks, Actions, and Assessments
When an action or a risk appears in the right column of the grid in the Risks and Actions workspace, the status displayed is the status of the Risk Assessment. The following table lists examples of operations and their resulting statuses.
| Operation | Resulting Status in the Right Pane |
|---|---|
| Modify a risk or action directly without affecting the assessment. | No status icon will be displayed. |
| Modify the assessment without modifying the risk or action. | Status icon will be  . . |
| Link an existing action or risk. | Status icon will be  . . |
| Link a new action or risk. | Status icon will be . |
| Unlink an existing assessment. | Status icon will be  . . |
| Unlink a new assessment. | Risk or action card will no longer be displayed. |
| Delete an existing risk that has mitigating action(s). | Status icon will be . |
Access Risks and Actions
Procedure
- Select the Risks and Actions tab.The Risks and Actions workspace appears.

Create a Risk or Action Without a Context
Procedure
- In the Risks and Actions workspace, in the grid, select .The column positions are switched. The Actions column is now the left column.
- In the Actions column, select .A blank datasheet appears for the new action record.

- Select
 .The record is saved.
Create a Risk Without Any Context or in the Context of an Action
Procedure
- In the Risks column, select A blank datasheet appears for the new risk record.

- Select .The record is saved.
Create an Action in Context of a Risk
Procedure
- In the Mitigating Actions column, select A blank datasheet appears for the new action record.

- Select .The record is saved.
Create a Mitigated Risk in the Context of an Action
Procedure
- In the Risks and Actions workspace, in the grid, select .The column positions are switched. The Mitigated Risks column is now the right column.
- In the Mitigated Risks column, select .A blank datasheet appears for the new mitigated risks record.

- As needed, enter values in the available fields and use the risk matrix control to assess the unmitigated risk.Note: You will only be able to do an unmitigated assessment in this view before saving the new risk. After that, to edit the unmitigated risk assessment, you must switch the column positions by selecting. Usually, you can only edit the mitigated risk assessment when in the context of an action.
- Select .The record is saved and the unmitigated risk assessment is used to initialize the mitigated risk assessment.
- Select .The risk is saved.
Modify a Risk or Action
Procedure
- Select in the card for the risk or action that you want to modify on either side of the Risks and Actions workspace.The card expands for the risk or action that you selected, displaying the datasheet.

- Select .The record is saved and the card for the risk or action is updated.Note: If you modify actions that were previously implemented, you must a apply the updates you made to the implemented actions.
Copy a Risk or Action
Procedure
- Access Risks and Actions.Note: In the Risks and Actions workspace, in the grid, only items in the left column can be copied. Depending on whether you want to copy a risk or an action, if needed, select to switch the column positions.
- Select the check box next to the risk or action that you want to copy, and then select
 .The new copy of the risk or action will appear in the column and will be selected. None of the items associated with the copied item will be copied, but only the original copied item itself.
Delete a Risk or Action
Before You Begin
The Strategy must be in an Active or Modified state before any risks or actions can be removed.
Procedure
-
Access Risks and Actions.Note: In the Risks and Actions workspace, in the grid, only items in the left column can be copied. Depending on whether you want to delete a risk or an action, if needed, select to switch the column positions.
- Select the check box inside the card for the item that you want to delete, and then select .The Confirm Delete dialog box appears, asking you to confirm that you want to delete the risk or action.
- Select Yes.The risk or action is marked for removal and a is displayed on the applicable risk or action card. When the state of the strategy is set to Active again, the deleted item will disappear from the risks or actions column.
Undo a Risk or Action
Procedure
- Access Risks and Actions
.Note: In the Risks and Actions workspace, the undo operation can only be executed in the left column. Depending on whether you want to carry out the undo operation on a risk or an action, if needed, select to switch the column positions.
- Select the check box inside the card for the item whose last action should be undone, and then select
 .A message appears, asking you to confirm that you want to undo the last action taken against the selected item.
Consolidate Actions
Before You Begin
This topic assumes that at least two actions have been added to the selected strategy.
Procedure
- Access Risks and Actions.Note: In the Risks and Actions workspace, in the grid, only items in the left column can be consolidated. Depending on whether you want to consolidate actions, if needed, select to switch the column positions.
- Select the check box in the card for each action that you want to consolidate, and then select
 .The Consolidate Actions window appears.
- Select the radio button next to the action that you want to supersede the others, and then select Consolidate.The superseded actions now appear in the Consolidated Actions section of the expanded action card for the superseding action, and the superseding action's card now contains a
 button.
  Note:
Note:The superseded actions are now activated. In the Consolidate Actions section, in the Name column, you can select the link to access the details of the action.
In the Consolidate Actions section, in the Name column, you can select the link to access the details of the action.

Unconsolidate Actions
Before You Begin
This topic assumes that the selected strategy contains consolidated actions.
Procedure
- Access Risks and Actions.Note: In the Risks and Actions workspace, in the grid, only items in the left column can be consolidated. Depending on whether you want to consolidate risks or actions, if needed, select to switch the column positions.
- Select on the card for the superseding action that you want to expand.
The action card expands, displaying the action's datasheet on the left and the Consolidate Actions section on the right.
- In the Consolidate Actions section, select the action that you want to unconsolidate, and then select
 .
.The action is removed from the Consolidate Actions section and returns to the Actions column in the Risks and Actions workspace.
Link a Risk or Action
Procedure
- Access Risks and Actions
.Note: In the Risks and Actions workspace, in the grid, only items in the right column can be linked. Depending on whether you want to link a risk or an action, if needed, select to switch the column positions.
- In the left column, select the card for the item to which you want to link a mitigating action or a mitigated risk.The card for the item is highlighted with a blue edge.

- In the grid, select
 .The Link Actions or the Link Risks window appears, displaying a list of available items that you can link to the risk or action that you selected in the pane.
Unlink a Risk or Action
Procedure
- Access Risks and Actions.Note: In the Risks and Actions workspace, in the grid, items can only be unlinked from the right column. Depending on whether you want to unlink a risk or an action, if needed, select to switch the column positions.
- In the left column, select the card for the item from which you want to unlink a mitigating action or a mitigated risk.The card for the item is highlighted with a blue edge.
- In the right column, select the check box for each mitigating action or mitigated risk that you want to unlink from the highlighted item, and then, in the upper-right corner of the grid, select
 .A message appears, asking you to confirm that you want to unlink the selected items.