Administer
Access the APM Connect Administration Center
Using the APM Connect Administration Center, you can run extraction and load jobs. Before you can begin running jobs, you must set up the APM Connect Administration Center. This topic explains how to access and deploy the APM Connect Administration Center for the first time.
Procedure
- Select .
The Database parameters window appears, and a check is performed by the APM Connect Administration Center.
 Important: If your license does not validate as shown in the previous image, you can validate your license manually.
 - If your license validates, in the Database parameters window, select Go to login page.
The Login page appears.

Results
The APM Connect Administration Center is successfully deployed, and the APM Connect Administration Center Welcome page appears.

Configure the APM Connect Administration Center
This topic describes how to configure the APM Connect Administration Center.
About This Task
Depending on whether you are using the EAM Adapters or the Data Loaders, configuring the APM Connect Administration Center requires defining parameters for some or all of the following components: Commandline, Job conductor, Monitoring, and Log4j.
Procedure
Results
The APM Connect Administration Center parameters are configured.
APM Connect Connection Records
The APM Connect workspace stores information about connections used by APM Connect. Specifically, it manages the connection between GE Digital APM and APM Connect components. This topic provides an alphabetical list and description of the fields that exist in the APM Connect workspace. The information in the table reflects the baseline state and behavior of these fields.
General Setting
|
Field |
Data Type |
Description | Behavior and Usage |
|---|---|---|---|
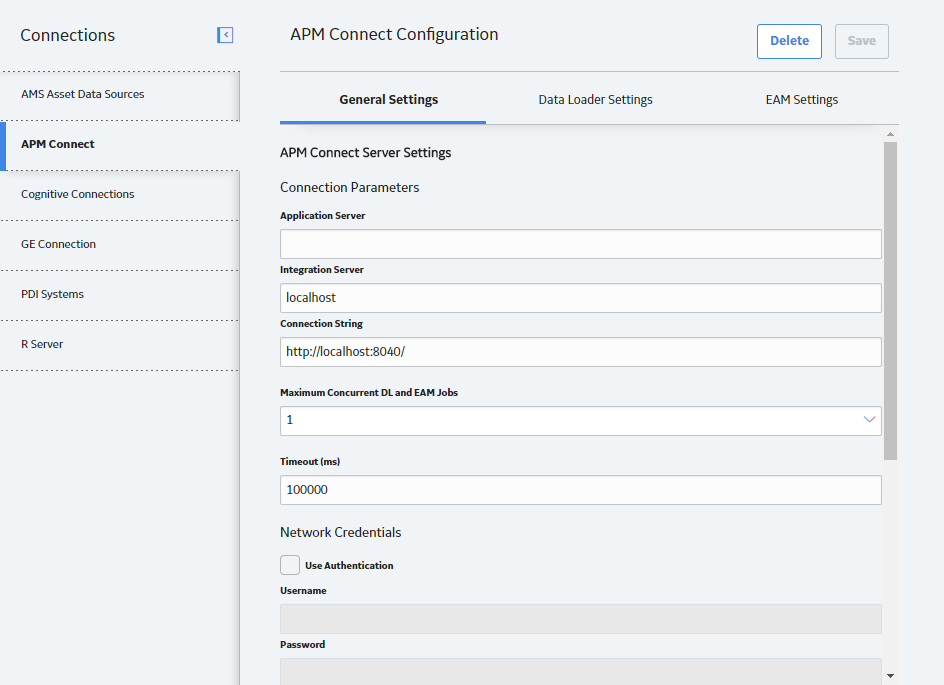
| Application Server | String | The name of your GE Digital APM server. | Enter the name of your GE Digital APM Server to establish your connection to your APM Connect Server. |
| Connection String | String | The URL indicating the APM Connect server host and port used to connect GE Digital APM and the APM Connect sever. |
This field is required. The connection string is a combination of the APM Connect Connection parameters APM_CONNECT_HOST and APM_CONNECT_PORT as defined in the context file. For example, if the host was apmconnect and the port was 8040, the connection string would be http://apmconnect:8040/. Note: This string is used by the file SAP_ConnectorService.jar.
|
| Integration Server | String | The location of the server where the Integration Services is installed. | This field is required. |
| Maximum Concurrent DL and EAM Jobs | Numeric | The number of Data Loading jobs or EAM jobs that can run at the same time. | This field is required. The default value is 1. This means that only one job can run at a time. The maximum value allowed is 5. When the number of concurrent jobs is low, data ingestion into GE Digital APM is faster and the system is less likely to become overloaded. Note: Two Data Loaders of the same type are not allowed to run at the same time. For example, if you initiated two Taxonomy data loads at the same time, the second job would not begin loading until the first is complete regardless of the value in the field. |
| Password | String | The password for the APM Connect network. | This field is required only if you are using network authentication. |
| Password |
String | The password of the proxy server. | This field is required only if you are using proxy server authentication. |
| Port | String | The port number of the PostgreSQL server. | The default value is 5432. This value must match the value specified for the IR_PORT parameter in the context file. |
| Proxy Server | String | The location of the proxy server. | This field is required only if you are using proxy server authentication. |
| Timeout (ms) | Numeric | The time in milliseconds before the connection between the APM Connect server and GE Digital APM will timeout. | The default value is 100,000 ms, and is populated automatically. |
| Use Authentication | Boolean | Indicates whether or not authorization will be used. | If the check box is selected, authentication will be used, and you must enter the network user name and password. |
| Use Proxy Server | Boolean | Indicates the whether or not to use a proxy server. | If the check box is selected, the proxy server will be used. |
| Use Proxy Server Authentication | Boolean | Indicates whether or not authentication will be used to the proxy server. | If the check box is selected, authentication will be used for the proxy server. |
| Username | String | The user name for the APM Connect network. | This field is required only if you are using network authentication. |
| Username | String | The user name for the proxy server. | This field is required only if you are using proxy server authentication. |
Data Loader Settings
| Field | Data Type | Description | Behavior and Usage |
|---|---|---|---|
| Base File Path | String | The path to the file server. | This field is required. An example of a valid server path is \\hostserver\share\subfolder. If an invalid server path is entered, an error message will appear.  |
| Database Name | String | The database name of the Data Loader staging (IR) database. | None. |
| Host Name | String | The host name of the Data Loaders staging (IR) database. | None. |
| Logging Level | String | Determines the logging level for the data loader logs. |
The following logging levels can be selected:
Notes:
|
| Password | String | The Data Loader staging database (IR) password. | None. |
| Password | String | The password of the file server. | None. |
| Use File Path Authentication | Boolean | Indicates whether or not to use authentication when accessing the file server. | If selected, authentication will be used for the file path. |
| UserName | String | The Data Loader staging database (IR) user name. | None. |
| Username | String | The user name of the file server. | None. |
EAM Settings
| Field | Data Type | Description | Behavior and Usage |
|---|---|---|---|
| Work Order Generation Schedule | Boolean | Stores the scheduling mechanism for transferring work orders to SAP. | To determine the schedule, you must schedule work orders. |
Set User Permissions
To begin using the APM Connect Administration Center to run data extractions, or Jobs, you must first give the admin user all the user roles.
Before You Begin
A user must be authorized for a project before they can view or change sections associated with a project.
Procedure
- Select the user that you want to be the administrator.
The Data section is activated.

- In the Data section, next to the Role: box, select
 .
.
Results
The user permissions are set.
Authorize Users for Projects
Before a user can begin work on a specific project, that user must be authorized to work on that project. Each project can have multiple users with differing roles. Users can also be authorized for multiple projects. This topic explains how to authorize a user for a project.
Procedure
- In the Menu pane, in the Settings section, select Project authorizations.
The Project Authorizations workspace appears displaying the Project section which lists all the projects to which you can add users and the User Authorizations for the Project: <name> section which lists all users that can be added to the project.

- To give a user read permissions only, in the Right column in the row for that user, select the
 button.
 - To give a user read and write permissions, in the Right column in the row for that user, select the
 button.Tip: The icons in the Right column will be appear in a lighter color if the user is not authorized for a specific action, and be colored if the user has the required permissions.
The user is now authorized for the project.
Configure Logging
APM Connect uses log4j version 1.2 to log events and provides a default configuration for logging events. These steps describe how to modify this default configuration.
Procedure
Configure Source System Custom Field Mappings or Default Values
There may be times when you need to either map values from GE Digital APM to your source system or add a default value for a field in your source system from GE Digital APM. This topic describes how to achieve this goal.
Before You Begin
To successfully perform this task, you must have the following:
- Administrative rights to the APM Connect database from which you are retrieving the field values or setting the default values.
- A database tool, such as DBeaver or DBVisualizer.
About This Task
There are times when you need to have information that is stored in GE Digital APM displayed in your source system database. To achieve this goal, you need to modify tables used by GE Digital APM to send data to your source system.
The following procedure describes how to either configure a mapping between GE Digital APM and your source system or to set a default in your source system from GE Digital APM.
The following image is an example of the southbound_mapping_control table as displayed by a database tool.

Procedure
- Using a database tool, navigate to the GE Digital APM database you want to configure.
- In the database navigation, in the Tables folder, select southbound_mapping_control.
- Navigate to the target_field_name and target_field_map_name column you want to configure.
- Configure the field mapping or default value for your source system.
Item to configure How to configure Field mapping In the apm_field_name column, enter the name of the GE Digital APM field that contains the value to apply in the source system, and then set the value in the mapping_enabled column to true
For example, if you want to set the source system value of REPORTEDBY in map table REPORTEDBY_NOTIFHEADER from the GE Digital APM field CurrentUserID, the table would resemble the following when you complete your update. Important: If, after configuring the mapping, you see a blank value for the field, make sure the value you entered in the apm_field_name column is correct.
Default value In the target_field_default column, enter the value you want to be the default in your source system and set the value in the mapping_enabled column to false.
Results
Configure the APM Connect Administration Center for the Studio
About This Task
Procedure
- According to recommendations in the information in the following table, enter the necessary parameters.
Parameter Description Recommend or Default Value Host The IP address of the CommandLine. localhost Port The port number on which the CommandLine is queried. 8002 Job generation folder The path to the folder where Jobs are generated. <root:>\APMConnect\Utilities\cmdline\generationCache User component path The path to the folder where user components are stored. <root:>\APMConnect\Utilities\cmdline\custom_components The default parameters are configured as shown in the following image.
Install the Studio
About This Task
Procedure
Results
The installation is complete, and Talend Studio desktop icon is available.
Deploy Data Loaders or Adapters
After configuring APM Connect, you must deploy the adapters or data loaders you need.
The process for deploying and configuring the data loaders and the various adapters are described in the sections devoted to the APM Connect data loaders or the other adapters.
Access APM Connect EAM Jobs
Procedure
The APM Connect EAM Jobs page appears.

Access the Details of an EAM Job
Procedure
- In the Status and Log column, view the status of each job.Tip: If necessary, you can cancel an import job by selecting the
 button that appears in the Status and Log column. If you cancel a job, any changes that have already occurred are not removed, therefore, you may need to manually modify records to update or remove unnecessary data.
Status
Description
Waiting
Initial state when job is created. The data import job is queued for pre-processing on the APM Connect Server.
Staging In Progress
The data import job is being prepared on the APM Connect Server.
Staging Failure
The data import job failed during preparation.
Staging Complete
The data import job was prepared successfully.
Dataloader Enqueued
The maximum number of data load jobs has been exceeded, as determined in the APM Connect Connection Records, or there is a job of the same type running. The data import will begin once the other jobs are complete.
Configuring Dataloader
The data import job is configuring the proper user roles and arranging data processing for most efficient execution flow.
In Progress
The data import job is loading data into the GE Digital APM Data Source.
Data Synchronization in Progress
The data import job is synchronizing the loaded data and relationships across the Data Source.
Job Cancelling
The data import job is in the process of being canceled. This occurs after you select
. Cancelled by User
The data import job was cancelled successfully.
Note: When a job is cancelled, the data imported prior to cancelling is not removed.Errors
The data import is complete, but encountered one or more errors. You can download the log file to view detailed error messages.
Complete
Data has been imported into GE Digital APM.
Note: If the icon appears, the data was imported with warnings. You can download the log file to view detailed warning messages.
 - In the Status and Log column, select
 on the row corresponding to the EAM job for which you want to access the log.
The log file is downloaded.
- To view the information contained in the Log Text, select the
 Log Text
A window appears, displaying details about the job such as error messages, warnings concerning the data load, and general information regarding the data records that were loaded.
Delete a Job
When upgrading in a cloud environment or an adapter, you have to delete the old adapter job before installing the new job.
Procedure
- In the Job Conductor workspace, select the job you want to delete, and then, at the top of the workspace, select
 .
.
Results
The job is deleted.
Access the APM Connect Page
Procedure
The APM Connect workspace appears.
Establish Connection from GE Digital APM
About This Task
To load data into GE Digital APM using the APM Connect Data Loaders or the EAM Adapters. You must establish the connection between your APM Connect component and GE Digital APM.
Procedure
Results
Determine Logging Level
Procedure
Results
Once the record is saved, subsequent data loads will return log files with the logging level you determined. The logging level will only apply to future data loads. Meaning if you change the level from Error to Warn historic log files will not be updated with more details. It will only apply to new data loads.