Guidelines for Working with Clients
Supported Historian OLE DB Clients
This section describes the following clients supported by the Historian OLE DB Provider:
Other OLE DB clients are likely to work with the Historian OLE DB Provider, but have not been tested.Connecting to the OLE DB Provider
Historian Interactive SQL Application
The Historian Interactive SQL application (ihSQL.exe) is a test program that allows you to run a SQL query and display the results of the query in the same window. It is useful if you need to test or verify a query using the Historian OLE DB Provider. The Historian Interactive SQL application requires that you have some SQL knowledge, since there are no wizards or experts. It can open and save SQL queries and can even show multiple windows, each containing a query request to the same server or different servers.
This application is particularly helpful in troubleshooting OLE DB problems from different client tools. If you are having trouble with a SQL query in Visual Basic or Crystal Reports, try it in the Historian Interactive SQL application first.
When to Use the Historian Interactive SQL Application
The Historian Interactive SQL application allows you to access data quickly and efficiently. With this application you can perform such functions as the following:
- Test SQL syntax before embedding it in an application.
- Troubleshoot OLE DB connections or Historian errors.
- Perform more complex searching or filtering of data than you can in the Historian SDK and Administration applications (for web and Windows).
Historian Interactive SQL Application Functionality
You can retrieve Historian data from any available Historian server. The Historian Interactive SQL application provides a login screen when you open the application so that you can specify the server you want to query. You specify the server at startup, and you can switch to another server after completing your queries, or you can also open multiple windows to the same server or different servers. For instance, you might want to open more than one window to compare two different time periods on the same server, or the same time period on different servers.
Aside from entering and executing SQL queries, you can save and load queries, or export query results to Microsoft Excel.
The following figure displays an example of a query and its results in the Historian Interactive SQL application.
Figure: Historian Interactive SQL Application

Historian Interactive SQL Toolbar
- Executing queries
- Switching to a new Historian server
- Exporting query results to Microsoft Excel
- Saving a query
- Printing query results
Figure: Historian Interactive SQL Toolbar

Starting the Historian Interactive SQL Application
To start the Historian Interactive SQL application, follow these steps:
- From the Start menu, select .Important: In Windows 10 and Windows 7, the first time you use ihSQL.exe, you may need to select Run As Administrator. If you do not do this the first time you use ihSQL.exe, you may not be able to log in. After this, you do not need to select Run as Administrator again.The Historian Interactive SQL Login dialog box appears, as shown in the following figure.
Figure: Historian Interactive SQL Login Dialog Box

SET variables. See SET Variables for a table that lists the SET variables with their default values.For more detailed information on the supported SQL syntax that you can use in the Historian Interactive SQL application, refer to Supported SQL Syntax.
Work With Queries
You can use the Historian Interactive SQL application to run a query against the data that is contained in the Historian database tables. A query is a SET or SELECT statement, or a combination of both of these SQL statements. When you execute a SELECT or SET statement in the Historian Interactive SQL application, you can execute only one SET and one SELECT statement per query.
The tables that you can query contain data and statistics associated with Historian tags, collectors, archivers, raw data, messages, comments, trend, and session settings. For information see Historian database tables.
Entering and Executing Queries
- Do one of the following:
- Click the Execute Query button.
- Press Ctrl+E.
If you entered a valid query, the results of the query appear in the bottom half of the window, as shown in the following figure.Figure: Sample Query in the Historian Interactive SQL Application

Make a New Connection to the Historian Server
The Historian Interactive SQL application allows you to make multiple connections to the same server or different servers. This allows you to look at data from different servers.
Making a New Connection
- Select New from the File menu.The Historian Interactive SQL Login dialog box appears, as shown in the following figure.
Figure: Historian Interactive SQL Login Dialog Box
SET variables. See SET Variables for a table that lists the SET variables with their default values.Save Queries
The Historian Interactive SQL application allows you to save any SQL query. When you save a query, you do not have to re-type the query every time you want to run it. Since some of your queries may be complex statements, recalling a saved query helps save time. The saved files are stored as .SQL files in the current working directory. You can later open these file in the Historian Interactive SQL application or even use them in other client applications.
Saving a Query
Recall Saved Queries
The Historian Interactive SQL application allows you to recall a previously saved query, so that you do not have to re-type the whole query again. This is particularly useful if you have a long query that you want to run against the Historian OLE DB Provider.
Recalling a Saved Query
Export Query Results to Microsoft Excel
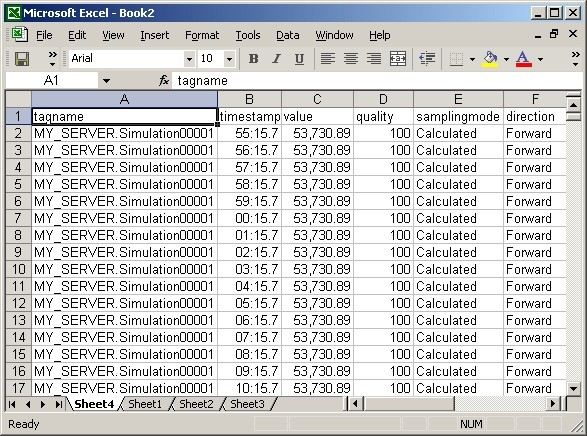
The Historian OLE DB Interactive SQL application allows you to export the results of a query directly into Microsoft Excel, as shown in the following figure.
Figure: Sample Export of Query Results Into Microsoft Excel
After you export the results, you must format the date and time column in Microsoft Excel so that it displays correctly. See Formatting Dates and Times in Excel for instructions on how to format the date column.
Exporting Query Results to Excel
- Click the Export Results to Microsoft Excel button, as shown in the following figure.
Figure: Export Results to Microsoft Excel Button

After you click the Export Results to Microsoft Excel button, Microsoft Excel opens with your data already inserted into a spreadsheet. Additional formatting to the data can be done in Excel.
NOTE: Ensure that the cells in the Excel worksheet do not contain quotation marks at the beginning.
Proficy Real Time Information Portal SQL Client
Proficy Real Time Information Portal is a web-based tool for accessing, analyzing, and visualizing production information. It has sophisticated trending and reporting capabilities that take advantage of the vast archival and retrieval capabilities of Historian.
Parameterized SQL Queries in the Proficy Portal
Parameters are used within the Proficy Real Time Information Portal to build SQL queries that can be reused with different values. In the place of a constant value in a SQL query, you can instead place a parameter, which takes a value at execution time. Parameterized SQL queries are driven by Proficy Real Time Information Portal components such as list boxes, combo boxes or grids.
Parameterized queries are built in the Proficy Real Time Information Portal SQL Query Builder application. You can define a parameter by entering the name of the parameter in the Parameter field of the Specify Selected Item Wizard or the Specify Criterion Wizard. When you enter a name, the Statement Builder adds a question mark to the end of the name and encloses the entire string in curly brackets. For example, the parameter temperature becomes {temperature?}.
You also have the option to select a data type for the parameter. The data type determines the kind of data the parameter can hold. By default, the data type is set to char. However, you can select int, date, num, or char as the type of database column.
When you define a parameter in the SQL Statement Builder, you can specify a default value for the parameter from the Parameters tab.
Parameter names must be unique. You cannot create multiple parameters with the same name. Consult your Proficy Real Time Information Portal documentation for more information.
Crystal Reports
Crystal Reports allows you to create reports easily through its experts and wizards. Refer to the Crystal Reports documentation for more details. When working with Crystal Reports, be aware of the following items:
- Crystal does not support the
SETcommand. You must use aWHEREclause in aSELECTstatement to specify query parameters. - A single Crystal Report can only retrieve data from one server, but you can create subreports from different servers within a report.
- The Crystal Reports application does not display milliseconds in timestamps.
- If you want to report on numeric data in the
ValueorQualitycolumns of the ihRawData table, you may want to convert all Variant to Float data types from the Report Expert, so that Crystal Reports displays them correctly in the report. This also enables the correct formatting.Note: See Displaying Variant Data Type Columns as Floats in Crystal Reports for more details. - Analysis of the ihTrend and ihAlarm tables in Crystal Reports is not supported.
Creating a Crystal Report with Historian Data
To import Historian table data into Crystal Reports using the Standard Report Expert:
Display Variant Data Type Columns as Floats in Crystal Reports
You must convert Variant data types to Float data types in Crystal Reports to format decimal point precision in your report. For instance, if retrieving the Value column from the ihRawData table, you would need to convert the values to Floats. You do not have to perform these steps if you are working with strings.
Converting the IhRawData Value Column From Variant to Float
- After you have added the Historian OLE DB Provider database connection and added Historian database tables, select the Fields tab in the Standard Report Expert.The following figure shows how the Fields tab should appear.
Figure: Fields Tab in Standard Report Expert

- Enter the following text in the Formula field:ifnumerictext({ihRawData.Value}) then cdbl({ihRawData.Value}) else 0The Formula Editor should look similar to the following figure.
Figure: Crystal Reports Formula Editor

Crystal Reports Date and Time Formats
This section describes how to format the date/time column for Historian tables in Crystal Reports, if you need to display dates in a specific format. When formatting timestamps, note that milliseconds do not display in Crystal Reports. For more specific information on formatting reports, refer to the Crystal Reports online Help.
Formatting Dates and Times in Crystal Reports
Microsoft Excel
With Excel, you can import a snapshot of Historian data at a single point in time. You can make Historian available as a data source in Excel by either of the following methods:
- Importing the Historian table data directly
- Importing the Historian table data from a .UDL file
Once Historian is available as a data source, you can create and edit SQL queries in Excel. The following sections describe how to import Historian data, edit the default query, refresh the query data, and format the date/time columns. For detailed information about using Microsoft Excel, refer the Microsoft Excel online Help.
When to Use Excel Instead of the Historian Excel Add-In
Use the Excel Add-In when you want to get data into Microsoft Office 2003, 2007 or 2010 (32-bit/64-bit). Use the Historian OLE DB Provider with Excel, instead of the Excel Add-In, when you want to do any of the following:
- Perform advanced filtering, sorting, and joining of data.
- Obtain detailed information from the ihTrend table.
- Run calculations using the SQL aggregate functions.
- Perform advanced summaries.
Importing Historian Table Data Into Excel
Import Historian Table Data From a .UDL File Into Excel
With a universal data link (.UDL) file, you can specify the connection information so that Excel can connect to the tables in Historian OLE DB Provider and import the data. Before you can import data using a .UDL file, you must create the .UDL file.
Creating a .UDL File
Importing Data Into Excel by Using a .UDL File
Edit SQL Queries in Excel
By default, data import functionality in Excel selects all columns from the specified Historian table using the default query parameters. This command is the equivalent of running the SQL command SELECT * FROM TABLE_NAME, where TABLE_NAME is the name of the table that you want to query.
You can change the query by issuing a different SQL query if you are familiar with SQL syntax. Refer to the Microsoft Excel documentation for more information.
If you are unsure if the SQL syntax is correct, you can test your SQL query outside of Excel using the Historian Interactive SQL application. See Historian Interactive SQL Application for more details.
Excel Date and Time Formats
This section describes how to format the date/time column for Historian tables in Excel if you need to display a specific date format. For more specific information on formatting spreadsheets, refer to the Microsoft Excel online Help.
Formatting Dates and Times in Excel
- To select the column you want to format, click its heading.
- Right-click the selected column.
- Select Format Cells from the right-click menu.
- Click the Number tab, if it is not already selected.
- Click the Date category.
- Select a timestamp type in the Type group box.
- If you need to display milliseconds, instead of clicking the Date category, select Custom, and then enter dd-mmm-yyyy hh:mm:ss.000 in the Type field.
- Click OK.
Refresh Excel Data
You can use the data refresh feature in Excel to update the external data that displays in the spreadsheet. When you perform the update, the current Historian data at the time of the refresh is returned with the query. The refresh feature is most useful when using relative start times, such as Now - 2h. Excel also allows you to automatically set refresh intervals.
Refreshing Data in Excel
- To refresh the data that currently displays in the Excel spreadsheet, click the Refresh Data button on the External Data toolbar, as shown in the following figure.
Figure: Microsoft Excel Refresh Data Button

- If the External Data toolbar is not available, select Toolbars from the View menu, and then click External Data.
Linked Servers in Microsoft SQL Server
If you require the ability to relate Historian data with other data in SQL Server tables such as batch events, iFIX alarms and events, iDownTimedata, and any other information that is available in a relational database, you can use the Historian OLE DB Provider as a linked server in Microsoft SQL Server. You can also use the OLE DB Provider as a linked server if you do not want to duplicate data with an import.
With linked servers, when you query data from Historian, the SQL Server fetches the requested data from Historian at the time the query is executed. Data is not duplicated because nothing is imported or stored in SQL Server. The data is simply returned as part of a query, just as any other query on a SQL Server database would return data.
Another benefit of using the Historian OLE DB Provider as a linked server is that clients do not need any Historian software installed. For example, a client tool such as Microsoft Query Analyzer can be used to retrieve Historian product data over the network on a computer with no Historian software installed.
Configuring the Historian OLE DB Provider as a Linked Server
OPENQUERY statement.Use Microsoft System Stored Procedures
You can use the sp_addlinkedserver system stored procedure from Microsoft SQL Server to programmatically configure a linked server definition. However, using this system stored procedure alone does not provide a way to set the Allow In Process and Level Zero Only options.
To use sp_addlinkedserver you must first configure a linked server and options using the Enterprise Manager , as described in Configuring the Historian OLE DB Provider as a Linked Server. Then, since the options Allow In Process and Level Zero Only apply to all linked servers that use the provider, you can create additional linked server definitions to other Historian servers using sp_addlinkedserver.
Once you create your linked server definitions, you can then perform tasks such as using sp_linkedservers to browse the set of linked servers, or using sp_dropserver to remove a linked server.
Example 1: Configure a Linked Server Definition by Using sp_addlinkedserver
EXEC sp_addlinkedserver @server='MYSERVER_LS', @srvproduct='', @provider='iHOLEDB.iHistorian.1', @datasrc='MY_SERVER'Example 2: Browse Linked Server Definitions by Using sp_linkedservers
EXEC sp_linkedserversExample 3: Delete Linked Server Definitions by Using sp_dropserver
EXEC sp_dropserver 'MYSERVER_LS', 'droplogins'Refer to the Microsoft SQL Server documentation for additional information on sp_addlinkedserver, sp_linkedservers, and sp_dropserver. If you have access to MSDN, refer to the System Stored Procedures topic in the Microsoft SQL Server online documentation.
Access a Linked Server in Microsoft SQL Server
You can use four types of syntax to access the Historian OLE DB Provider as a linked server:
OPENQUERY- Four-Part Name Syntax
OPENROWSETOPENDATASOURCE
OPENQUERY is the recommended method of accessing data by means of a linked server. This method requires that you preconfigure a linked server definition. Then, use that linked server name in the OPENQUERY command. Four-part name syntax also requires that you preconfigure a linked server definition.
OPENROWSET and OPENDATASOURCE are considered ad hoc methods of accessing data via an OLE DB provider. They are recommended only for infrequently accessed data. When using either syntax, you must specify the data source, username, and password in each query instead of configuring it once in a linked server definition. If you want to limit the number of users to a defined set of servers and user names, you can disallow all methods of ad hoc access by selecting the Disallow Adhoc Accesses option in the Provider Options dialog box.
The sections that follow provide some examples of each syntax type.
Use OPENQUERY to Access a Linked Server
The following examples show how to use OPENQUERY to access the Historian OLE DB Provider as a linked server in Microsoft SQL Server. Be sure that you configure the linked server as described in Configuring the Historian OLE DB Provider as a Linked Server before using any of the examples.
OPENQUERY to access the ihTrend table. Use four-part name syntax to access the ihTrend table.Example 1: Return a List of Tags From Historian
SELECT * FROM OPENQUERY(iHist,'SELECT * FROM ihTags')Example 2: Use a Complex Query to Extract Values From Historian
SELECT TagName, TimeStamp, Value, Quality FROM OPENQUERY (iHist,'
SET
StartTime=yesterday-12Day, EndTime=Today, IntervalMilliseconds=1Hour, SamplingMode=Calculated, CalculationMode=Maximum
SELECT * FROM ihRawData WHERE TagName LIKE *simulation00001')
Use Four-Part Name Syntax
Although four-part name syntax works with all tables, it is only necessary to use it with the ihTrend table, because the ihTrend table does not work with OPENQUERY.
Example: Access the ihTrend Table From a Linked Server
SELECT * FROM iHist...[SELECT timestamp, *.value FROM ihTrend]Use OPENROWSET and OPENDATASOURCE to Access a Linked Server
SQL Server supports ad hoc access for infrequently accessed data using OPENROWSET and OPENDATASOURCE. However, you achieve the best results using the OPENQUERY command.
The following examples show how to use OPENROWSET and OPENDATASOURCE to access the Historian OLE DB Provider as a linked server in Microsoft SQL Server.
Example 1: Use OPENROWSET With a SQL Query
SELECT * FROM OPENROWSET('ihOLEDB.iHistorian.1', 'MY_SERVER';'';'','SET starttime="2002-01-30 10:00:00", endtime="2002Example 2: Use OPENDATASOURCE to Access a Table
SELECT * FROM OPENDATASOURCE('iHOLEDB.iHistorian.1', 'Data Source=MY_SERVER')...ihTagsExample 3: Use OPENDATASOURCE With a SQL Query and Security
SELECT * FROM OPENDATASOURCE('iHOLEDB.iHistorian.1', 'Data Source=MY_SERVER;User ID=user1;Password=thepassword')...[SEAdvanced Linked Server Examples
Example 1: Join Historian Data With iFIX Alarms Logged With AlarmODBC
The following examples display some advanced SQL queries that use the linked server capability in Microsoft SQL Server.
The following example determines the last time and date a specific analog tag went into alarm. Then, the date and time of the alarm is used to collect the data from the previous hour leading up to the alarm. You can use this example to determine if the value spiked into alarm or slowly approached the alarm limit.
declare @var1 as varchar(300)
declare @iHistServer as varchar(10)
declare @Tagname as varchar(40)
declare @HistTagname as varchar(50)
declare @AlarmStatus as varchar(10)
declare @Node as varchar(8)
declare @StartDt as varchar(30)
declare @EndDt as varchar(30)
declare @queryDt as varchar(30)
SET @iHistServer = 'iHistMY_SERVER'
SET @Node = 'MY_SCADA'
SET @Tagname = 'Simulation00001'
SET @HistTagname = 'MY_SERVER.' + @Tagname
SET @AlarmStatus = 'HIHI'
SET @queryDt= DATEADD(day, -1, CURRENT_TIMESTAMP)
SET @EndDt = (SELECT TOP 1 DateTimeLast FROM AlarmODBC WHERE AlarmStatus = @AlarmStatus AND Node = @Node and Tagname =
SET @StartDt = DATEADD(hour, -1, @EndDt)
set @var1 = 'SELECT * FROM OPENQUERY
('+ @iHistServer +',''SET StartTime="'+ @StartDt +'", EndTime="'+ @Enddt +'"
SELECT Tagname, TimeStamp, Value, Quality FROM ihRawData WHERE TagName = '+ @HistTagname +''')' exec (@var1)
Example 2: Access Linked Server Data With a Stored Procedure
A stored procedure can insulate callers from the details of linked server processing and can improve maintainability by localizing the linked server code.
This example procedure interfaces with the alarm ODBC table to get the last alarm time for a specified tag in the past 24 hours. It then uses this time to retrieve data for the tag from 1 hour before to the time the alarm occurred via a linked server to the Historian server.
The input parameters are the linked Historian server name, tag name, alarm status, and SCADA node name the alarm was created on. This example uses a sim tag in the Historian database rather than setting up a collector to an iFIX SCADA node. An iFIX tag name would probably need to be concatenated with the node and field (node.tagname.fieldname).
EXEC alarmhist 'iHistMY_SERVER', 'simulation00001', 'HIHI', 'MY_SCADA'The first time you create the procedure in Enterprise Manager, you must include the following two lines before the create procedure command to avoid an error:
SET ANSI_NULLS ON
GO
(@iHistServer varchar(10),
@Tagname varchar(40),
@AlarmStatus varchar(10),
@Node varchar(8))
AS
declare @var1 as varchar(400)
declare @HistTagname as varchar(50)
declare @StartDt as varchar(30)
declare @EndDt as varchar(30)
declare @queryDt as varchar(30)
declare @count as int
declare @CalculationMode as varchar(20)
SET @HistTagname = 'MY_SERVER.' + @Tagname
SET @queryDt= DATEADD(day, -1, CURRENT_TIMESTAMP)
SET @count = (SELECT COUNT(*) FROM AlarmODBC WHERE AlarmStatus = @AlarmStatus AND Node = @Node AND Tagname = @Tagname
If @count > 0
BEGIN
If @AlarmStatus = 'HIHI' or @AlarmStatus = 'HI'
BEGIN
SET @CalculationMode = 'Maximum'
END
ELSE
BEGIN
SET @CalculationMode = 'Minimum'
END
SET @EndDt = (SELECT TOP 1 DateTimeLast FROM AlarmODBC WHERE AlarmStatus = @AlarmStatus AND Node = @Node AND Tagname =
SET @StartDt = DATEADD(hour, -1, @EndDt)
SET @var1 = 'SELECT * FROM OPENQUERY
('+ @iHistServer +',''SET StartTime="'+ @StartDt +'",
EndTime="'+ @EndDt +'", IntervalMilliseconds=60000,
SamplingMode=Calculated,CalculationMode='+ @CalculationMode +'
SELECT Tagname, TimeStamp, Value, Quality FROM ihRawData WHERE TagName = '+ @HistTagname +''')'
print (@var1)
exec (@var1)
END
GO
VisiconX
Using the Historian OLE DB Provider with VisiconX, you can do the following:
- Use table or SQL queries.
- Insert multiple controls into a picture to the same or different servers.
- Pass a user name and password or be prompted when opening a picture.
To access the Historian OLE DB Provider from VisiconX, follow the steps outlined for OLE DB providers in the Using VisiconX electronic book.
After you follow the steps outlined in the Using VisiconX manual, you need to perform one other task with the FixUserPreferences.ini file in the Dynamics/Local folder. This additional step is necessary because the provider does not support asynchronous (ASYNC) executes. By updating one line in the FixUserPreferences.ini file, you can make all of your VisiconX controls use synchronous (SYNC) executes. See Updating FixUserPreferences.ini for details.
For more information on VisiconX and the SQL Wizard, refer to the VisiconX Using VisiconX electronic book.
Updating FixUserPreferences.ini
SYNC) executes in VisiconX, follow these steps:Visual Basic and ADO
You can access the Historian OLE DB Provider as you would any other OLE DB Provider by using Microsoft ActiveX Data Objects (ADO). This approach is more generic than using the Historian SDK.
Asynchronous Connection Support
Visual Basic supports asynchronous (ASYNC) connections. You can open multiple ADO connections to the same data source from within a Visual Basic program. You are limited to one server per connection, and one username and password. A different user can make another connection to the same server, however, by using a different username and password.
Client-Side Cursor Recommendation
It is recommended that you use client-side cursors instead of server-side cursors in Visual Basic.
If you use a server-side cursor, the RowCount property on the recordset object will always be -1 instead of the actual row count.
Retrieve Milliseconds
The following snippet of code shows how you can use Visual Basic to retrieve milliseconds within timestamps.
Public Function Time_To_String_With_Milliseconds(TheTime As Double) As String
Dim Temp As String
Dim TimeFraction As Double
Dim Msc As Long
Dim TempTime As Date

On Error GoTo errc

If TheTime = 0 Then
Time_To_String_With_Milliseconds = ""
Exit Function
End If

TimeFraction = TheTime * 86400#
TimeFraction = TimeFraction - Fix(TimeFraction)

Msc = CLng(TimeFraction * 1000)

TempTime = TheTime - (TimeFraction / 86400#)
If Msc = 1000 Then
Msc = 0
TempTime = DateAdd("s", 1, TempTime)
End If

Time_To_String_With_Milliseconds = LCase(Format$(TempTime, "dd-mmm-yyyy hh:nn:ss") + "." + Format$(Msc, "000"))

errc:

End Function
Throttle Results With the ADO MaxRecords Property
The following example shows how you can use the MaxRecords Property in ADO to throttle the number of rows returned from your query.
SET rstTitles = New ADODB.Recordset
rstTitles.MaxRecords = 10
strSQLTitles = "SELECT Tagname FROM ihTags"
rstTitles.Open strSQLTitles, strCnxn, adOpenStatic, adLockReadOnly, adCmdText
Parameterized Queries in Visual Basic
The following example shows how you can use parameterized queries in your VB script.
Private Sub SampleParameterizedQuery()
    Dim ihConnectString As String
    Dim ihRecordSet     As ADODB.Recordset
    Dim ihConnection    As ADODB.Connection
    Dim ihParameter     As ADODB.Parameter
    Dim ihCommand       As ADODB.Command

    'Set Up the Historian Connect String...
    Set ihConnectString = "Provider=ihOLEDB.iHistorian.1;User Id=;Password="

    'Create Our Other Objects...
    Set ihConnection = CreateObject("ADODB.Connection")
    Set ihRecordSet = CreateObject("ADODB.Recordset")
    Set ihCommand = CreateObject("ADODB.Command")

    'Open the Connection to the Historian Archiver...
    ihConnection.ConnectionString = ihConnectString
    ihConnection.Open
    'Set up the Command Object
    With ihCommand

        'Set the Active Connection to the Historian Connection Opened Above..
        .ActiveConnection = ihConnection

        'Set the Command Text to a Parameterized Sql Statement....
        .CommandText = "select * from ihTags where datatype = ?"

        'Set the Type of the Command...
        .CommandType = adCmdText

        'Refresh Our Parameter List...
        .Parameters.Refresh
    End With

    'Create a Single Parameter Object...
    Set ihParameter = ihCommand.CreateParameter("Temp", adChar, adParamInput, 100)
    'Set the Parameters Value...
    ihParameter.Value = "SingleFloat"
    'Add the Parameter to the Command Object...
    ihCommand.Parameters.Append ihParameter
    'Run the Command!
    Set ihRecordSet = ihCommand.Execute
End Sub
Oracle
You can import Historian data into Oracle by using an ADO program. A sample program is provided in the Historian/Samples/Oracle folder.
Use SQL WorkSheet to test that Oracle imported the data and created the tables properly.