CygNet Data Collector
Overview of CygNet Data Collector
The Historian CygNet Data Collector gathers data samples from a CygNet Server and stores the corresponding data entries into the Historian Server. This collector supports collecting of Analog, Digital and String type of data from CygNet Server. This collector supports a distributed model, where the CygNet Server, the Collector, and Historian are installed on different machines. Typically, however, the collector is installed on the same computer as the CygNet Server and sends data to a remote Historian server.
The CygNet collector uses unsolicited collection, whereby changes to the CygNet tags are detected, and are forwarded to the Historian server. The collector is intended to duplicate raw samples from the CygNet into the Historian data archive.
At the time of collector browse, CygNet-Collector connects with CygNet using CxScript64.dll API component and queries the CygNet FAC (Facility Service) and PNT (Point Service) services associated with the CVS (Current Value Service).
The CygNet Point Value is mapped to the GE Historian server as a Collector tag for data collection. CygNet Collector stores VHS (Value History Service) points UDCs(Uniform Data Codes) as Tag source address.
Refer to the following topics for more information:
- Installing Cygnet Collector
- Summary of CygNet Collector Features
- Tag Attributes Available on a Browse (CygNet Collector)
- Selecting Data Types
- Configuration Tab for CygNet Collectors
- Collector Specific Configuration for CygNet Collector
- Hierarchical CygNet Collector Browsing
- Manual Recalculation and Bad Offline Values
- Troubleshooting the CygNet Collector
Summary of CygNet Collector Features
The following table outlines the features of the CygNet Collector.
| Feature | Capability |
|---|---|
| Browse Source for Tags | Yes (on CygNet Server that supports browsing) |
| Browse Source for Tag Attributes | Yes |
| Polled Collection | Yes |
| Unsolicited Collection | Yes |
| Timestamp Resolution | 100ms |
| Floating Point Data | Yes |
| Integer Data | Yes |
| String Data | Yes |
| Python Expression Tags | No |
Installing Cygnet Collector
The Cygnet Data Collector consists of System API as well as the Collector Toolkit components.
- Cygnet 64 Bit API (installed and registered)
- Cygnet 64 Bit ODBC Driver
The following error is reported by the collector, if the Cygnet 64 Bit APIs are not installed:
Error Setting Cygnet GlobalFunctions object: 'Class not registered'
Follow the step below to manually install the CxScript64.dllrequired by Cygnet Collector: regsvr32 "C:\...\8.1.2 Install\Cygnet 812\Support64\CxScript64.dll"Note: The install location of the CxScript64.dll file may differ from that specified above.
Installing Cygnet Collector via the installer
- On the Historian installer wizard, select Cygnet collector option.
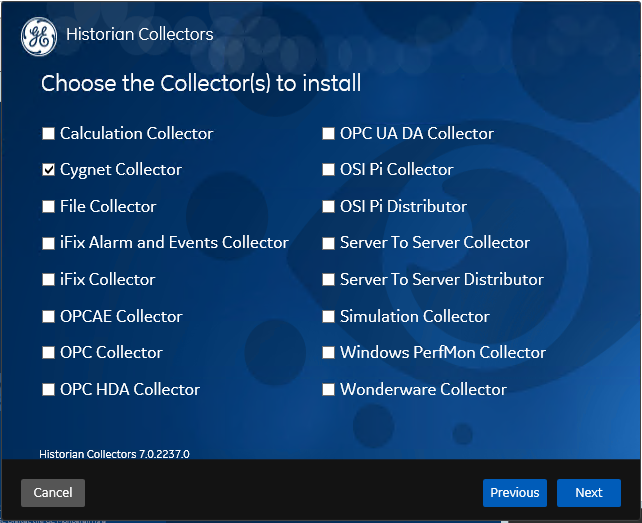
- Click Next.
- Click Finish at the end of the wizard to install Cygnet Collector.
Uninstalling Cygnet Collector
Installing Cygnet Collector manually
To install multiple instances of Cygnet collector manually through a command line interface:
- Verify if the Historian Cygnet Collector is visible in the service control.

- From the Services panel do the following:
- Set the Startup type to Automatic.
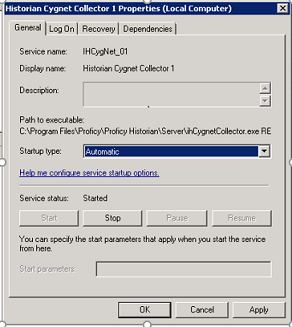
- Set the Log on as property to use a system account that has rights to read from the Cygnet application.
- Set the Startup type to Automatic.
- Create a key with the registry name used, for example, "Cygnet_01".
- Run the regeditcommand to open the Registry Editor. Navigate to: HKEY_LOCAL_MACHINE\SOFTWARE\GE Digital\Historian Cygnet Collector\iHistorian\Services\CygnetCollector\.
- Right click on CygnetCollector and Create key called Cygnet_01.
- Create the following registry entries with String value type.
-
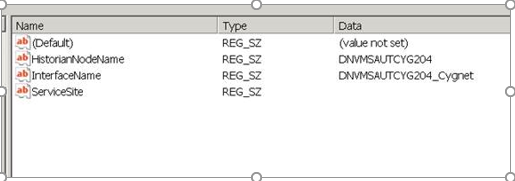
- Modify the following Keysas needed:
- HistorianNodeName - Name of Proficy Historian where the collector sends the data.
- InterfaceName - Name of the collector as it will be identified in the Proficy Historian Archiver (must be unique). The interface name must include Cygnet(Eg: CygnetCollector, MyCygnetCollector, TestCygnet are all acceptable)
- ServiceSite - This must be populated with the correct Cygnet site before re-starting the collector.
To uninstall\delete the multiple instances of Cygnet collector installed manually from command line running as admin:
sc getkeynameto get the proper key for deletion.sc delete <keyname>For example: sc getkeyname Historian Cygnet Collector[SC] GetServiceKeyName SUCCESS Name = IHCygnetOne sc delete "IHCygnetOne[SC] DeleteService SUCCESS
Note: A machine reboot may be required for the removal of service and registry entries to take affect.
Configuration Tab for CygNet Collectors
Collector Specific Configuration for CygNet Collector
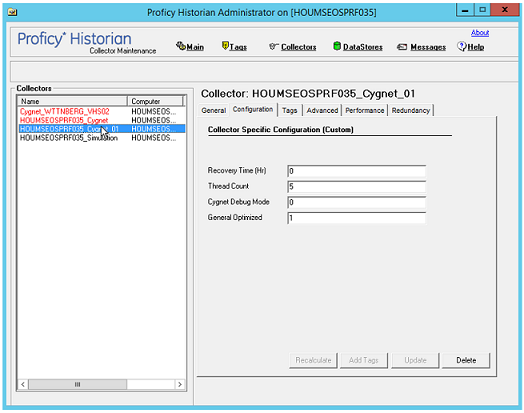
Enter the value for the CygNet Collector-specific field parameters through the CygNet Collector Maintenance - Configuration tab of the Historian Administrator.
Configuring a recovery time
To configure a recovery time, perform the following:
- Start the Historian Administrator.
- Select the Collectors screen.
- Select the CygNet Collector.
- Click the Configuration tab.
- In the Recovery Time (hr) field, enter a recovery time, in hours.
| Field | Description |
|---|---|
| Recovery Time(hours) | Maximum recovery time, data collector should collect from server, at the time of collector startup. Recovery logic is activated when the CygNet Collector and CygNet Server reestablish a connection after a connection loss, or when the CygNet Collector is started. The CygNet Collector will attempt to recover all data samples between the current time and the last known write time, up to a maximum number of hours configured for the collector. Continuous collection resumes only after the previous data has been recovered.
Note: The default recovery time available is 0 hours and maximum value is 7 days.
|
| Thread Count |
Maximum number of threads span for reading data from CygNet server. That is, number of threads to be used by collector for querying data from cygnet. Collector must be restarted for change to take effect. |
| CygNet Debug Mode | Debug Mode for CygNet Collector. This will enable verbose logging to the CygNet Collector log. Details of CygNet query transactions can be enabled by setting the value to 255. A value of 0 turns off the Cygnet Debug Mode.
Note: Do not leave Cygnet Debug Mode on for an extended period. a maximum of 10 minutes is recommended. Leaving it on will create very large log files and could use up a great deal of disk space.
|
| General Optimized | Whether to apply optimization on the tag data reads. |
- General2 = Recovery Time(hours)
- General3 = Thread Count
- General4 = Cygnet Debug Mode
- General5 = General Optimized
Tag Attributes Available on a Browse (CygNet Collector)
Following table outlines the tag attributes available when browsing.
| Attribute | Capability |
|---|---|
| Tagname | Yes |
| Source Address | Yes |
| Engineering Unit Description | Yes |
| Data Type | Yes. See Selecting Data Types. |
| Hi Engineering Units | Yes, applicable for Analog, Discrete not for String type |
| Lo Engineering Units | Yes, applicable for Analog, Discrete not for String type |
| Hi Scale | No |
| Lo Scale | No |
| Is Array Tag | No |
Selecting Data Types
The following table lists the data types recommended for use with Historian.
| CygNet Data Types | Recommended Data Type in Historian |
|---|---|
| Analog | Float |
| Enumeration | Integer |
| Digital | Bool |
| String | Variable String |
Hierarchical CygNet Collector Browsing
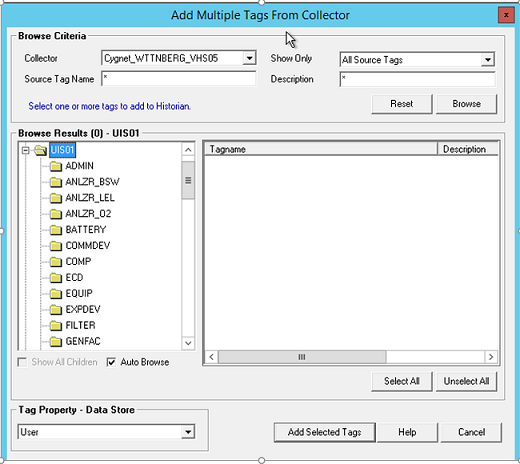
CygNet Server supports hierarchical organization of your tags in a tree structure, then Historian will use the server's hierarchy when browsing CygNet Collector in the Non-Web Administrator.
- Browse your CygNet data source for new tags.
Manual Recalculation and Bad Offline Values
CygNet Collector supports Manual recalculation of tags. See Historian EBook for details.
WriteBadOfflineAtStartup (DWORD)set this to 0to disable adding the bad offline at startup.-
DeleteBeforeRecalc (DWORD)By default, before performing a recalculation on an interval, the collector will delete any previously stored values in Proficy Historian. To disable this feature, set this key to 0
The CygNet collector also inserts a bad offline while a tag is modified. It may stay as the current value until new values are read from cygnet the by collector.
Modification of Cygnet Collector Parameters
Cygnet Collector parameters can be modified in the registry under HKEY_LOCAL_MACHINE\SOFTWARE\GE Digital\iHistorian\Services\CygnetCollector.
- General2 = Recovery Time(hours)
- General3 = Thread Count
- General4 = Cygnet Debug Mode
- General5 = General Optimized
Troubleshooting the CygNet Collector
The CygNet Data Collector generates logs during initialization, configuration, and general operation. These can be found in the general logging folder C:\Proficy Historian Data\LogFiles.
Troubleshooting Tips
Troubleshoot the collector using one or more of the following:
- Examining the log files for information.
- Examining the Windows Event Viewer for error/warnings.
- Be sure to run the CygNet Server before the CygNet Data Collector starts up.
- Be sure CygNet ODBC Client tools are installed.
Additional log information can be gathered by using the Cygnet Debug Mode described above for debugging the CygNet to Collector interface.
To turn on debug mode for the Collector:
- From the Start menu, select Run and enter Regedit.
- Open the following key folder: HKEY_LOCAL_MACHINE\SOFTWARE\GE Digital\iHistorian\Services\CygnetCollector\<entry>
- Double-click DebugMode DWORD value.
- Select Base as Decimal.
- In the Value data field, type 255.
- Click OK.
- Restart the CygNet Collector service for the Historian debug mode to take effect.
- Close the Registry Editor and open the Proficy OPC HDA Server trace log file.
Note: Do not turn on both Cygnet Debug Mode and DebugMode at the same time!
The following error is reported by the collector if the Cygnet 64 Bit APIs are not installed: