How Do I
Adding a Mirror Node Manually
Adding a Mirror Node Automatically
Deleting a Mirror Node
Configure General Collector Options
You can modify collector configurations from the following sections of the Collector Configuration Screen.
Action Buttons
| Button | Action |
|---|---|
| Resumes collection of the collector. | |
| Pauses the collection of the collector | |
| Refreshes the screen | |
| Update | Updates the changes made. |
Performance Tab
| Field | Description |
|---|---|
| Report Rate | This display is a trend chart that displays the average rate at which data is coming into the server from the selected collector. This is a general indicator of load on the Historian collector. Since this chart displays a slow trend of compressed data, it may not always match the instantaneous value of Report Rate displayed in the Collector panel of the System Statistics screen. |
| Out of Order | The number of samples within a series of timestamped data values normally transmitted in sequence that have been received out of sequence since collector startup. This field applies to all collectors. |
| Compression | This display is a trend chart that displays the effectiveness of collector compression. If the chart displays a low current value, you can widen the compression deadbands to pass fewer values and increase the effect of compression. |
| Total Events Collected | Displays the number of events collected from the data source. |
| Total Events Reported | Displays the total number of events reported to the Historian archive from the collector. |
| Overruns | This trend chart displays the value at which data overruns are occurring. This value is calculated by following equation: OVERRUN_PCT =OVERRUNS / ( OVERRUNS + TOTAL_EVENTS_COLLECTED ) Overruns are a count of the total number of data events not collected. Under normal conditions, the current value should always be zero. If the current value is not zero, which indicates that data is being lost, you should take steps to reduce peak load on the system by increasing the collection interval. |
Defaults Tab
The Defaults tab displays the information related to tags and the collectors. The following table explains the fields in detail:
| Field | Description |
|---|---|
| Prefix for Tag Names | Displays a prefix, if any, that is automatically added to all tag names when you browse and pick the specified collector. To change the prefix, enter a new text string and click the Update button at the bottom of the screen. This field applies to all collectors except the File and Calculation Collectors |
| Collection Type | Indicates whether this collector is configured for polled data collection or unsolicited collection. |
| Collection Interval | The time in milliseconds, seconds, minutes, or hours required to complete a poll of a given tag on the selected collector. It is also used in unsolicited collection. In effect, it specifies how frequently data can be read from a tag. The collection interval can be individually configured for each tag. To change it, enter a new value. NOTE: To avoid collecting repeat values with the OPC Collector when using device timestamps, specify a collection interval that is greater than the OPC Server update rate. |
| Time Assigned By | Indicates whether the timestamp for the data value is supplied by the collector or the data source. To change it, select a different type. |
| Compression Indicates whether or not collector compression is enabled as a default setting. To change it, select the other option. This option is overridden by Tag settings. | |
| Deadband | The default setting of the collector compression deadband in absolute or percentage range values. |
| Timeout | The default setting for the collector compression time-out for tags added through the Add Multiple Tags From Collector dialog box. You must enable the Collector Compression option to use this field. |
| Spike Logic Control | Spike logic monitors incoming data samples for spikes in a tag's values. If spike logic is enabled, a sample of equal value to the previously archived sample is inserted into the archive in front of the spike value. |
| Multiplier | The Multiplier option specifies how much larger a spike value must be than the deadband range before spike logic is invoked. For example, if a value of 3 is entered in the Multiplier field and the deadband percentage is set to 5%, spike logic will not be invoked until the difference between the spike value and the previously archived data point is 15% of the EGU range. |
| Interval | The Interval option specifies how many samples must have been compressed before spike logic is invoked. For example, if the Interval field is set to 4, and 6 values have been compressed since the last archived data sample, spike logic will be invoked. |
| On-Line Tag Config Changes | Enabling this feature allows you to make on the fly changes to tags without having to restart the collector. If you disable this option, any changes you make to tags do not affect collection until you restart the collector executable. |
| Sync Timestamp for Server | Enabling this feature automatically adjusts all outgoing data timestamps to match the server clock. This feature is not active when you configure timestamps to be supplied by the data source. Note, that this does not change collector times to match the server time, it adds or subtracts an increment of time to compensate for the relative difference between the clocks of the server and collector, independent of time zone or day light saving time (DST) differences. If the collector system clock is greater than 15 minutes ahead of the archiver system clock, and the Synchronize Timestamps to Server option is disabled, data will not be written to the archive. |
| Delay Collection @ Startup (Sec) | Permits you to enter the number of seconds to delay collection on startup (after loading its tag configuration). The default is 2 seconds. |
Configuration Tab
| Field | Description |
|---|---|
| Description | The name of the selected collector. |
| Number of Tags | Displays the number of tags currently added to the Simulation Collector. Edit this field to modify the number of Simulation tags available for addition to the Historian System. |
| Function Period (Seconds) | The period, in seconds, of the SIN, STEP, and RAMP functions implemented in the Simulation collector. The default is 60 seconds. |
| Computer Name | The machine name of the computer that the collector is installed on. |
| Memory Buffer Size | The size of the memory buffer currently assigned to the store and forward function. The memory buffer stores data during short-term or momentary interruptions of the server connection; the disk buffer handles long duration outages. To estimate the size you need for this buffer, you need to know how fast the collector is trying to send data to the server and how long the server connection is likely to be down. With those values and a safety margin, you can calculate the required size of the buffer. NOTE: If you enter a new value for this parameter, the change is effective the next time you restart the collector. |
| Minimum Free Space | The minimum free disk space that must be available on the computer. If the minimum space required is not available when the collector starts, the collector will shut down. |
| Heartbeat Output Address | The address in the source database into which the collector writes the heartbeat signal output. This address should be connected to a writable analog field. For an iFIX data collector, use an iFIX tag for the output address. Enter the address as NODE.TAG.FIELD (for example, MyNode.MyCollector_AO.F_CV). For an OPC Collector, use the OPC address in the server. Refer to your OPC documentation for more information. The data collector writes the value of 1 to this location every 60 seconds while it is running. You could program the iFIX database to generate an alarm if the Heartbeat Output Address is not written to once every 60 seconds, notifying you that the data collector has stopped. |
| Status Output Address |
Address in the source database into which the collector writes the current value of the collector status (running, stopping, stopped, unknown, or starting) output, letting an operator or the HMI/SCADA application know the current status of the collector. This address should be connected to a writable text field of at least 8 characters. This value is updated only upon a change in status of the collector. For an iFIX data collector, use a TX tag for the output address. Enter the address as NODE.TAG.FIELD (for example, MyNode.MyCollector_TX.A_CV). For an OPC Collector, use an OPC address in the server. Refer to your OPC documentation for more information. The text string usually displays Running, Stopped, or Unknown, matching the Status column value displayed in the collector pane in the System Statistics screen of the Historian Administrator. |
| Rate Output Address |
The address in the source database into which the collector writes the current value of the events/minute output, letting an operator or the HMI/SCADA application know the performance of the collector. This should be connected to a writable analog field. The value is written once per minute. For an iFIX data collector, use an iFIX tag for the output address. Enter the address as NODE.TAG.FIELD (for example, MyNode.MySIM_AO.F_CV). For an OPC Collector, use a writable OPC address in the server. Refer to your OPC documentation for more information. This value displays the same value as the Report Rate field in the collector pane in the System Statistics screen of the Historian Administrator. |
Redundancy Tab
Historian includes support for collector redundancy, which decreases the likelihood of lost data due to software or hardware failures. Implementing collector redundancy ensures that collection of your data remains uninterrupted. Collector redundancy makes use of two or more collectors, gathering data from a single source. Two or more collectors may be configured in a redundant group. All collectors in the group actively gather the same tags from a data source but only the "active" collector forwards its samples to the Historian server. The non-active collectors buffer their data against failover of the active collector. The Historian server actively monitors the health of the redundant collectors and will automatically switch to a backup if certain user-configurable trigger conditions are met.
| Field | Description |
|---|---|
| Backup Collector | If enabled, specifies that this is a redundant collector. |
| Backup For | Specifies the primary collector. Note: This configuration will be preserved if you disable collector redundancy. This allows you to temporarily take a redundant collector offline without losing its configuration.
|
| Backup Collector Status | The current status of this collector. |
| Backed Up By | The name of the collector providing redundancy for the selected collector. |
| Watchdog Tag | Specifies a tag to use to determine the status of the collector. If the watchdog tag meets any of the conditions specified below, the secondary collector will be brought on line to replace it. |
| Failover on Bad Quality | If enabled, the secondary collector is promoted when a data sample from the watchdog tag is received with bad quality. Failover happens on every write of a bad data sample to the watchdog, not just on the transition from good to bad quality |
| Failover When Value Transitions from Zero | If selected, the secondary collector is promoted when a data sample from the watchdog tag with a non-zero value is received from the primary collector. Failure happens every time a non-zero value is received, not just when the value promotes from zero to a non-zero value |
| Failover When No Value Changes for __ Seconds | If selected, the secondary collector is promoted when no data value changes have been received within the time period specified. This could be tied into a heartbeat status indicator where the value is checked every 5 seconds. To prevent failure, there must be a value change. |
Plan For Data Recovery
Planning for data recovery means always having up-to-date backup files for important information to call up and restore quickly when the need arises.
- The .IHC file contains all configuration information.
- The *.IHA file is the current online archive files.
The .IHC file is automatically backed up when, and only when, you back up the current archive .IHA file. The .IHC uses the following naming convention: ComputerName_Config-Backup.ihc
By default, the .IHC backup path is the same as the archives path. If the default backup path is different than the archives path, the .IHC file is copied to the backup folder with the standard .IHC naming convention ComputerName_Config.ihc
Restoring the IHC file restores the system configuration (tag, archive, and collector configuration) to the state it was in before the event occurred. If you restore the archive file (IHA) along with the configuration file (IHC), you can quickly pick up where you left off when the event occurred with minimum loss of data.
Develop a Maintenance Plan
Daily Maintenance
On a daily schedule, perform the following backup operations unless you use ihArchiveBackup.exe to back up archives automatically.- Use the Historian Web Admin Console to back up the current archive and most recent .IHA archived data file. This preserves data collected up to this moment in time. You do not need to back up any read-only archive files after they have been backed up once.
- Use Windows Explorer to back up the .IHC file if it has been modified by anyone (unless it is backed up automatically). This file contains all current configuration information (tag configuration, archive configuration, and collector configuration). Using this file, you can restore the system configuration after an unplanned shutdown.
Monitor Historian Performance
Historian provides a variety of performance counters and performance tags that can be used to monitor how well the Historian components are performing. These performance tags or counters can also be used to determine the resource usage on the computer that runs the Historian application.
Use performance tags to view information in an Excel report or SDK program, possibly along with other Historian tags. Use performance counters to view information in Windows Performance monitor, possibly along with non-Historian counter information.
Performance counters are useful when the Historian Web Admin Console is not installed or cannot connect. Like any Windows performance counter, you must add the counters for collection to view history. Performance tags are always being collected and you can view past data any time.
Performance counters are updated in real time. Performance tags are updated once per minute with the activity over the last minute.
Performance counters contain more information than tags. Any counter can be collected to a tag using the Historian Windows Performance Collector. Those tags will count against your licensed tag count.
Historian Performance Tags
The following table provides information about the various Historian Server Performance tags.
| Tag Name | Description |
|---|---|
| PerfTag_CompressionRatio | Specifies the current effect of archive data compression. |
| PerfTag_MinimumCompressionRatio | Specifies the minimum compression ratio. |
| PerfTag_MaximumCompressionRatio | Specifies the maximum compression ratio. |
| PerfTag_TotalEvents | Specifies the total number of data samples reported to the Historian archive from all sources. . |
| PerfTag_TotalOutOfOrder | Specifies the total out of order data samples. |
| PerfTag_AverageEventRate | Specifies the average number of data samples per minute sent to archiver from all sources |
| PerfTag_MinimumEventRate | Specifies the minimum number of data samples per minute sent to archiver from all sources. |
| PerfTag_MaximumEventRate | Specifies the maximum number of data samples per minute sent to archiver from all sources. |
| PerfTag_WriteCacheHitRatio | Specifies the hit ratio of the write cache in percent of the total writes. |
| PerfTag_TotalFailedWrites | Specifies the total number of samples since startup that failed to be written. |
| PerfTag_TotalMessages | Specifies the total messages (for example, connection or audit messages) received by the archiver since startup |
| PerfTag_TotalAlerts | Specifies the total number of alerts received by the data archiver since startup. |
| PerfTag_FreeSpace | Indicates the free disk space left in the current archive. |
| PerfTag_SpaceConsumptionRate | Specifies an archive disk space consumption rate in megabytes per day. |
| PerfTag_PredictedDaysToFull | Indicates the approximate number of days required for an archive to fill. |
| PerfTag_MemoryUsage | Specifies the amount of RAM used by the Data Archiver. |
| PerfTag_MemoryVMSize | Specifies the amount of virtual memory used by the Data Archiver. |
| PerfTag_TotalAlarms | Specifies the total number of alarms received by the Data Archiver since starting up. |
| PerfTag_AverageAlarmRate | Specifies the average alarm rate in alarms per minute received by Data Archiver. |
| PerfTag_TotalFailedAlarms | Specifies the total number of alarms since startup that failed to be written. |
| Perftag_ReadQueueSize | Specifies the total number of messages present in the Read queue. |
| Perftag_AverageReadRate | Specifies the total number of data samples per minute returned from the Data Archiver for all read requests. |
| Perftag_ ReadQueuePushRate | Specifies the number of read requests per minute that came into the archiver from all clients. A read request can return multiple data samples. |
| Perftag_ WriteQueuePushRate | Specifies the number of write requests per minute that came into the archiver from all clients. A write request can contain multiple data samples. |
%CollectorName% with the name of a Collector.| Tag Name | Description |
|---|---|
PerfTag_%CollectorName%_InterfaceStatus |
Specifies the status of an interface. |
PerfTag_%CollectorName%_InterfaceTotalEventsCollected |
Specifies the total number of events collected by an interface. |
PerfTag_%CollectorName%_InterfaceTotalEventsReported |
Specifies the total number of events reported by an interface. |
PerfTag_%CollectorName%_InterfaceOutOfOrderEvents |
Specifies the total out of order events. |
PerfTag_%CollectorName%_InterfaceAverageEventRate |
Specifies the average event rate of an interface. |
PerfTag_%CollectorName%_InterfaceMinimumEventRate |
Specifies the minimum event rate of an interface. |
PerfTag_%CollectorName%_InterfaceMaximumEventRate |
Specifies the maximum event rate of an interface. |
PerfTag_%CollectorName%_InterfaceOverruns |
Specifies the interface overruns. |
PerfTag_%CollectorName%_InterfaceCompression |
Specifies the compression of an interface. |
PerfTag_%CollectorName%_InterfaceOverrunsPercent |
Specifies the number of overruns in relation to the total events collected since startup. |
Historian Server Performance Counters
The Windows performance counters are exposed as objects with counters. In the table below, you can see each counter and the object to which it belongs. Each object has one or more instances as shown in the Windows Performance Monitor.
| Archive Counter | Description |
|---|---|
| Cache Priority | Relative priority of items from the archive stored to the Windows Cache. A higher priority means the item is more likely to stay in cache. |
| Disk Read Time (usec) | Duration of last disk read in microseconds. |
| Disk Read Time Max (usec) | Maximum duration across all disk reads from the archive in microseconds. |
| Disk Reads | Number of disk reads from archive. |
| Disk Write Time (usec) | Time of last disk write in microseconds. |
| Disk Write Time Max (usec) | Maximum duration of all disk writes to the archive in microseconds. |
| Disk Writes | Number of disk writes to archive. |
| File Size (MB) | Size of the archive file in MB. |
| Read Calls | Number of read calls to the archive since startup. |
| Read Rate (Calls/min) | Number of read calls to the archive per minute. |
| Write Count | Number of data samples written to archive since startup. |
| Write Count Rate | Number of data samples written to archive per minute. |
| Writes Compressed | Number of data samples since startup that were compressed writes to the archive. |
| Writes Expensive | Number of data samples since startup that were expensive or slow. |
| Writes Failed | Number of data samples that were failed writes to the archive. |
| Writes OutofOrder | Number of data samples that were out of time order writes to the archive. |
| Cache Counter | Description |
|---|---|
| Hit Percentage | Hit rate percentage (0-100) for successful data retrieval calls to the cache. Higher numbers represent more efficiency. |
| Hits | Number of hits in the cache since startup. To reset the count, restart the Archiver. |
| Misses | Number of misses in the cache. |
| Num Adds | Total number objects added to cache. |
| Num Deletes | Total number of objects deleted from cache. |
| Num High Prio Objs | Number of high priority objects available for deletion. |
| Num Low Prio Objs | Number of low priority objects available for deletion. |
| Num Med Prio Objs | Number of medium priority objects available for deletion. |
| Obj Count | Number of objects in the cache. |
| Size (KB) | Size of cache in KB. |
| DataStores Counter | Description |
|---|---|
| Compression Ratio (Average) | Archive compression ratio for this data store. |
| Compression Ratio (Max) | Maximum archive compression ratio for the data store. |
| Compression Ratio (Min) | Minimum archive compression ratio for the data store. |
| Messages (Total Alerts) | Total alerts since startup |
| Messages (Total) | Total messages since startup. |
| Read Calls | Number of read calls to the data store. |
| Read Rate (Calls/min) | Average read rate across all archives in the data store. (Read Calls/Minute) |
| Read Samp Rate (Samp/min) | Average read rate across all archives in the data store. (Samples/Minute) |
| Space (Consumption MB/day) | Disk space consumption rate. (MB/day) |
| Space (Days To Full) | Number of days until current archive is full. |
| Space (Free in MB) | Free disk space in the current archive. |
| Write Rate (Average) | Average event rate across all archives. (Samples/Minute) |
| Write Rate (Max) | Minimum event rate across all archives. (Samples/Minute) |
| Write Rate (Min) | Minimum event rate across all archives. (Samples/Minute) |
| Writes (Cache Hit Ratio) | Write Cache hit ratio. |
| Writes (Compressed) | Total number of compressed data samples since startup. |
| Writes (Total Failed) | Total failed data sample writes since startup. |
| Writes (Total OutOfOrder) | Total out of order data samples since startup. |
| Writes (Total) | Total data samples across all archives since startup. |
| Overview Counter | Description |
|---|---|
| Compression Ratio (Average) | Average archive compression ratio of all data stores. |
| Compression Ratio (Max) | Average maximum compression ratio of all data stores. |
| Compression Ratio (Min) | Average minimum compression ratio of all data stores. |
| Memory Usage (KB) | Private bytes memory usage for Data Archiver. |
| Memory VM Size (KB) | Virtual Bytes memory usage for Data Archiver. |
| Messages (Total Alerts) | Sum of total alerts of all data stores since startup. |
| Messages (Total) | Sum of total messages of all data stores since startup. |
| Read Rate (Calls/min) | Sum of all average read rates of all data stores. (Samples/Minute) |
| Read Samp Rate (Samp/min) | Average read rate across all archives. (Samples/Minute) |
| Space (Consumption MB/day) | Sum of space consumption rate (MB/day) of all data stores. |
| Space (Days To Full) | Minimum number of days until current archive is full for all data stores. |
| Space (Free in MB) | Sum of all free space in the current archive of all data stores. |
| Write Rate (Average) | Sum of all average event rates of all data stores. (Samples/Minute) |
| Write Rate (Max) | Sum of all maximum event rates of all data stores. |
| Write Rate (Min) | Sum of all minimum event rates of all data stores. |
| Writes (Cache Hit Ratio) | Average write Cache hit ratio of all data stores. |
| Writes (Compressed) | Sum of total number of compressed data samples of all data stores. |
| Writes (Expensive) | Sum of total number of expensive writes data samples of all data stores. One of the reasons for expensive writes is out-of-order data. |
| Writes (Total Failed) | Sum of total failed data sample writes of all data stores. |
| Writes (Total OutOfOrder) | Sum of total out of order data samples of all data stores. |
| Writes (Total) | Sum of total data samples across all archives of all data stores. |
| Queue Counters | Description |
|---|---|
| ClientQueues with Msgs | The number of client queues with messages current on them. A lower number means all clients are up to date. A higher number means that the archiver is not up to date with incoming network traffic |
| Count (Max) | Maximum number of messages on the queue. (memory and disk) |
| Count (Total) | Number of messages on the queue. (memory and disk) |
| Disk Buf Msg Reads | Number of messages read from the disk buffer file. |
| Disk Buf Msg Writes | Number of messages written to the disk buffer file. |
| Processed Count | Number of messages processed from the queue since startup. |
| Processed Rate (msg/min) | Recent rate at which messages have been processed for the queue. |
| Processing Time (Ave) | Average time in milliseconds to process a message. |
| Processing Time (Last) | Time in milliseconds to process the last message. |
| Processing Time (Max) | Maximum time in milliseconds to process a message. |
| Recv Count (msgs) | Number of messages received into the queue. |
| Recv Rate (msgs/min) | Recent rate at which messages have been received for the queue. |
| Size Kb (Mem&Disk Max) | Max size of messages in Kb on the queue. (memory and disk). |
| Size Kb (Mem&Disk) | Size of messages in Kb on the queue. (memory and disk) |
| Size Kb (Mem) | Size of messages in Kb on the queue. (memory only) |
| Threads | Number of worker threads allocated to process this queue. This is the number of created threads but they may be idle. |
| Threads Working | Number of queue processing worker threads currently processing messages. |
| Time in Queue (Ave) | Average time in milliseconds that a message was in the queue, waiting to be processed. |
| Time in Queue (Last) | Time in milliseconds that the last message was in the queue, waiting to be processed. |
| Time in Queue (Max) | Maximum time in milliseconds that a message was in the queue, waiting to be processed. |
| Config Counters | Description |
|---|---|
| File Size | The size of the Configuration File in MB |
| Hist Tags(Actual) | Number of the Historical tags in the system |
| Hist Tags (Licensed) | Total licensed Historian tags. |
| Hist Tags(Used) | Effective number of Historical Licensed Tags in the system. Can be greater than the number of tags because some tags count as more than one Licensed Tag. |
| Hist Tags (UsedByArrays) | Effective number of Historical Licensed Array Tags in the system (Not the raw tag count, the effective licensed count). |
| Hist Tags (UsedByUserDef) | Effective number of Historical Licensed User Defined Tags in the system (Not the raw tag count, the effective licensed count). |
| Number of Collectors | Number of collectors defined on the system. |
| Number of EnumSets | Number of enumerated sets defined on the system. |
| Number of UserDefTypes | Number of user defined types defined on the system. |
| SCADA Tags (Actual) | Number of SCADA Tags in the system. |
| SCADA Tags (Licensed) | Total Licensed SCADA tags. |
| SCADA Tags (Used) | Effective number of SCADA Licensed Tags in the system. Can be greater than the number of tags because some tags count as more than one Licensed Tag. |
| SCADA Tags (UsedByArrays) | Effective number of SCADA Licensed Array Tags in the system (Not the raw tag count, the effective licensed count). |
| SCADA Tags (UsedByUserDef) | Effective number of SCADA Licensed User Defined Tags in the system (Not the raw tag count, the effective licensed count). |
Adding a Performance Tag
Viewing Tag or Counter Trend Data
- On the Tag Maintenance screen, select a tag.
- Right-click the tag and select Trend. The trend for the selected tag displays.
Evaluate Data Compression Performance
You can determine how effectively data compression is functioning at any given time by examining the Collector Detail Diagnostics on the Collectors section of the Dashboard, as shown in the Understanding the Interface topic.
The compression field at the top of the screen shows the current effect of archive compression. If the value is zero, it indicates that compression is either ineffective or turned off. If it shows a value other than zero, it indicates that archive compression is operating and effective. The value itself indicates how well it is functioning. To increase the effect of data compression, increase the value of the archive compression deadband so that compression becomes more active. Values for this parameter should typically range from 0 to 9%.
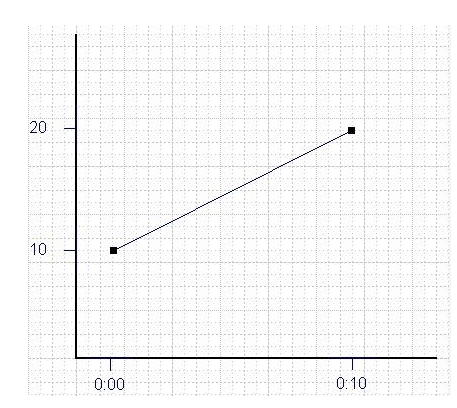
Handling Value Step Changes with Collector Data Compression
BigDiff=abs(HI_EGU-LO_EGU)*(CompressionDeadbandPercent/(100.0*2.0))*4.0
If ( Collector Compression is Enabled )
If ( Elapsed time since LastReportedValue>=( SampleInterval * 5 ) )
If ( abs(CurrentValue-LastReportedValue) > BigDiff )
Write LastReportedValue,Timestamp=(CurrentTime-SampleInterval) Example: Value Spike with Collector Compression
| Time | X |
|---|---|
| 0:00:00 | 10.0 (steady state value) |
| 0:00:01 | 10.0 |
| 0:00:02 | 10.0 |
| 0:00:03 | 10.0 |
| 0:00:04 | 10.0 |
| 0:00:05 | 10.0 |
| 0:00:06 | 10.0 |
| 0:00:07 | 10.0 |
| 0:00:08 | 10.0 |
| 0:00:09 | 10.0 |
| 0:00:10 | 20.0 (new value after step change) |
| Time | X |
|---|---|
| 0:00:00 | 10.0 (steady state value) |
| 0:00:10 | 20.0 (new value after step change) |
| Time | X |
|---|---|
| 0:00:00 | 10.0 (steady state value) |
| 0:00:09 | 10.0 (inserted Marker value) |
| 0:00:10 | 20.0 (new value after step change) |

Historian Data Types
| Data Type | Size | Description |
|---|---|---|
| Single Float | 4 bytes | The single float data type stores decimal values up to 6 places. Valid ranges for the single float data type are 1.175494351e-38F to 3.402823466e+38F |
| Double Float | 8 bytes | The double float data type stores decimal values up to 15 places. Valid values for the double float data type are 2.2250738585072014e-308 to 1.7976931348623158e+308 |
| Single Integer | 2 bytes | The single integer data type stores whole numbers, without decimal places. Valid values for the single integer data type are -32767 to +32767. |
| Double Integer | 4 bytes | The double integer data type stores whole numbers, without decimal places. Valid values for the double integer data type are - 2147483648 to +2147483648. |
| Quad Integer | 8 bytes | The quad integer data type stores whole numbers without decimal places. Valid values for the quad integer data type are -9,223,372,036,854,775,808 (negative 9 quintillion) to +9,223,372,036,854,775,807 (positive 9 quintillion). |
| Unsigned Single Integer | 2 bytes | The unsigned single integer data type stores whole numbers without decimal places. Valid values for the unsigned single integer data type are 0 to 65535. |
| Unsigned Double Integer | 4 bytes | The unsigned double integer data type stores whole numbers without decimal places. Valid values for the unsigned double integer data type are 0 to 4,294,967, 295 (4.2 billion). |
| Unsigned Quad Integer | 8 bytes | The unsigned quad integer data type stores whole numbers without decimal places. Valid values for the unsigned quad integer data type are 0 to 18,446,744,073,709,551,615 (19 quintillion). More information |
| Byte | 1 byte | The Byte data type stores integer values. Valid values for the byte data type are -128 to +127. |
| Boolean | 1 byte | The Boolean data type stores boolean values. Valid values for the boolean data type are 0=FALSE and 1=TRUE. If the user sends zero, the value is taken as zero. Anything other than zero is treated as one. |
| Fixed String | Configured by user | The fixed string data type stores string data of a fixed size. Valid values are between 0 and 255 bytes. More information |
| Variable String | No fixed size | The variable string data type stores string values of undetermined size. This data type is useful if you cannot rely on a constant string length from your data source. |
| Binary Object | No fixed size | The binary object data type stores binary data. This is useful for capturing data that can not be classified by any other data type. |
| Scaled | 2 bytes | The scaled data type lets you store a 4-byte float as a 2-byte integer in the Historian archive. The scaled data type saves disk space but sacrifices data precision as a result. More information |
Additional Notes on Data Types
Quad Integer
If a tag is associated with Quad Integer, Unsigned Double Integer, or Unsigned Quad Integer data types and if you are retrieving data using Non-Web Admin, Excel Add-in, Calculation, ihSQL, and ihSDK, then there may be a loss of precision value due to a Visual Basic limitation.
Calculation Collector supports only the calculations performed using the current value calculation. It does not support other calculations due to a Visual Basic script limitation.
The high and low EGU limits for Quad Integer, Unsigned Single Integer, Unsigned Double Integer, and Unsigned Quad Integer are between 2.2250738585072014e-308 to 1.7976931348623158e+308.
Fixed String Data Types
The fixed string data type lets you store string data of a fixed size. This is useful when you know exactly what data will be received by Historian. If a value is larger than the size specified in the Data Length field, it will be truncated.
Scaled Data Types
Historian uses the high and low EGU values to both store and retrieve archived values for the scaled data type. This allows you to store 4 byte floats as 2 byte integers in the Historian archive. Though this saves disk space, it also sacrifices data precision as a result. The smaller the span is between the high and low EGU limits, the more precise the retrieved value will be.
ArchivedValue = (((RealWorldValue - EngUnits->Low) / (EngUnits->High - EngUnits->Low) * (float) HR_SCALED_MAX_VALUE) + .5);Setting a Value For the Fixed String Data Type
- In the Admin App, select the Tags tab.
- Select the tag you want to configure.
- Select the Collection tab.
- In the Data Type drop-down list, select Fixed String.
- Enter a value in bytes in the adjacent field. This field is enabled only when the data type selected is Fixed String.
Add a Tag to a Data Source
To display the Tags screen, click the Tags link in any of the Historian Web Admin Console screens. The Tags screen lets you read and modify all tag parameters for the Historian system. To access information on a specific tag or group of tags, however, you must first search for the tags. You can search for the tags using the Search for Tags button.
You can add tags manually through the tags screen or choose the tags from the listed collectors. Typically, you add tags to Historian by browsing the data source. You can also add tags manually or add tags from the collector by clicking the appropriate link in the second line of the display.
If you add a tag with a tag name greater than 25 characters in length, the characters beyond 25 are not visible in the Tags list on the Tags screen. To see the entire tag name, place the mouse cursor over the tag to see a ToolTip that displays the complete tag name.
Adding a Tag Manually
Adding a Source Address to a Tag
Adding OPC Tags from a Collector
Adding Simulation Tags from a Collector
Filter and Search Tags
- Add multiple search criteria based on the tag criteria and the criteria value.
- Modify the existing criteria value.
- Delete unwanted search criteria from the list.
- Automatically load the most recently used criteria for re-use.
- Search the Historian database based on search criteria.
- View the details of a tag.
Filtering Tags
- On the Tags page, click the Filter button. The section expands to show the filter criteria.

Searching for Tags: Simple Search
Searching for Tags: Advanced Search
The Advanced Tag Search dialog box allows you to search for a set of tags that match the search criteria and then perform actions on one or more tags that you select from the list.
It saves the most recently used search criteria to a file named DefaultSearchCriteria.xml in the Excel App Data path, which is: c:\users\<username>\AppData, and this criteria is automatically loaded into the dialog box the next time it is opened. This allows you to re-use or modify the criteria rather than entering them each time. To reset your criteria, delete the XML file.
- Select tags from the list by clicking Add
 . To select all of the tags, click the Add All button. To remove a selected tag, click Remove
 .
.
Displaying Tag Trend Data
- Click the
 button at the bottom of the screen and select the Trend option. The Trend screen displays the trend of the last 10 minutes with an interval of 1 minute and interpolated sampling mode. By default, all selected tag trends are shown.
- To zoom in on the trend, click and drag to select the region to zoom in on.
- To zoom out on the trend, click the Reset Zoom button.
- To see the tag name, date/time, quality, and value at an instance, hover your mouse over the trend.
- You can change the type of trend you want to view: Line, Column, or Area.
- Selected tag names are shown as legends; click to see a particular tag's trend and click again to hide the trend.
- Click the Refresh button to refresh the screen.
- Click the Close button to cancel the operation.
Displaying Raw Data Samples
- For each selected tag, values are sorted by timestamp in descending order.
- Where necessary, tag names are truncated and indicated with an ellipsis "..."
- To view the full name, hover over the tag name. A tooltip displays the full tag name.
- Panes can be collapsed and expanded to see the last 10 raw values for more selected tags.
- Click Refresh button to refresh the screen.
- Click Close button to cancel the operation.
Dynamic Collector Updates
The dynamic collector update feature ensures that any modifications done to the tag configuration do not affect all the tags in a collector. Only the tags that stop data collection will record zero data and bad quality without restarting the collector. In other words, the tags that do not stop data collection do not record bad data samples to the collection.
- OPC Collector
- iFIX Collector
- Calculation Collector
- Simulation Collector
- Server to Server Collector
- PI Collector
- PI Distributor
If you disable On-line Tag Configuration Changes option, any changes you make to the tags do not affect collection until after you restart the collector. To restart the collector, stop and start the collector service or executable. Restarting the collector stops and restarts the tag(s) collection and records bad data samples to the collection. If the modified tags get zero bad markers and available runtime values at the same time, then precedence is given to available runtime values instead of zero bad markers.
All the collector configuration changes done within a 30 second time frame are batched together. When possible, update/modify a small set of tags at a time to collect the modified data faster. However, when updating large sets of tags at the same time, best practice is to disable On-line Tag Configuration Changes and restart the collector after you are finished.
Starting or Stopping Data Collection For a Tag
- In the Tag Viewer section of the Tags screen, select the tag from the list.
- In the Tag Editor section, click the Collection tab.
- Scroll down to the Collection field and either:
- Disable the collection option.
- Enable the collection option.
- Click Update.
Reload Tag Parameters
Whenever you modify certain tag parameters, the following collectors reload only the modified tags without restarting the collectors.
- OPC Collector
- iFIX Collector
- Calculation Collector
- Simulation Collector
- Server to Server Collector
- PI Collector
- PI Distributor
If you disable the On-line Tag Configuration Changes option, any changes you make to the tags do not affect collection until after you restart the collector. To restart the collector you must stop and start the collector service or executable. Restarting the collector stops and restarts the tag(s) collection and records bad data samples to the collection. All the collector configuration changes done within a 30 second time frame are batched together and applied to the collector. If the modified tags get zero bad markers and available runtime values at the same time, then precedence is given to available runtime values instead of zero bad markers.
It is recommended that you update/modify a small set of tags at a time to collect the modified data faster. It is recommended to you disable the On-line Tag Configuration Changes option while updating large sets of tags at the same time, and restart the collector after modification.
Tag Properties that Cause the Tag Collection to Stop and Restart
- Collector Name
- Collector Type
- SourceAddress
- Spare 1 5
- Data Type
- Collection Interval
- Collection Offset
- Collection Disabled/Enabled (CollectionDisabled in SDK)
- Collection Type
- TimeStampType
- Calculation Dependencies (in SDK) or Calculation Triggers (in the Historian Administrator) applies to Server-to-Server and Calculation Collectors only
Tag Properties that Do Not Cause the Tag Collection to Stop and Restart
- High Engineering Units
- Low Engineering Units
- Input Scaling
- High Scale
- Low Scale
- Collector Compression
- Collector Deadband Percent Range
- Collector Compression Timeout
Rename Tags
New tag names are called active tag names and old tag names are called aliases.
You can also rename or permanently rename tags using the Non-Web Historian Administrator, the Excel Add-in, or the Application Program Interfaces (ihSDK, ihUAPI, or ihAPI).
If you modify the properties of a renamed tag, the properties of all of its aliases will also be updated.
Whenever you rename a tag, only the active (newest) tag name will be visible in the Tags list on the Historian Administrator Tag screen. You can rename tags multiple times, but only the latest, active tag name will be visible in the Tags list.
You can also retrieve the data using any alias (that is, the new or old tag names). However, the Tag screen will display only an active tag name (that is, the new tag name). Whenever you change or copy a tag name, the information about the old tag name, new tag name, and time stamps are all recorded in the audit trail.
- If you modify a renamed tag property, then all of the alias' tag properties will also be updated.
- If you delete a renamed tag, then all the aliases will also be deleted.
- You can rename tags multiple times, but only the latest active tag name (renamed tag name) will be visible in the Tags list.
- If you rename a tag, the tag count does not increase.
- If you copy a tag, then the tag count increases.
- An alias can be queried, but cannot be modified or deleted.
Permanently Rename a Tag
You can permanently rename a tag if you no longer want to read from and write to a tag by its previous name. Permanently renaming makes the previous tag name available for new usage. For example, if you had permanently renamed Tag A to Tag B, you can create a new tag with the tag name Tag A with no linkage to the previous tag.
- If you permanently rename a tag, the tag name will be updated with the new tag name and the old tag name will be lost.
- You can permanently rename tags multiple times, but only the latest tag name (new tag name) will be visible in the Tags list.
- If you permanently rename a tag, the tag count does not increase.
- Store and forward data will be lost if you do a permanent rename and the data is sent using the old tag name.
- There will be loss of data during the process of permanently renaming a tag. If you are going to perform permanent rename, it is recommended to stop the collector and then permanently rename the tag.
- If a tag is permanently renamed and is a trigger tag to other tags, then you need to re-assign the new trigger name to the tags.
Copying a Tag
Renaming a Tag
Renaming a Tag Permanently
Stale Tag Management
Stale tags are tags that have no new data samples within a specified period of time. These tags add to system overhead and slow down user queries. The Data Store Configuration option allows system administrators to configure the time period after which tags are considered stale and how often the system should check for stale tags.
Under the default configuration, tags are never considered stale. This effectively disables stale tag management.
To see the names and descriptions of all currently stale tags, use the IsStale criteria in a tag search.
To improve performance, permanently delete unused tags. Perform a tag search using the IsStale criteria and select Permanently Delete Tag.
Delete Tags
| Delete | Permanently Delete |
|---|---|
| The tag is removed from the tag database but any data for that tag is retained in the archive | All data associated with the tag is completely lost and the tag name is available for reuse. |
| Tag data is still available from the archive, so you can still reference that tag, for example, from within a calculation formula or by using the Excel Add-In. | Tag data is no longer available from the archives and you will not be able to query the existing data for that tag. |
Deleting a Tag
- In the Tag screen, select a tag from the list.
- Click the button at the bottom right of the screen. The Delete Tag dialog box appears.
- Select the Remove Tag(s) from System option and click OK. This removes the tag from the Tag Database but retains any data for that tag in the archive.
- A message box appears asking you to confirm the deletion. Click Yes to delete the tag.
Deleting a Tag Permanently
- In the Tag screen, select a tag from the list.
- Click the Delete button. The Delete Tag dialog box appears.
- Select the Permanently Remove Tag(s) from System option and click OK. This permanently removes the tag from the Tag Database.
- A message box appears asking you to confirm the deletion. Click Yes to delete the tag.
Configure Data Stores
A Data Store is logical collection of tags used to store, organize, and manage tags according to the data source and storage requirements. A Data Store can have multiple archive files (*.IHA), and includes both logical and physical storage definitions.
Tags can be segregated into separate archives through the use of Data Stores. The primary use of data stores is to segregate tags by data collection intervals. For example, you can put a name plate or static tags where the value rarely changes into one data store, and your process tags into another data store. This can improve query performance.
Historian Data stores are stored archive files that contain data gathered from all data sources during a specific period of time. You can write and read data from the archives available under the data stores. Using data stores, you can store, organize, and manage tags according to the data source and storage requirements.
- Historical Data Store - Tags stored under historical data store will store data as long as disk space is available. Depending on your license, you may be able to create multiple historical data stores. The maximum number of Historical data stores supported depends on the license.
- SCADA Buffer Data Store - Tags stored under the SCADA buffer data store will store data for a specific duration of time based on license.
- System - Stores Historian messages and performance tags. This is only for internal usage within Historian, and you cannot add tags to this data store. You cannot rename or delete the System data store.
- User - Stores the data for the tags. This is a default data store. You can rename and delete a user data store as long as there is another default data store set for tag addition.
- SCADA Buffer - Stores short term tags and data in a SCADA Historian data store.
Moving Tags Between Data Stores
When you move a tag, only the tag itself is moved; the data already associated with that tag does not automatically move with it. Moving the old data is optional, but if the old data is not moved to the new data store, it cannot be retrieved.
Before moving any data, best practice is to back up the archive file(s) that contain the old data.
Adding a Data Store
- Click
 to add the data store. A message appears indicating that the data store has been added.
Deleting a Data Store
Editing a Data Store
/ \ * ? < > | Configure Data Archives
About Data Archives
- Machinename_Config.ihc the single .IHC file contains information about the archiver, tag configuration, and collector configuration.
- Machinename_ArchiveXXX.iha archive data files where x is a number indicating the place of the file in a time-based sequence.
Archive Creation
- Open the Data Stores screen and then click the Edit button. The Archive Configuration page appears.
- Select the Configuration tab.
- In the Archive Duration field, select the Days option from the drop-down list.
- Enter the number of days for which you want to create archives.
- Click Update.
- Open the Data Stores screen and then click Edit. The Archive Configuration Page appears.
- Select the Configuration tab.
- In the Archive Duration field, select the Hours option from the drop-down list.
- Enter the number of hours for which you want to create archives.
- Click Update.
The Archive Configuration Screen
To display the Archive Configuration screen, click the Edit button on the Data Stores page.
The Archive Configuration screen lets you read and modify the parameters of archives and data stores. In this screen, you can see the list of all archives of the selected data store.
To examine a particular archive, select the archive and then click the Edit button. The details of the archive are displayed in the Archive Details section.
Points To Remember
- You may need to add an archive when the current archive is almost full and you have not enabled automatic creation of archives.
- You may need to restore an archive when you start up after an unplanned shutdown or when you need to retrieve data from an old, inactive archive.
- You may need to back up an archive before a planned Historian software product upgrade.
- You may need to manually resynchronize archives when the archives in the mirrored environment are not synchronized.
Action Buttons
Click a button to perform the action indicated by the name. The following table describes these buttons.
| Button | Action |
|---|---|
| Add Archive |
Click this button to add a new archive to the data store. |
Remove Archive  |
Remove an archive. First click an archive name to select it, and then click Remove. Clicking OK removes the archive file from the list of archives for the system, and places it in the \Archives\Offline directory. This does not delete the archive file from the system. An archive must be closed before it can be removed. |
Close Archive  |
Manually close the current archive. An archive must be closed before it can be removed. |
Backup Archive  |
Back up a selected archive. Verify the file name and path and then click OK to save the file. |
Restore Archive  |
Restores an archive from backup. |
| Update | Apply all parameter changes that you have made in this screen. If you want to cancel changes and return to the original values or settings, open a different screen and then return to the Archive Configuration screen. |
| Edit | Click this to edit the Archive configuration details. |
Statistics Section
Indicates the current status of the collector.- Running indicates that the collector is operating.
- Stopped indicates that it is in pause mode and not collecting data.
- Unknown indicates that status information about the collector is unavailable at present, perhaps as a result of a lost connection between collector and server.
| Field | Description |
|---|---|
| Default Archive Path | The path name that will be used for any newly created archives. If you change the path, the change takes effect the next time a new archive is created. Note: Do not use a period in the default archive path field. If a period is present in the default archive path, you will not be able to specify a default archive name.
|
| Default Backup Path | The location to which the backup file will be saved. |
| Archive Duration (Days/Hours) | Specifies the duration of a newly created archive in days or hours. A new archive will be created after the selected number of days or hours. Note: When the Archive Duration property is changed in a mirrored environment, the changes will take effect only after a time gap of 15 minutes.
|
| Data is Read-only After (Hours) | The number of hours, prior to now, for which data can be stored in a read/write archive. After the time expires, that portion of the archive file is automatically made read-only. Incoming data values with timestamps prior to this time are rejected. A single archive file, therefore, may contain a read-only section, another read-write section containing recently written data, and unused free space. Note: A read-only archive file cannot be moved using Windows Explorer. To move a read-only archive file, select the file and click the Remove button on the Details Tab of the Archive Maintenance screen. The Archiver then releases its locks, which permits you to move the file at will.
|
| Base Archive Name | A prefix that is automatically added to the file name of all created archives. To change the prefix, enter a new text string and click Update. |
| Free Space Required (MB) | Indicates the remaining disk space required after a new archive is created. If the available space is less than the requirement, a new archive is not created. The default is 5000 MB. The Free Space Required field does not apply to alarm and event archives. The alarm and event archiver will continue writing to the alarm and event archive until the drive is full. If this occurs, the alarm and event archiver will buffer incoming alarm and event data until the drive has free space. An error will also be written to the Historian message log. |
| Automatically Create Archives (Enable/Disable) | Select the appropriate button to enable or disable this function. When enabled, the server automatically starts a new archive in the default path directory whenever the current archive fills up. If disabled, no new data will be written to the archives once the default size has been reached. Note: To create multiple archives at the same time, Automatically Create Archives must be Disabled.
|
| Overwrite Old Archives (Enable/Disable) | Select the appropriate button to enable or disable this function. When enabled, the system replaces the oldest archived data with new data when the default size has been reached.
CAUTION: Since this action deletes historical data, exercise caution in using this feature. Be sure that you have a backup of the archive so that you can restore it later.
|
| SCADA Buffer Duration (Days) | Indicates the maximum number of days the trend data can be stored. The maximum number of days is 200 days. This field applies only to SCADA Buffer Data Stores. |
| Use Caching (Enabled/Disabled) | When reading data from the archiver, some data is saved in the system memory and retrieved using caching. This results in faster retrieval as the data is already stored in the buffer. Enable the Use Caching option to retrieve data faster. This option is not available for SCADA Buffer Data Stores. |
| Generate Message on Data Update (Enabled/Disabled) | If this option is enabled, an audit log entry will be made any time the value of a previously archived data point in the Historian archive is overwritten. This log entry will contain both the original and new values. To create multiple archives at the same time, Generate Message on Data Update must be Disabled. This option is not available for SCADA Buffer Data Stores. |
| Store OPC Quality (Enabled/Disabled) | Stores the OPC data quality. To create multiple archives at the same time, Store OPC Quality must be Disabled. |
| Stale Period | Specifies the time period after which tags are considered stale for this data store. The value is defined in days. Valid values are:
|
| Stale Period Check | Specifies the frequency with which the staleness of the tag is checked. The value is defined in days. Valid values are 1 day (the default) to 30 days. |
Archives Section
| Field | Description |
|---|---|
| Name | The name of the archive. |
| Start Time | The time of the oldest sample in the archive. |
| End Time | The time the archive is automatically or manually closed. |
Archive Details Section
| Field | Description |
|---|---|
| Status | The current operating state of the archive: Active, Current, Empty.
|
| Start Time | The time of the oldest sample in the archive. |
| End Time | The time the archive is automatically or manually closed. |
| Last Backup On | The date and time the last backup was performed on this archive. |
| Backup By | User name (at time of login to the Historian Administrator) of the person who performed the last backup of the archive. |
| File Location | The path and name of the archive file. |
| File Size (MB) | The size (in MB) of the archive file. Note: Historian now supports a maximum Archive Size of 256 GB per archive.
|
| File Attribute | The attribute to set a closed archive to Read-only or Read/Write. Note: If you plan to create multiple archives at the same time, then you must set File Attribute to Read/Write.
|
Calculate Required Archive Size
If you enable the Overwrite Old Archives option and if you want to retrieve time-based information, create an additional archive to overcome the early loss of data due to archive preparedness. For example, if you want to save 12 months of data into 12 archives, create 13 archives.
During archiver startup and every 60 seconds while the server is running, Historian checks to make sure that you have configured enough free disk space to save the archives, buffer files, and log files. If there is insufficient disk space, the Data Archiver shuts down and a message is logged into the log file. For each archive, you need approximately 1MB of archive space for every 1000 tags, for tag information.
[03/03/10 15:28:41.398] Insufficient space available in [d:\Historian\Archives\]
[03/03/10 15:28:41.399] The server requires a minimum of [5000 MB] to continue
[03/03/10 15:28:41.679] USER: DataArchiver TOPIC: ServiceControl MSG: DataArchiver(DataArchiver) Archiver s
[03/03/10 15:28:41.807] DataArchiver Service Stopped.
[03/03/10 15:28:41.809] [d:\Historian\LogFiles\DataArchiver-34.log] Closed.- Number of tags a large number of tags increases the data rate.
- Polling frequency of each tag a high polling frequency increases the data rate.
- Compression settings disabling compression or setting narrow deadband parameters increases the data rate.
- Data types choosing data types that increase the number of bytes per value increases the data rate.
| Number of tags | 5000 |
| Polling rate | 1 value/5 seconds |
| % Pass Compression | 5% (Pass Compression is the number of data values archived relative to the number of values read, expressed as percent.) |
| Bytes/value: | 4 |
| Duration: | 1 month (30 days) |
Calculation


The calculation shows that a file size of 500 MB is adequate for archiving one month of data for this application.
- Decrease the polling frequency.
- Increase compression deadband, reducing the pass percentage.
- Reduce the number of tags.
- Add more disk capacity to your computer.
Archive Size Calculator
An Archive Size Calculator tool is available to estimate archive size based on your input and estimates the archive size and collector compression based upon a tag that has already been configured. Log on to http://support.ge-ip.com/devsupport/ to download this and other GE Intelligent Platforms freeware product solutions.
Prepare for Multiple Archive Creation
- In the Archive Details section, set File Attribute to Read/Write.
- In the Configuration Tab:
- set Automatically Create Archives to Disabled.
- set Overwrite Old archives to Enabled.
- set Store OPC Quality to Disabled.
- set Data is Readonly After (Hours) to 1 month.
- set Generate Message on Data Update to Disabled.
Before you begin creating multiple archives on a remote machine, ensure that you have enough hard disk space on that machine. The Allocate Space slider does not display a remote machine's hard disk space; the r;percentage of available disk space will be used message displayed by the Allocate Space slider will be inaccurate if it appears at all.
If you receive the error message Runtime error 330 Invalid Property Value while creating multiple archives on a remote machine, it is probably because you did not have enough hard disk space on that machine. When you click OK on the error message, Historian Administrator may disappear. You must now clean up the remote machine's hard disk space and restart Historian Administrator.
Adding One or More Archives
- In the Archives section, click the icon. The Add New Archive(s) dialog box appears.

Back up Historian Archive Files
Back up your Historian archive files periodically to ensure your data is protected. Historian bundles alarm and event data with tag data in its backup files, and stores them as ZIP files. After an archive has been backed up, it can be stored to a shared network location, stored off-site, or written to physical media.
- Use Microsoft Volume Shadow Copy Service to back up archives more than 2 GB in size..
- Ensure that you have enough hard drive space on your default backup location before backing up your archives.
- For Historian 6.0 or later clients, you can only back up time-based archives.
The .IHC file is automatically backed up when, and only when, you back up the "current" archive .IHA file. By default, the .IHC backup path is the same as the archives path. The .IHC uses the following naming convention: ComputerName_Config-Backup.ihc If the default backup path is different than the archives path, the .IHC file is copied to the backup folder with the standard .IHC naming convention ComputerName_Config.ihc.
If you back up an archive more than once, the backup tool will (by default) attempt to use the same name for the backup file and will detect that an archive with the same name already exists. Rename the backup archive file or move the original backup archive file from the target backup directory.
Backing up Archives using Historian
Including Alarm Data in Archive Backups
| Alarm/Data Archive | Start Time | End Time |
|---|---|---|
| Alarm1 | 09/02/2004 | 09/06/2004 |
| Archive1 | 09/01/2004 | 09/03/2004 |
| Archive2 | 09/03/2004 | 09/04/2004 |
| Archive3 | 09/04/2004 | 09/06/2004 |
Use the following procedure to change alarm timestamp checking.
Backing up Archives Using Volume Shadow Copy Service
VSS provides fast volume capture of the state of a disk which is called a snapshot or shadow copy. When the snapshot is taken, disk writes are suspended for a brief period of time, typically on the order of milliseconds. After the snapshot, disk writes can resume, but the original state of the files are maintained by a difference file. The different file allows the state of the original file at the time of the snapshot to be reconstructed. This behavior allows files to be backed up while new data is being written to files.
The Volume Shadow Copy feature is provided by Windows Operating System, and the instructions to use backup and restore vary depending on the backup application that is used in the Windows operating system.
- Windows 7
- Windows 8.1
- Windows 10
- Windows Server 2008 R2
- Windows Server 2012 R2 64-bit
The Backup and Restore Center in Windows Server 2008 32-bit and 64-bit do not allow you to backup selected files or folders. However, you can do volume backups. The features available in the Backup and Restore Center depend on the Windows editions. If you need additional assistance with using Windows Server Backup Wizard, refer to Microsoft's website at: http://technet.microsoft.com/en-us/library/cc753528.aspx
In addition to using the Backup and Restore wizard, you can also use the command line utilities:- Refer to How to use command line parameters with the Ntbackup command: http://support.microsoft.com/kb/814583
- Refer to How to use command line parameters with the Wbadmin command: http://technet.microsoft.com/en-us/library/cc754015(WS.10).aspx
- If you need additional assistance about using Windows Server Backup Wizard, refer to Microsoft's website at: http://technet.microsoft.com/en-us/library/cc753528.aspx
Backing up Archives with Volume Shadow Copy Service on Windows 7, 8.1, or 10
Backing up Archives with Volume Shadow Copy Service on Windows Server 2008, 2008 R2, or 2012 R2
- You must also be a member of the Backup Operators or Administrators group.
- You must install backup and recovery tools first. For more information about Installing Widows Server Backup Tools, refer to Microsoft's website at: http://technet.microsoft.com/en-us/library/cc770266(WS.10).aspx
- Ensure that you have enough hard drive space on your default backup location before backing up your archives.
- For optimum performance, save the paging file of the operating system, Historian archives, and scheduled backup directory on separate drives.
Restore or Resynchronize Historian Archive Files
If the Archive files in the mirror environment are not synchronized, manually synchronize the archive files from one node to another node by using the Resync Archive option.