Data Collector Operation and Troubleshooting

Important: You do not have the latest version of Historian! You are missing out on the newest capabilities and enhanced security. For information on all the latest features, see the Historian product page. For more information on upgrades, contact your GE Digital sales agent or e-mail GE Digital Sales Support. For the most up-to-date documentation, go here.

Data Collector File Locations

Historian data collector files are installed in the following default directories:

Executables

  • OPC, Simulator, File, Calculation, and Server-to-Collectors
    c:\Program Files\Proficy\Historian\Server
  • iFIXCollector
    c:\Dynamics

LOG files and SHOW files

C:\Historian Data\LogFiles (*.log, *.shw)

Buffer files and local tag cache

C:\Historian Data\BufferFiles (*.msq, *.cfg)

Pausing or Resuming Data Collection

Pausing or Resuming Data Collection from the Non-Web Admin

  1. Open the Historian Administrator.
  2. Click the Collectors link.
    The Collector Maintenance screen appears.
  3. From the list of collectors at the left of the screen, click the collector you want to pause or resume.
  4. Select the appropriate running status from the Collection Status section of the General tab.
    No data buffering occurs while collection is paused.
  5. Click Update to activate your change.

Pausing or Resuming Data Collection from the Web Admin

  1. Open the Historian Web Administrator.
  2. Go to the Collectors Configuration screen.
  3. From the list of collectors at the left of the screen, click the collector you want to pause or resume.
  4. Click Pause or Resume.
    No data buffering occurs while collection is paused.

Pausing or Resuming Data Collection from the Local Collector Machine

Note: This procedure only applies to the Simulation and OPC Collectors.
  1. On the Start menu, click Run. (For Windows Vista, Windows Server 2008, and Windows 7, click the Windows Start button and click the Start Search field.)
  2. Type services.msc and click OK.
    The Services dialog box opens.
  3. Select the Historian 7.1 (collector type) Collector and click Start or Stop.
  4. Click Close.

Pausing Data Collection from the Collector Icon

  1. Click the Windows Start button, select Historian 6.0 from the Programs menu, and select the appropriate icon for your collector.
    The process should start and an application icon display should appear in minimized form on the lower toolbar.
  2. To stop the collector, maximize the icon from the toolbar, type s, and press Enter.

Pausing Collection for a Subset of Tags from the Non-Web Admin

  1. From the Historian Administrator Main screen, click the Tags link.
    The Tag Maintenance screen appears.
  2. Select one or more tags in the Tags section.
    The right-hand column displays current parameters.
  3. Locate the Collection field on the Collection tab.
  4. Select the Disabled option.
  5. Click Update.

Pausing Collection for a Subset of Tags from the Web Admin

  1. Go to the Tags screen from the Configuration page.
  2. Select one or more tags in the Tags section.
    The Tag Editor section displays current parameters.
  3. Locate the Collection field on the Collection tab.
  4. Disable the option.
  5. Click Update.
    Data collection stops for those tags. To re-activate collection for those tags, select Enabled for the Collection option and click Update.
    Note: If the collector is configured to allow online changes, making configuration changes such as the above may cause bad data samples to be recorded as the collector internally restarts. Disable online configuration changes and restart the collector manually if you want to avoid this behavior.

Modifying User Privileges for Starting a Collector

To start any collector, a user must have Power User privileges at a minimum. Typically, a user from the Administrator group starts a collector. If running as a service, you can use the local system account. If a user is not a Power User or Administrator, for instance, and you still want to allow that user to start a collector, you can override the user permissions setting in the Windows Registry.

The following example shows how to change the user permissions for a collector (the iFIX Collector) in Window XP, 2003 Server, 2008 Server or XP. While these steps outline the procedure for changing the user permissions for the iFIX Collector, note that you must perform these steps individually for each collector that you want to allow the user to start.

To change the permissions in the Windows Registry, you must be an Administrator. After you change the permissions, you can exit the Registry Editor, allow the user to log in again, and then allow that user to restart the collector.

  1. On the Start menu, click Run. (For Windows Vista, Windows Server 2008, and Windows 7, click the Windows Start button and click inside the Start Search field.)
  2. Type regedt32 and click OK.
    The Registry Editor appears.
  3. Navigate to the following registry key:
    HKEY_LOCAL_MACHINE\SOFTWARE\Intellution,Inc.\iHistorian\Services\iFixCollector
  4. Right-click the iFIX Collector folder and select Permissions.
    The Permissions for iFIXCollector dialog box appears.
  5. Select the Users group in the top portion of the dialog box.
  6. Select the Allow check box from the Full Control permissions, in the bottom portion of the dialog box.
  7. Click Apply.

Data Collector Troubleshooting

About Monitoring Data Collector Performance Statistics

You can evaluate data collector performance by observing information displayed or recorded in the following screens or files:
  • Historian Administrator Main screen and Historian Messages screen.

    For a detailed description of the parameter/option fields and the Alerts and Message Search Windows, refer to Using the Historian Administrator manual.

  • LOG and SHOW files on the data collector local machine.

    LOG (.log) files are historical journals of every event affecting operation of the collector. When you troubleshoot a problem in a collector, examining the log files is the best place to begin. The default path for LOG and SHW files is C:\Proficy Historian Data\LogFiles. The highest number is the most recent.

    SHOW (.shw) files allow you to examine the current configuration of a data collector. This file also details version and system configuration affecting the specific collector. The default path for LOG and SHW files is C:\Proficy Historian Data\LogFiles.

    If you are upgrading from a previous version of Historian, then the Archives, LogFiles, and BufferFiles destination paths will remain unchanged.

    Historian periodically checks for Archives, Bufferfiles, and Logfiles folder disk space availability. If the available disk space is less than configured, then Historian Data Archiver may shutdown.

  • Event Viewer on the Historian Server and on the collector local machine.

    The Windows Event Viewer logs all system events of interest to an administrator or developer. Each event has an identifying icon, such as Information, Warning, or Error. Click an item to display more detail about the event. Use this information to determine when and why a server fault occurred and when satisfactory operation was restored.

  • Historian tag using the source address of the Rate Output Address, Status Output Address, or heartbeat Output Address.

Disabling Rebroadcasting for Historian Data Archiver

The Historian Data Archiver service rebroadcasts collector status reports to all connected clients to ensure they are immediately notified of any changes to their configuration. If you have many collectors (20 or more) pointing to a single Historian archive, you may experience network congestion.
  1. Start the Windows Registry Editor.
  2. Navigate to the HKEY_LOCAL_MACHINE\SOFTWARE\Intellution, Inc\iHistorian\Services\DataArchiver key
  3. Create a new DWORD called RouteInterfaceStatusMsg and set it to 0 (to enable rebroadcasting, set this value to 1).
  4. Close the Windows Registry Editor.
  5. Restart the Historian Data Archiver service.
    Note: If rebroadcasting is disabled in the Historian Data Archiver service, any programs subscribed to collector status changes using Collectors.SubscribeStatus = true will no longer automatically receive collector status messages. To receive collector status messages, periodically read the Collector.Status property instead.

Troubleshooting Tag Configuration

To troubleshoot the tag configuration:
  • View the Collector SHOW (DataCollector.shw) file in C:\Historian Data\LogFiles\xxxCollector.shw to review the current Data Collector configuration.
  • View the DataCollector.LOG file in C:\Proficy Historian Data\LogFiles\xxxCollector-01.log to detect operational errors with Tags.
  • f you are using aggregate data, such as average, minimum, or maximum, use a chart display such as the trend option or the Excel Add-In to sample and then observe how data is stored.
  • If you are not certain about what is happening, turn off Collector Compression and Archive Compression and observe how raw data values flow into the archive. Be sure to export the tag configuration first so you can return to the original configuration.
    Note: If you are upgrading from a previous version of Historian, then the Archives, LogFiles, and BufferFiles destination paths will remain unchanged. By default, C:\Program Files\Proficy\Proficy Historian\Logfiles\.

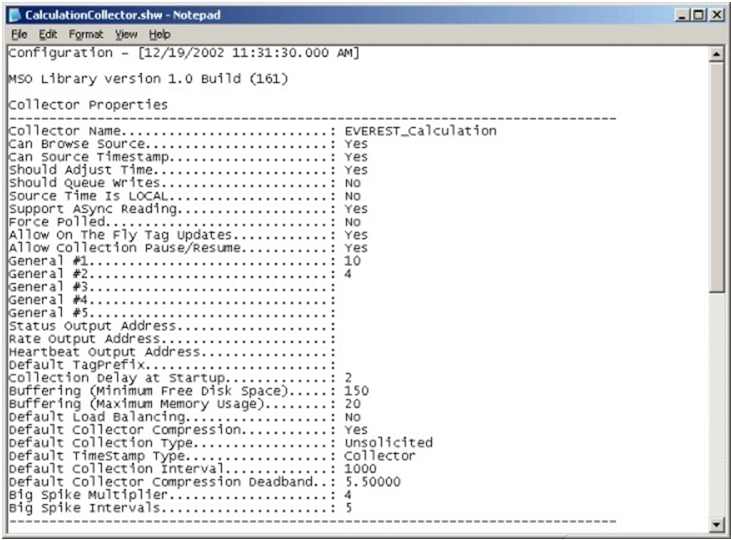
Reviewing the Active Collector Configuration

You can view the active collector configuration via the Historian Administration too, and you can also view the local Data collector SHOW (.shw) file.
  1. In the Historian Administrator Main screen, click the Collectors link. The Collector Maintenance screen appears.
    The Collector Maintenance screen appears.
  2. Select a data collector in the left column. The right column fills with current configuration data.
  3. Examine the current configuration settings to verify that they are appropriate.
    You can also review the active configuration by examining the local Data Collector SHOW(.SHW) File, as shown below:


  4. Scan the contents of the file and verify that the configuration parameters are correct for the application.
    If any of the values are not appropriate:
    1. Go back the Historian Administrator.
    2. Click the Collectors link to display the Collector Maintenance screen.
    3. Select a collector.
    4. Display the various tab pages and enter new values as appropriate..
    5. Click Update.
      The new values are stored in the Data Collector SHW file after 30 seconds.

Collector and Archive Compression

It is possible for collected tags with no compression to appear in Historian as if the collector or archive compression options are enabled. If collector compression occurs, you will notice an increase in the percentage of the Compression value from 0% in the Collectors panel of the System Statistics screen in the Historian Administrator. When archive compression occurs, you will notice the Archive Compression value and status bar change on the System Statistics screen.

Collector Compression

For all collectors, except the File Collector, you may observe collector compression occurring for your collected data (even though it is not enabled) if bad quality data samples appear in succession. When a succession of bad data quality samples appears, Historian collects only the first sample in the series. No new samples are collected until the data quality changes. Historian does not collect the redundant bad data quality samples, and this is reflected in the Collector Compression percentage statistic.

For a Calculation or Server-to-Server Collector, you may possibly observe collector compression (even though it is not enabled) when calculations fail, producing no results or bad quality data.

Archive Compression

If the Archive Compression value on the System Statistics screen indicates that archive compression is occurring, and you did not enable archive compression for the tags, the reason could be because of internal statistics tags with archive compression enabled.

Data Buffering

During normal operation, the Data Collector sends data and messages to the Historian Server using TCP/IP.The Server responds when it has successfully received the data.

Normal variations in response from the server can leave a small number of messages buffered in memory.When the collector loses its connection, or whenever the server cannot keep up with throughput, the data collector establishes a buffer. During such periods, the data collector continues to write data, caching it in the local file and memory buffer instead of writing it to the server. When the collector reestablishes the connection to the server, it forwards the stored data to the server, clearing the buffer as the server successfully receives the data.

If a collector writing to an archive loses its connection and the disk buffer becomes full, real-time collection does not begin immediately upon the re-established connection to the server. No data is collected from the time that the connection to the archive is re-established until approximately the time it takes for the buffer on the collector to clear.

Note: The Data Buffering feature does not apply to File Collectors. The File Collector does not process incoming files when the connection to the server is down. When the connection is re-established, processing of incoming files resumes.
If there is not enough free space for a collector to create its buffer files on initial startup, the collector shuts down immediately and sends the following message to the Event Viewer:
"[datetime] MessageAdd -MDW_iFIX Collector Buffering could not create buffer files. Shutting down."

If there is not enough free space for the collector to create its buffer files on startup, the collector shuts down and sends a message to the Event Viewer. The simplest way to prevent this from happening is to free up disk space to allow the collector to start. If this is not possible, you can edit the Registry to change the buffer size.

Editing the Registry to Change the Buffer Size

  1. Select Run from the Start menu.
    The Run dialog box appears.
  2. Type Regedit and press Enter.
    The Registry Editor appears.
  3. Locate the ComputerName_OPC1 key, where ComputerName is the name of your computer. You can find this key here:
    HKEY_LOCAL_MACHINE\SOFTWARE\Intellution,Inc.\Historian\Services\OPCCollector\ComputerName_OPC1
  4. Add a new DWORD value. Enter the name MinimumDiskFreeBufferSize, select the decimal option, and set the value to a small number such as 10 or 20. The value that you enter represents the number of MB of buffer space needed.
  5. Start the collector.
  6. If the Collector does not connect to the Historian Server, check the log file in the logfiles folder on the collector computer. If the log states that Historian "could not create buffer files" then repeat steps 1-5, this time using a smaller number.
  7. Once the Collector connects to the Historian Server, the collector should appear in the Admin UI and you can readjust the buffer file size on the bottom of the collectors General tab.

Setting Up Services Recovery Actions in Windows

Windows allows you to set up recovery actions to take place if a service fails. If you are running Historian Collectors on Windows, set recovery actions to restart the service for your individual collectors.

To set recovery actions for a specific service:

  1. Open the Control Panel.
  2. Double-click the Administrative Tools icon.
  3. Double-click the Services icon in the Administrative Tools dialog box.
    The Services dialog box appears.
  4. Right-click the Service you want to set recovery options for.
  5. Select Properties.
    The Service Properties dialog box appears.
  6. Select the Recovery tab.
  7. Select the recovery actions you want in the First attempt failure, Second attempt failure and Subsequent attempts failure fields.
    For more information on setting Services Recovery Actions, refer to the Microsoft Management Console online Help.