Public or Private Variables
About this task
A Variable ID can be a public or a private variable.
A component designer can make a Variable ID in a linked object either public or private. Using:
| Variable | A Screen Designer: |
|---|---|
| Public variables | Can enter a value for the Variable ID in the link container, thus making some values unique to that container. |
| Private variables | Cannot change the value for the Variable ID in the link container. |
Example
The following example demonstrates configuration for a source/linked object.
- Source object configuration
- Linked container configuration
- Linked object runtime test
- Later changes
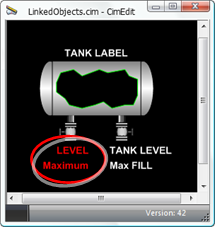
Source Object Configuration
A source object group includes the following objects.
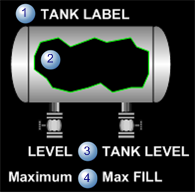
| 1 | Label that identifies the tank. |
| 2 | Tank that will fill based on an assigned variable value. |
| 3 | Text object that reports the runtime level. |
| 4 | Text object that reports the maximum allowed level. |
Following is the configuration for the source object group.
| Item Type | Name | Level | Public/ Private | Value assigned at the Source | Comments |
|---|---|---|---|---|---|
| Name | TANKS | Top level group | NA | TANKS | TANKS is the source object name for a group that includes a tank and a label. |
| Variable |
LABEL
|
TANKS | Public | No value | Text object that can be changed for the linked container. |
| Variable |
FILL_LEVEL
|
TANKS | Public | No value |
Value is a point that can be changed for the linked container.
FILL_LEVEL is assigned to the:
|
| Variable |
Maximum_Fill
|
TANKS | Private | 15000 |
Value cannot be changed for the linked container.
Maximum_Fill is assigned to the:
|
Linked Container Configuration
Because the tank is a SmartObject, when a screen designer creates a linked object, a SmartObject Configuration dialog box opens.
The screen designer enters the following values.
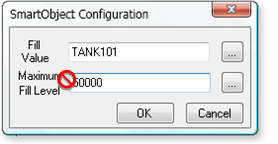
| Field | Variable | Value | Description |
|---|---|---|---|
| Fill Value | Public | TANK101 | A point that reports the actual level in TANK101. |
| Maximum Fill Level | Private | 50000 | Although the field appears to be read/write, 50000 will not be the value used. The source object's private variable had been assigned the value, 15,000, which will be the value used. |
Once the object is placed on the CimEdit screen, the screen designer
Procedure
-
Opens the object's Properties - Link container dialog box.
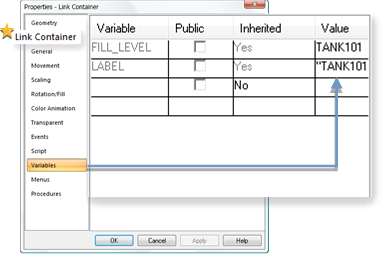
 The Link Container tab confirms that the object is a link container.
 -
Clicks OK to close the dialog box.
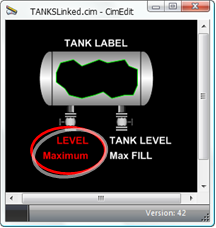
Linked Object Runtime Test
The following occurs when the CimView screen with the linked object opens.
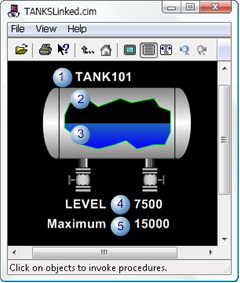
Object Value Variable Entered in the: 1 Label "TANK101" Public Link container's Properties dialog box. 2 Maximum Fill 15000 Private Source object's Properties dialog box. 3 Fill Value TANK101 Public Link container's SmartObject Configuration dialog box. 4 Fill Value TANK101 Public Link container's SmartObject Configuration dialog box. 5 Maximum Fill 15000 Private Source object's Properties dialog box. Later Changes
After the linked container was inserted on a CimEdit screen, the screen designer decided to change some source text to red.
The linked container screen is closed and re-opened.
The text that was changed in the source has changed to red in the link container.