Create a Get Query
About this task
Procedure
- In the main navigation menu, select
QUERIES.The QUERIES workspace appears.
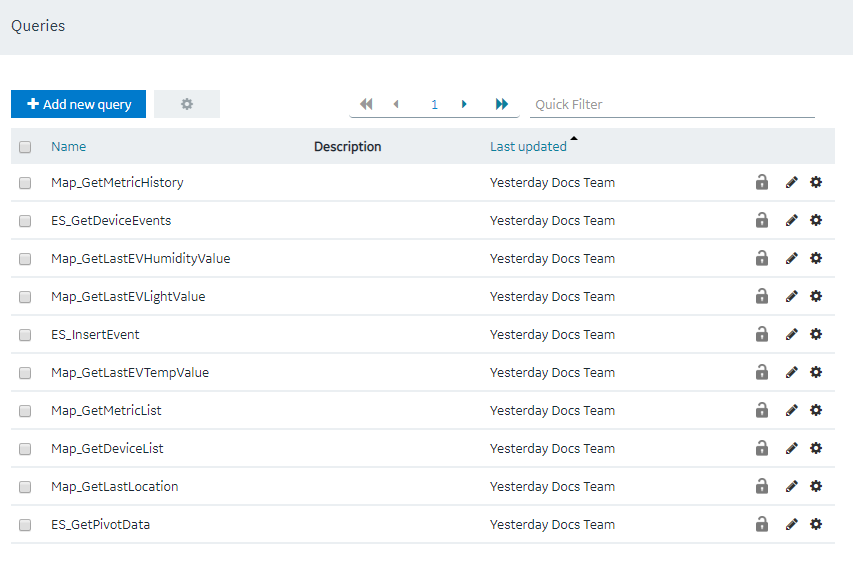
- Select Add new query.The Create Query window appears.
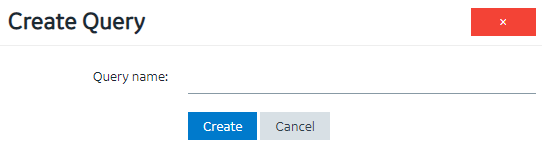
- In the Query name box, enter a name, and then select Create. The name must contain at least one uppercase or lowercase letter.The available options for creating the query appear.
- In the Description box, enter a value.
- In the Query Type box, select Get.
- In the Entity box, select an entity from which you want to get results.The Output Data, Conditions, Role Conditions, and Advanced sections appear.
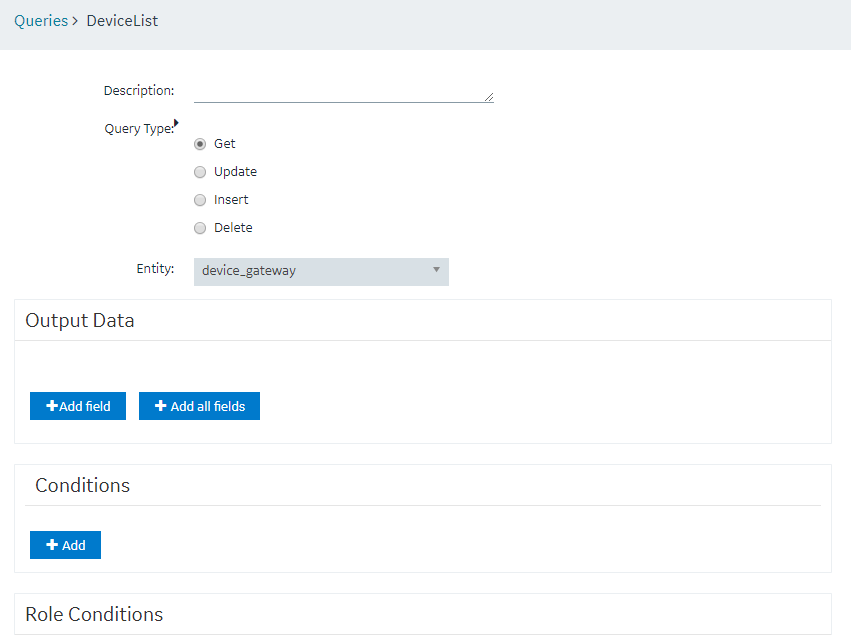
- In the Output Data section, select Add field. The FIELD, FUNCTION, and ACCESS boxes appear.Tip: If you want to get values from all the fields in the query, select Add all fields.
- Enter or select values as specified in the following table.
Field Description FIELD Select the field whose values you want to get using the query. Tip: If the entity that you have specified in the Entity box is a source entity in a relationship, you can select from fields in the source and target entities.FUNCTION Specify whether you want to get the maximum, minimum, average, sum, or count of the values in the field. By default, the value in this box is None, which indicates that the exact values will appear in the query results. ACCESS If you want to provide access to the data in the field only to users assigned to specific roles, select Permitted roles. By default, this box contains the value All users, which indicates that all users, regardless of the roles assigned to them, can access the query results. In the PERMITTED ROLES box that appears, navigate through the hierarchy of roles, and then select the roles assigned to users who can access the data in this field. - In the Conditions section, select Add, and then enter or select values as specified in the following table.
Field Description Required or Optional Select one of the following values: - Required: Select this value if the field must always contain a value. For example, suppose you are creating a query to display account details based on the account number. If you select Required, when you run the query, if you have not specified an account number, no records appear.
- Optional: Select this value if the field need not contain a value. For example, suppose you are creating a query to display account details based on the account number. If you select Optional, when you run the query, if you have not specified an account number, all the records appear.
Field Select the entity field based on which you want to create a condition. Operator Select the conditional operator that you want to use to compare the value in the selected field. Compare with Select one of the following values: - Input field: Select this value if you want to allow application users to specify a value that you want to compare with the entity field value. After you select this value, enter a name for the input field in the text box that appears. For example, suppose you want to create a query to display a list of devices in a specific site, and you want to allow the user to specify the site name. In this case:
- Select Input field, and then enter Site Name.
- Modify the page in the application that contains the query to include an input component that allows the user to enter or select the site name.
- Map the input component in the page with the input in the Page Data section.
When the user enters a value in the Site Name field in the application, the query results are filtered accordingly.
- Fixed Value: Select this value if you want to specify the value that you want to compare with the entity field value. After you select this value, enter a value in the text box that appears. For example, if you want to get data received from a device if the temperature exceeds 40 degrees Celsius:
- In the Field box, select the field that stores temperature.
- In the Operator box, select >.
- Select Fixed Value, and then enter 40 in the text box.
- Query: Select this value to specify a query whose output you want to compare with the field values in the specified entity. After you select this value, a drop-down list box appears in which you can select a query. For example, if there is a query that returns the maximum temperature recorded by a device, you can create a query to get a list of devices that record a temperature higher than the maximum temperature.
- In the Role Conditions section, select Add role condition, and then enter or select values as specified in the following table.
Field Description Apply conditions to Select one of the following values: - Specific Roles: Select this value if you want to apply the condition only to users assigned to specific roles. After you select this value, navigate through the hierarchy of roles, and select the roles.
- All roles: Select this value if you want to apply the condition to all or most users. After you select this value, the Exclude check box appears. Select this check box if you do not want to apply the condition to users assigned to specific roles. After you select this check box, navigate through the hierarchy of roles, and select the roles. For example, suppose the query returns sales data, and you want to apply the following conditions on who can access the query results:
- Users can access only the data that is related to their region.
- Regional officers can access data related to all regions.
In this case, select the Exclude check box, and then select the Regional Officer role.
Row visibility Select one of the following values: - Filter rows: Select this value if you want to filter rows based on a condition, and then specify the condition in the Entity field and In user's role tree boxes. For example, if the query returns sales data, and you want users to access only the data that is related to their region, then:
- In the Entity field box, select the entity field that stores the sales region data.
- In the In user's role tree box, select the category that stores the region roles.
- Show all rows: Select this value if you want users belonging to specific roles to access all the field values.
Entity field Select the entity field that contains the value that you want to compare with the value in the In user's role tree box. This box appears only if the value in the Row visibility box is Filter rows. In user's role tree Select the group or category of users that will be used to filter data. This box appears only if the value in the Row visibility box is Filter rows. - In the Advanced section, enter or select values as specified in the following table:
Field Description Distinct Select this check box if you do not want the query results to display duplicate field values. For example, suppose a query returns a list of countries that users belong to, and you want to view only the list of countries, you can select this check box so that each country appears only once. Order By Select Add, and then select the entity field and the order in which the field values should be arranged in the query results. Group By Select Add, and then select the entity field that you want to use to group the query results. If the query results contain a list of users and the country that each user belongs to, and if you want to group the users based on their country and sort them alphabetically, perform the following steps:- In the Order By box, select the entity field that stores the user name, and then select Asc.
- In the Group By box, select the entity field that stores the country.
- Select Save or Save And Exit.The query is created.