Dataloggers in Thickness Monitoring
About Dataloggers in Thickness Monitoring (TM)
Dataloggers are data collection devices, which are used to measure and record the thickness of a component. Using the Thickness Monitoring (TM) module, you can:
- Send data related to a TML to the datalogger.
- Receive data from the datalogger (after you collect measurement data in the field and record it in the datalogger).
The following dataloggers are supported in TM:
- GE DMS Go
- GE DMS Go+
- GE DMS2
- Olympus (Panametrics) 37DL Plus Ultrasonic Thickness Gage
- Olympus (Panametrics) 38DL Plus Ultrasonic Thickness Gage
For each datalogger, GE Digital APM provides:
- Baseline Datalogger Mapping records, which are used to send or receive data from the datalogger.
- Default datalogger settings, which you must review and modify if needed before you use the datalogger.
Access the TM Dataloggers page for an Asset or TML Group
About This Task
Procedure
- In the upper-right corner of the page, select
 , and then select Dataloggers.The TM Dataloggers page appears, displaying the Send To section. In the section, a list of TMLs linked to the selected asset or TML Group appears. The list also includes TMLs linked to any TML Groups in the asset. By default, the check boxes in all the rows are selected.
What To Do Next
Access the TM Dataloggers page for Multiple Assets
About This Task
This topic describes how to access the TM Dataloggers page for multiple assets. You can also access the TM Dataloggers page for a single asset or TML Group.
Procedure
- In the upper-right corner of the page, select
 .The Select Assets to Load for Dataloggers window appears, displaying a list of assets that the functional location contains.
- Select Done.The TM Dataloggers page appears, displaying the Send To section. In the section, a list of TMLs linked to the selected assets appears. The list includes TMLs linked to any TML Groups in the assets.
What To Do Next
Modify Datalogger Settings
Before You Begin
- Datalogger settings are specific to the user, data source, and browser. If you log in as a different user, switch browsers, or use a different data source, you will need to reconfigure your datalogger settings.
- When you send data to a GE DMS Go or GE DMS Go+ datalogger, GE Digital APM creates a folder in the USB drive. Therefore, you must have the Write permission to the USB drive on the machine that you will use to send data.
Procedure
- In the upper-right corner of the page, select
 .The datalogger settings appear.
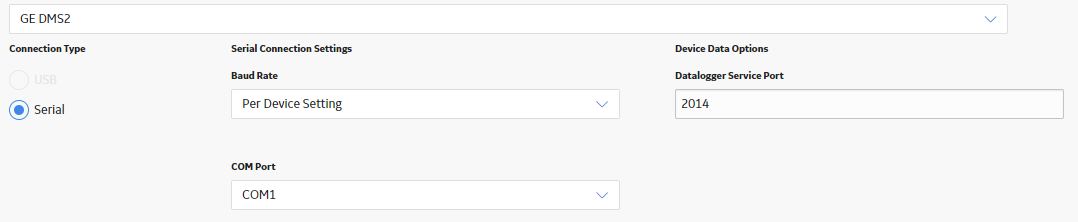
Results
What To Do Next
Send Data to a Datalogger
Before You Begin
- Install the Meridium Device Service on the machine that you will use with dataloggers. If you do not install it, when you attempt to send or receive data, you will be prompted to install it.
- Refer to the limitations when using a datalogger.
- If needed, modify the datalogger settings.
Procedure
- At the top of the page, in the drop-down list box, select the datalogger to which you want to send data. By default, the datalogger that you previously used is selected.In the Send To section, a list of TMLs linked to the selected assets appears. By default, the checkbox corresponding to TML Asset ID and the check boxes corresponding to all the TML records are selected.

- In the Send To section, do one of the following:
- If you want to send all the TML records to the device, select Send.
- If you want to send selected TML records to the device, select the check boxes corresponding to the required TML records, and then select Send.

A message appears, asking you to confirm whether you want to send the selected TML records to the device. - Select Yes.
The selected TML records are sent to the device.
At the end of the section, the red
changes to a green to indicate that the device is connected. If the data related to an asset was already sent to the datalogger previously, a message appears, asking you to confirm whether you want to overwrite the existing data on the datalogger. If you choose to overwrite, the data related to the asset is replaced with the data that you send. If you choose not to overwrite, the data will not be sent to the datalogger.
The date is sent to the datalogger. When the operation is complete, the green
changes to a red .
Add Columns to the Send To Grid
Before You Begin
- The data in the columns that you add is not automatically sent to the datalogger. If, however, you want to send this data to the datalogger, you must create a mapping for the corresponding field on the TM Admin Preferences page.
-
The columns that you add are specific to the user, data source, and browser. If you log in as a different user, switch browsers, or use a different data source, the columns that you have added will not appear.
Procedure
- In the upper-left corner of the Send To section, select
 .The Choose Columns window appears, displaying a list of fields in the Asset family in the left section.
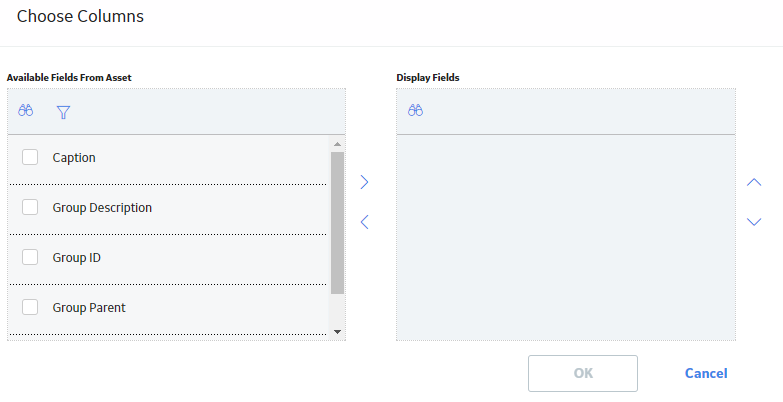
- Select
 , and then in the Family box, select the family from which you want to add fields.A list of fields in the selected family appear in the left section. If, however, the column for a field has already been added to the grid, or the field has been defined in a mapping, it does not appear in the list.
- Select the rows containing the fields that you want to add to the grid, and then select
 .The selected fields appear in the right section.
- If you want to add fields from another family, repeat steps 4-5.Tip: You can change the sequence of the fields using the
 and
and  buttons.
Remove Columns from the Send To Grid
About This Task
You cannot remove the default columns that appear in the grid in the Send To section. You can only remove the columns that you have added from the Column Chooser window.
Procedure
- In the upper-left corner of the Send To section, select .The Choose Columns window appears. In the right section, a list of fields for the columns that you have already added to the grid appears.
- Select , and then, in the Family box, select the family from which you want to remove the fields.In the right section, a list of fields that you have already added to the grid appears.
- Select the rows containing the fields that you want to remove from the grid, and then select
 .The selected fields are removed from the right section.
Receive Data from a Datalogger
Before You Begin
- Install the Meridium Device Service on the machine that you will use with dataloggers. If you do not install it, when you attempt to send or receive data, you will be prompted to install it.
Procedure
- Select the Receive From tab.The Receive From section appears.

- Select Receive.The Select Files to Receive window appears, displaying a list of files that store the measurement data. By default, the check boxes corresponding to all the files are selected.

- In the Receive From section, do one of the following:
- If you want to save all the TML records, select the check box corresponding to TML Asset ID, and then select Save.

- If you want to save selected TML records, select the check boxes corresponding to the required TML records, and then select Save.

The selected TML records are saved.
Note: If readings are not taken for a measurement, however, Measurement Not Taken records are not created. - If you want to save all the TML records, select the check box corresponding to TML Asset ID, and then select Save.
Results
- TML Corrosion Analysis linked to each TML whose measurement data you have received.
- Asset Corrosion Analysis linked to each asset whose measurement data you have received.
Troubleshoot Datalogger Issues
You may experience the following issues when using the datalogger in Thickness Monitoring:
- Datalogger device is not connected to the system.
- Meridium Device Service not found.
- Device Service is installed, but USB is not accessible due to permissions.
- Ultra-MATE software version compatibility Issue with DMS Go+ device.
- Incorrect readings are received.
- Meridium Device Service is not running under an authorized service account.
- OnDMS Go/DMS Go+ device readings with A-Scan saved do not properly load in the Datalogger interface
Datalogger device is not connected to the system
In the datalogger settings window, the File Directory drop-down list box is empty. Instead, the following error message appears below the File Directory drop-down list box:Invalid Input: File Directory is required. If your file directory list is empty. Check if your service port is valid.
When you attempt to send TMLs, the following error message appears:The device drive could not be found. Please ensure the SD card is inserted in the device.

Cause
- The Meridium Device Service is not running under an authorized service account.
Solution
- Access the Devices and drives in windows.
- Verify if the USB Drive is available.
- If the USB Drive is not available, make sure that the datalogger device is properly connected to the system.
Meridium Device Service not found
When you attempt to send data to a datalogger, following error is displayed on the TM Dataloggers page:
Meridium Device Service Not Found
Cause
- Meridium Device Service is not installed in the system.
- GE Digital APM uses a secured URL (https).
Solution
Device Service is Installed, but USB is not accessible due to permissions
When you attempt to send TML data, the following error message appears:
Error: <Directory>.dmsdr was not successfully sent to the GE DMS Go/Go+ device. Please check and make sure that all of the settings for the current device are correct. This might be due to the device having to change the file name because of limitations inherent in the device.Additionally, the following error message appears in the log file:
Sending message of type ACTION_FAILED to client.
Cause
- You don’t have USB access in your system.
- Navigate to the USB drive folder.
- Access the Meridium folder.
- Create a text file.
If you see an Access Denied message, you don't have USB access in your system.
Solution
Contact you system administrator to provide USB access in your system.
Ultra-MATE software version compatibility Issue with DMS Go+ device

You can also access the log file from the log folder in the service path folder to check the following error message:
Cause
The data format in DMS Go+ is changed in version 3.29. UltraMATE version older than 2.60.35 are not able to read data created with DMS Go+ version 3.29 due to the changed data format. UltraMATE version 2.60.28 or lower are able to read data created with DMS Go+ version 3.28 or lower.
Solution
GE Digital recommends customers with an existing valid license of UltraMATE software to download the UltraMATE version 2.60.35 from the https://www.gemeasurement.com/download-center. Contact GE Technical Support to get the password to unzip and install the UltraMATE software.
Incorrect readings are received
If you are a non-English customer, you may receive incorrect readings from the device.
Cause
When you receive thickness measurement data from a TM Datalogger in a system where the Windows Region format is set to any region other than English (United States), you may receive incorrect measurement values. For example, if you are using GE Digital APM in a system where the windows culture is set to Finnish (fi-FL) culture, a value of 0.75 inches may be received as 75234724750 inches.
Solution
- Follow the instructions in V4.3: Thickness Monitoring Datalogger sends incorrect readings into APM when using Finnish culture (fi-FL). KBA 6502.
or
- Uninstall the previous version and Install the Meridium Device Service on all of the machines that connect to devices with Thickness Monitoring.
Meridium Device Service is not running under an authorized service account
When you attempt to send TML data, following error message appears:
Error: <Directory>.dmsdr was not successfully sent to the GE DMS Go/Go+ device. Please check and make sure that all of the settings for the current device are correct. This might be due to the device having to change the file name because of limitations inherent in the device.Cause
Depending on the IT security policy of your company, Meridium Device Service may use an unauthorized system service account.
Solution
- Run services.msc to open the Services Manager.

- From the list of services, right-click on Meridium Devices Service, and then select Properties.
- Access the Log On tab.
- Select This account.
- Enter your administration credentials, and then select OK.
OnDMS Go/DMS Go+ devicereadings with A-Scan saved do not properly load in the Datalogger interface
When you attempt to receive the TML data using a DMS Go/DMS Go+ device, the data processing starts, but it never gets completed.
You can also access the log file from the log folder in the service path folder to check the following error message:
Exception occured while processing the request Year, Month, and Day parameters describe an un-representable DateTime.Cause
Using the Thickness Monitoring module, when you collected data with the DMS Go+ device and held the Send button for more than two seconds, the device also stored an A-Scan reading. The Thickness Monitoring Datalogger interface was unable to process this file or display the readings.
Solution
Follow the instructions in KBA 000034204.
This issue is applicable only for DMS Go/Go+ devices.