Overview

Overview of Data Sources

A data source stores the connection information for a GE Digital APM database and allows users to access that database. When you log in to GE Digital APM, you will select the data source that corresponds to the GE Digital APM database that you want to use.

Data sources are associated with a specific GE Digital APM Server to indicate which databases are accessible from that server.

Connection information about data sources is stored in MeridiumDatasources.xml, which exists on the GE Digital APM Server in the C:\ProgramData\Meridium folder. This file is created automatically when you install or upgrade the GE Digital APM Server. When it is first created during a new installation, it will be empty. It will be updated automatically as you create, modify, and delete data sources.

Note: Data source passwords are encrypted in the file.

Access the Data Sources Page

Procedure

In the module navigation menu, select Admin > Operations Manager > Data Sources.
The Data Sources page appears, displaying a list of existing data sources.

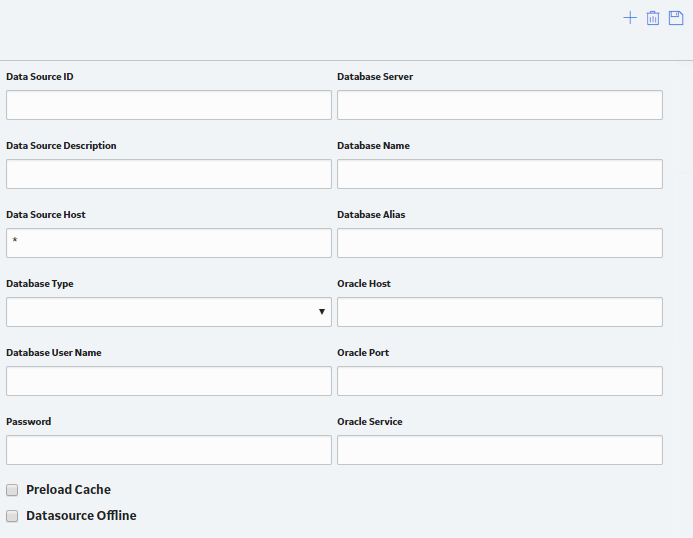
Create a Data Source

Procedure

  1. Access the Data Sources page.
  2. Select .

    An empty Data Source datasheet appears.

  3. In the Data Source ID box, enter a name for the data source.
    Important:
    • This value is required, and must be unique for the GE Digital APM server.
    • This value must not contain spaces or special characters and must be alphanumeric.
    • This value cannot be modified after you save the data source.
  4. In the Data Source Description box, enter a brief description of the data source.
    Note: The description for the data source will be displayed in the list of available data sources in the GE Digital APM login page.
  5. In the Data Source Host box:
    • If you are a GE Digital APM Now customer, enter the host name or address.
    • If you are not a GE Digital APM Now user, enter *.
  6. In the Database Type drop-down list box, select one of the following values:
    • Oracle
    • SQL Server
    If you select Oracle, the following boxes are enabled:
    • Database Alias
    • Oracle Host
    • Oracle Port
    • Oracle Service
    If you select SQL Server, the following boxes are enabled:
    • Database Server
    • Database Name
  7. Perform the following steps:
    • If you selected Oracle in step 6, then either enter a value in the Database Alias box, or enter values in the Oracle Host, Oracle Port, and Oracle Service boxes.
      Note:
      • A database alias, contained within a tnsnames.ora file, contains the Oracle host, port, and service information related to the database, and may have been set up by a database administrator to simplify access. To determine whether a database alias has been created, and to determine the appropriate values for the Database Alias box or Oracle Host, Oracle Port, and Oracle Service boxes, contact your database administrator.
      • If you selected Oracle in step 6, then you do not need to enter values in the Database Server and Database Name boxes.
    • If you selected SQL Server in step 6, then enter values in the Database Server and Database Name boxes.
      Note: If you selected SQL Server in step 6, then you do not need to enter values in the Database Alias, Oracle Host, Oracle Port, and Oracle Service boxes.
  8. In the Database User Name box, enter the user name or schema name for the database that you specified.
  9. In the Password box, enter the password for the associated database user name.
    The password must meet the criteria specified by the password policy.
  10. If you want Microsoft IIS to load and cache this database on the GE Digital APM server to improve performance, then select the Preload Cache check box.
  11. If you do not want the data source to appear for other Security Users when they attempt to log in to GE Digital APM, select the Datasource Offline check box.
  12. Select .
    The data source details are saved.

Results

  • The new data source appears in the left pane and will appear in the GE Digital APM login page. Additionally, after saving the data source, the button will appear next to the button to test the connection.