Performing LOPA
About Performing Layer of Protection Analysis (LOPA)
LOPA can be used to make decisions regarding risk in a hazardous scenario. A scenario is an unplanned event that results in an undesirable consequence. LOPA is usually applied to determine if a scenario is within the risk tolerance criteria or if the risk must be reduced.
When you create a LOPA, you will define the following information:
- The risk or initiating event for which you are conducting the LOPA.
- The consequence that may occur if that risk is not prevented from proceeding into an undesirable scenario.
- The enabling events and conditions that can help in initiating the undesirable event.
- The frequency of occurrence of events.
- The tolerable frequency of occurrence of event.
Additionally, a LOPA can be linked to the following:
Based on the values that you enter for the fields in LOPA, Conditional Modifiers, and Safeguards, the SIL value is calculated and stored in the Calculated SIL field in the LOPA. A summary of probabilities and frequency values for the LOPA and its associated records appear in the LOPA Summary workspace. Based on the summary, you can evaluate the scenario and make further decision on risk mitigation.
You can create a LOPA, and then link it to the following:
- A SIL Assessment for an Instrumented Function in SIS Management.
- A Cause-Consequence pair in Hazards Analysis.
If you have linked the LOPA with the SIL Assessment of an Instrumented Function, the SIL value calculated in the LOPA represents the target Safety Integrity Level that the Instrumented Function must achieve (i.e., the amount of risk reduction that the Instrumented Function must provide).
If the LOPA is linked to the Cause-Consequence pair in Hazards Analysis, then the SIL value determines if the safeguards that are currently in place reduce the risk to a tolerable level.
About Safety Integrity Level (SIL)
The SIL value is a measure of the reliability and availability of a safety system. It is the measurement of performance of a safety system under all the stated conditions within a stated period of time.
LOPA is a quantitative method for determining the SIL level for the safety system. The LOPA process uses information such as initiating event frequencies, the probabilities of failures of all safeguards, and the tolerable frequency of risk mitigation to determine the required probability of failure of the safety system. The required probability of failure is a number representing the probability that a safety system will fail in a dangerous scenario.
The SIL value for the safety system is determined by comparing the required probability of failure to the international standards of functional safety, defined in IEC 61508 and IEC 61511.
Based on the demand rate of the safety system, the SIL standards are classified into the following two types:
- Low Demand Mode: The demand rate of the safety system is less frequent than once per year. In these cases, the failure rate is measured by the average probability of failure on demand (PFD Avg).
- High Demand or Continuous Mode: The demand rate of the instrumented function is more frequent than once per year. In this case, the failure rate is measured by the average probability of failure per hour (PFH).
As per the industry standards, the required probability of failure are related to one of the four safety integrity levels contained in the following table:
| Safety Integrity Level (SIL) | Required Probability of Failure | |
|---|---|---|
|
Low Demand Mode Probability of Failure on Demand (PFD Avg) |
High Demand or Continuous Mode Probability of Failure per Hour (PFH) | |
| 4 | ≥ 10-5 to < 10-4 | ≥ 10-9 to < 10-8 |
| 3 | ≥ 10-4 to < 10-3 | ≥ 10-8 to < 10-7 |
| 2 | ≥ 10-3 to < 10-2 | ≥ 10-7 to < 10-6 |
| 1 | ≥ 10-2 to < 10-1 | ≥ 10-6 to < 10-5 |
For example, if the required probability of failure for a safety system is 0.02, which is a value between 0.01 and 0.1, the Safety Integrity Level for the safety system is 1.
About Qualitative Risk Rank Mapping from LOPA
LOPA is used for quantitative assessment of the probability of occurrence of an incident or risk and for assessing the SIL value. With GE Digital APM, you can use the values calculated in LOPA to quantitatively assess the SIL and derive a qualitative risk rank mapping for an Instrumented Function in SIS Management. You can then create recommendations that can be promoted to Asset Strategy Management (ASM).
Details
GE Digital APM maps the quantitative values calculated using LOPA with the Risk Matrix configured for the site to which the LOPA belongs, and then assigns the unmitigated risk in the Risk Matrix. The following values in the LOPA are used to derive at the unmitigated risk rank:
- Risk Category: The value in the Risk Category field in the LOPA identifies the category of the driving risk associated with the initiating event. This value is mapped to the Risk Category in the Risk Matrix.
- Risk Severity: The value in the Risk Severity field identifies the severity of the impact and is mapped to the Consequence value in the Risk Matrix.
-
Unmitigated Consequence Frequency: The value in the Unmitigated Consequence Frequency field is mapped to the Probability value in the Risk Matrix in one of the following ways:
- The Probability that is equal to or less than the unmitigated consequence frequency is selected as the Probability for the Risk Matrix.
- If the unmitigated consequence frequency is lower than the lowest Probability defined in the Risk Matrix, the lowest Probability is selected as the Probability for the Risk Matrix.
Note: GE Digital APM assumes that you have created the Risk Matrix for your site using probability values that have been standardized to be measured in terms of years.
Based on the Probability and Consequence values, GE Digital APM identifies the unmitigated risk rank associated with the selected Risk Category. A Risk Assessment record, which stores details such as the driving risk category and the unmitigated risk rank value, is created and linked to the LOPA.
If you assess the SIL value for an Instrumented Function using a LOPA that is linked to a Risk Assessment, and then create a recommendation for the Instrumented Function, the Mitigated Risk section appears in the Recommendation. In the Mitigated Risk section, the following details appear:
- Total Risk: Contains the unmitigated risk rank stored in the Risk Assessment associated with the LOPA.
- Driving Risk: Contains the Risk Category that you selected in the LOPA.
- Driving Risk Threshold: Indicates the Risk Threshold value for the unmitigated risk rank.
On the Risk Matrix, in the Risk Category that you selected in the LOPA, the  icon appears on the cell corresponding to the unmitigated risk rank. You can then select the mitigated risk rank for the category.
Example: Unmitigated Consequence Frequency Falls Between two Probability values
Suppose that you have configured a Risk Matrix for Site X with the following values in Risk Probability records for the Risk Category Operations:
| Risk Probability Name | Probability | Failure Interval | Failure Interval Units |
|---|---|---|---|
| Frequent | 1 | 1 | years |
| Probable | 0.1 | 10 | years |
| Possible | 0.01 | 100 | years |
| Remote | 0.001 | 1000 | years |
| Improbable | 0.0001 | 10000 | years |
In Site X, suppose that you created a LOPA with the following details:
- Risk Category = Operations
- Risk Severity = High
- Unmitigated Consequence Frequency = 0.005
For the above example, the probability value in the Risk Matrix that is less than the unmitigated consequence frequency is 0.001. Therefore, on the Risk Matrix, the unmitigated risk will be mapped to the cell corresponding to Probability value 0.001 and Consequence value High.
Example: Unmitigated Consequence Frequency is Lower than the Lowest Probability value
Suppose that you have configured a Risk Matrix for Site X with the following values in Risk Probability records for the Risk Category Operations:
| Risk Probability Name | Probability | Failure Interval | Failure Interval Units |
|---|---|---|---|
| Frequent | 5 | .2 | years |
| Probable | 1 | 1 | years |
| Possible | 0.3 | 3.33 | years |
| Remote | 0.1 | 10 | years |
| Improbable | 0.05 | 20 | years |
In Site X, suppose that you created a LOPA with the following details:
- Risk Category = Operations
- Risk Severity = Medium
- Unmitigated Consequence Frequency = 0.001
For the above example, the unmitigated consequence frequency is lower than the lowest probability value (i.e., 0.05) in the Risk Matrix. Therefore, on the Risk Matrix, the unmitigated risk will be mapped to the cell corresponding to Probability value 0.05 and Consequence value Medium.
About Integration Between Hazards Analysis and LOPA
Integration between Hazards Analysis and LOPA helps in analyzing the risk in a hazardous scenario, and developing appropriate Safeguards to mitigate the risk.
You can create or link a LOPA with a Consequence in Hazards Analysis (i.e., a HAZOP or a What If Analysis). When you create or link a LOPA with a Consequence, the following information is mapped from the Cause to the LOPA:
- Cause Type: The value in the CCPS Cause Type field from the Hazards Cause is mapped to the Initiating Event Type field in the LOPA.
- Cause Frequency: The value in the Cause Frequency (per year) field from the Hazards Cause is mapped to the Frequency of Initiating Event field in the LOPA.
Hence, though you create or link a LOPA from a Consequence, the LOPA is performed on a Cause-Consequence pair. For each Cause-Consequence pair, you can perform a LOPA.
Safeguard sharing between Hazards Analysis and LOPA
When you create or link a LOPA with a Consequence in Hazards Analysis, the Safeguards that are associated with the LOPA are automatically linked to the Consequence for which you performed the LOPA. Similarly, the Safeguards that are associated with the Consequence are automatically linked to the LOPA.
You can modify a Safeguard only if the Hazards Analysis and the LOPA with which the Safeguard is associated are in the Planning state.
When you unlink a LOPA from the Consequence in Hazards Analysis, GE Digital APM system creates copies of the Safeguards associated with the LOPA, and then links them to the Consequence. The copied Safeguards appear in the Hazards Worksheet of the Hazards Analysis.
Illustration
The following image shows the data mapping between Hazards Analysis and LOPA.

About Integration Between SIS Management and LOPA
Integration between SIS Management and LOPA helps in assessing the SIL level for Instrumented Functions.
To assess the SIL level for an Instrumented Function using LOPA:
- Perform a LOPA for the risk that the instrumented function is designed to mitigate. A LOPA record will be created.
- Approve the LOPA by changing the state of the LOPA to Complete.
- In the SIL Assessment section of the Instrumented Function, link the LOPA in the LOPA Assessment datasheet. A LOPA Assessment record is created by mapping the following values from the LOPA record that you linked.
This field in LOPA Assessment: ...is populated with the value in this field from LOPA: Linked LOPA ID LOPA ID Frequency of Initiating Event Frequency of Initiating Event Mitigated Consequence Frequency Mitigated Consequence Frequency Required Mitigated Consequence Frequency Required Mitigated Consequence Frequency Required Probability of Failure Required PIF PFD Risk Reduction Factor (RRF) Required PIF Risk Reduction Factor Unmitigated Consequence Frequency Unmitigated Consequence Frequency Total IPL PFD Total IPL PFD Selected SIL Level Calculated SIL If the LOPA is associated with a Risk Assessment, then a copy of the Risk Assessment is created and linked with the LOPA Assessment.
- You can then associate the LOPA Assessment with an Instrumented Function. GE Digital APM system populates the following values in the SIL Assessment section of the Instrumented Function based on the values in the LOPA Assessment:
This field in Instrumented Function: ...is populated with the value in this field from LOPA Assessment: Selected SIL Level Selected SIL Level Required Probability of Failure Required Probability of Failure Risk Reduction Factor Risk Reduction Factor (RRF) The Instrumented Function is linked to the Risk Assessment associated with the LOPA Assessment.
Illustration
The following image illustrates the data mapping between LOPA and LOPA Assessment.

About Revision History
The Revision History feature allows you to manage the revisions made for an entire LOPA analysis. When you perform a LOPA analysis, you link records from multiple families to the LOPA, which represents the entire analysis. When you complete an analysis (i.e., the analysis has been approved), you will change the state of the LOPA to Complete. When you do so, a snapshot of the LOPA and each record linked to it is saved as a LOPA Revision record.
In other words, after the record state for the LOPA is changed to Complete, one Revision record is created for each record that is linked to the LOPA. Records for the following families are created:
- LOPA Revision: One record for the LOPA.
- Hazards Analysis Consequence Revision: One record for each Conditional Modifier associated with the LOPA.
- Hazards Analysis Safeguard Revision: One record for each Safeguard associated with the LOPA
- IPL Checklist Revision: One record per IPL criteria that is associated with each Safeguard associated with the LOPA.
A Revision family contains all the fields that are in the source family. Each Revision record stores the values for all the fields in the source record as it appeared when the state of the LOPA was changed to Complete.
If you re-evaluate the LOPA, and then change the state of the LOPA to Complete, a second set of Revision records will be created, and so on. The number of revisions performed on the LOPA appears in the upper-right corner of the LOPA Summary workspace for the LOPA, which you can select to access the Revision History. When you select the Show Changes button for a record, a list of values in the preceding revision record and a list of values for all the fields that were modified (i.e., values in the latest revision record) are displayed.
Access a Layer of Protection Analysis
Procedure
- On the LOPA Overview page, select one of the following tabs:
- Under Review: Select this tab if you want to view a LOPA record that is being reviewed and has not been approved.
- Approved: Select this tab if you want to view a LOPA record that is in Complete state.
A list of LOPAs appears based on the tab that you selected.

- In the LOPA ID column, select the link for the LOPA that you want to view.
The LOPA Summary workspace appears, displaying the Definition and Summary tabs. The Definition tab is selected by default, displaying the datasheet for the selected LOPA.
Note: As needed, you can modify the values in the available fields, and then select to save your changes. You can modify values for a LOPA only if the record in the Planning state.
The following tabs appear in the pane to the left of of the LOPA Summary workspace:
- Conditional Modifiers : Contains a list of Conditional Modifiers associated with the LOPA.
- Safeguards and IPLs : Contains a list of Safeguards associated with the LOPA.
Access the LOPA Summary
This topic describes how to access the LOPA Summary workspace, which provides an overview of frequencies and probability values associated with various calculations in LOPA.
Before You Begin
- Create a Layer of Protection Analysis.
- Create Conditional Modifiers that you want to associate with the LOPA.
- Create Safeguards and specify if they are IPLs.
Procedure
- In the LOPA Summary workspace, select Summary.
The Summary section appears, displaying summary information for the LOPA and the associated Conditional Modifiers and Safeguards.
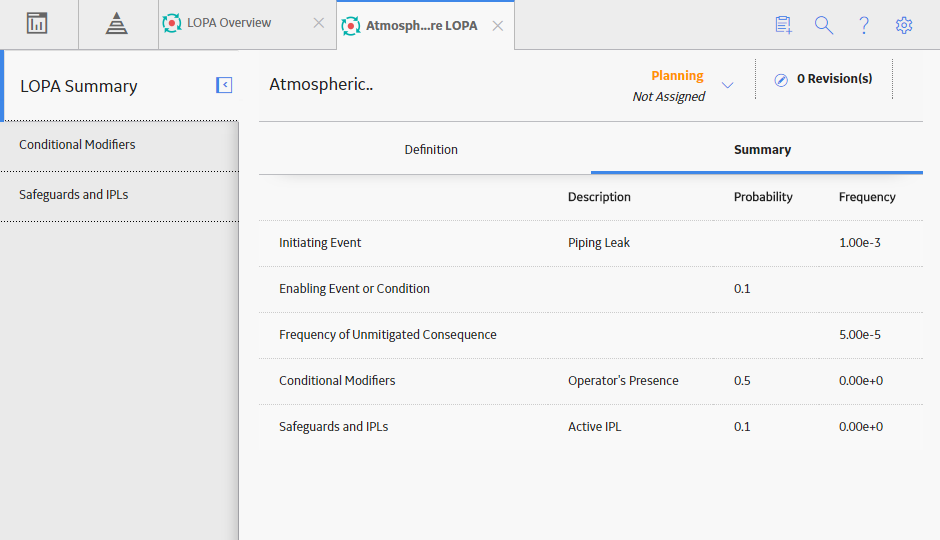
The Summary section contains the following information:
- Initiating Event: Contains the description of the Initiating Event and the frequency of occurrence of the initiating event.
- Enabling Event or Condition: Contains the description of the enabling event and the probability of occurrence of the enabling event.
- Frequency of Unmitigated Consequence: Contains the frequency of occurrence of the Consequence before any Safeguards and IPLs are considered.
- Conditional Modifiers: Contains the Conditional Modifier ID and the probability of occurrence of the Conditional Modifier. One row appears for each Conditional Modifier that is associated with the LOPA.
- Safeguards and IPLs: Contains the Safeguard ID and the probability that the Safeguard will fail on demand (PFD). One row appears for each Safeguard that is associated with the LOPA.
Create a Layer of Protection Analysis
About This Task
This topic describes how to create a LOPA via the LOPA Overview page. You can also create a LOPA from a Consequence in Hazards Analysis, which is then automatically linked to the Consequence.
Procedure
- On the LOPA Overview page, select the Under Review tab.A list of LOPAs appears.
- In the upper-left corner of the Under Review section, select
 .A blank datasheet for LOPA appears, displaying the Definition section.
- In the upper-right corner of the Definition section, select .The LOPA is created.
Results
- If you selected a value in the Risk Category and Risk Severity fields, then a Risk Assessment record is created and linked with the LOPA. The Risk Assessment record stores details about the unmitigated risk, which will be used for qualitative risk analysis of an Instrumented Function.
What To Do Next
- Link the LOPA to a Consequence in Hazards Analysis. For more information, refer to the Hazards Analysis section of the documentation.
-or-
- Assess the SIL value of an Instrumented Function using the LOPA. For more information, refer to the SIS Management section of the documentation.
Change the State of a LOPA
This topic describes how to change the state of a LOPA, while assigning the state of the LOPA to the appropriate user.
Before You Begin
If a LOPA is used for SIL assessment of an Instrumented Function, a LOPA Assessment record is created and associated with the LOPA. When you change the state of a LOPA to Complete, the associated LOPA Assessment is also updated. Any change to the LOPA Assessment will also affect the associated Instrumented Function and Protective Instrument Loops. Therefore, if the LOPA is linked to a LOPA Assessment of an Instrumented Function in a SIL Analysis, then to change the state of the LOPA to Complete, the SIL Analysis and the associated PILs must be in a modifiable state.
- The SIL Analysis must be in the Planning state.
- The Protective Instrument Loops associated with the Instrumented Function must be in the Design state.
About This Task
Procedure
- Change the State of a LOPA that is not Linked to a LOPA Assessment.
- In the upper-right corner of the LOPA Summary workspace, select the button that indicates the current state of the LOPA. For example, if the current state of the LOPA is Planning, select Planning.
A menu appears, displaying the list of operations that you can perform on the LOPA to change its state.
 Note: You can view the states assigned to various users by selecting the Manage State Assignments link. If not already done, you can assign the next state of the LOPA to the appropriate user, and then select Done.
- In the upper-right corner of the LOPA Summary workspace, select the button that indicates the current state of the LOPA. For example, if the current state of the LOPA is Planning, select Planning.
- Change the State of a LOPA that is Linked to a LOPA Assessment
- In the upper-right corner of the LOPA Summary workspace, select the button that indicates the current state of the LOPA. For example, if the current state of the LOPA is Planning, select Planning.
A menu appears, displaying the list of operations that you can perform on the LOPA to change its state.
Note: You can view the states assigned to various users by selecting the Manage State Assignments link. If not already done, you can assign the next state of the LOPA to the appropriate user, and then select Done. - Select the necessary operation that will change the state of the LOPA, and then select Done. For example, if you want to change the state of the LOPA from Planning to Active, select Begin, and then select Done.
If the LOPA is in the Pending Approval state and you selected the operation Accept, a message appears, indicating that when you change the state of the LOPA to Complete, the changes to the LOPA will update the values in the associated LOPA Assessment and the Protective Instrumented Loops.

- Select OK.
If the associated SIL Analysis is not in the Planning state or the associated Protective Instrument Loops are not in the Design state, a message appears, stating that the state of the LOPA cannot be changed.

- Select OK.
The state of the LOPA is not changed.
-or-
If the LOPA is not in Pending Approval state, the state of the LOPA is changed.
- Select OK.
- In the upper-right corner of the LOPA Summary workspace, select the button that indicates the current state of the LOPA. For example, if the current state of the LOPA is Planning, select Planning.
Results
- When you change the state of a LOPA to Complete, the number of revisions for the LOPA is incremented by one, and appears in the upper-right corner of the LOPA Summary workspace.
- For each revision, a Revision record is created for the LOPA, and its associated Conditional Modifiers and Safeguards.
-
If you changed the state of LOPA linked to a LOPA Assessment of an Instrumented Function in a SIL Analysis to Complete, then the values in the associated LOPA Assessment and Risk Assessment are updated based on the values in the LOPA. If linked to a LOPA Assessment of an Instrumented Function in a SIL Analysis, the following records are also updated:
- Instrumented Functions with which the LOPA Assessment is linked.
- Protective Instrument Loops associated with the Instrumented Functions.
Access Revision History of a LOPA
Procedure
- In the upper-right corner of the page, select Revisions.A list of revisions for the LOPA appears.

- For the row that contains the revision that you want to access, in the Revision Name column, select the link.The LOPA Revision datasheet for the selected revision appears, displaying the details of the LOPA for that revision. The Conditional Modifiers tab and the Safeguards and IPLs tab appears in the left pane.

- If you want to view the changes that have been made for the LOPA, in the upper-right corner of the page, select Show Changes.The Changes For Selected Datasheet window appears, displaying a list of values in the preceding LOPA Revision record and a list of values in the latest LOPA Revision record for the selected LOPA.

- If you want to view the changes that have been made for conditional modifiers associated with LOPA, perform the following steps:
- In the left pane, select Conditional Modifiers.In the left pane, the Conditional Modifier records that are associated with the LOPA appear.

- In the left pane, select Conditional Modifiers.
- If you want to view the changes that have been made for safeguards and IPLs associated with LOPA, perform the following steps:
- In the left pane, select Safeguards and IPLs.
In the left pane, the Safeguard records that are associated with the LOPA appear.

- In the left pane, select Safeguards and IPLs.
Delete a Layer of Protection Analysis
Procedure
- On the upper-right corner of the LOPA datasheet, select
 , and then select Delete.Note: You can delete a LOPA only if the LOPA is in the Planning state.
A confirmation message appears, asking you if you want to delete the LOPA.
Note: When you delete a LOPA, the relationship with the associated Consequence Modifiers and Safeguards is removed.