Overview
Overview of the Management of Change (MoC) Module
Any organization in today's business environment must be ready to undergo changes almost constantly to have a competitive advantage. A change, when implemented after careful planning and impact analysis, can lead to improved business and safety performance.
Change Management is used extensively in industries to ensure that when changes are implemented, a thorough risk assessment has been done and all aspects of the change have been considered prior to implementation of the change.
More Details
The GE Digital APM Management of Change (MOC) module follows a systematic approach to delivering a change, taking into consideration all aspects of operations which will or could be impacted because of the change. Using MOC, changes are undertaken as Change Projects. In the Change Project, changes are formally introduced, approved, and implemented as tasks. The Management of Change module provides a flexible solution for creating and managing change projects, communicating changes to team members, and enforcing an approval system to provide accountability for the change. With MOC, you are able to comply with change management requirements by relating records from other GE Digital APM entities to ensure that all impacted areas of the organization are recorded as changed elements in the Change Project. This in turn provides your organization with a greater degree of auditability, which is essential in industries that require Management of Change as a regulatory compliance requirement.
Access the MoC Overview Page
Procedure
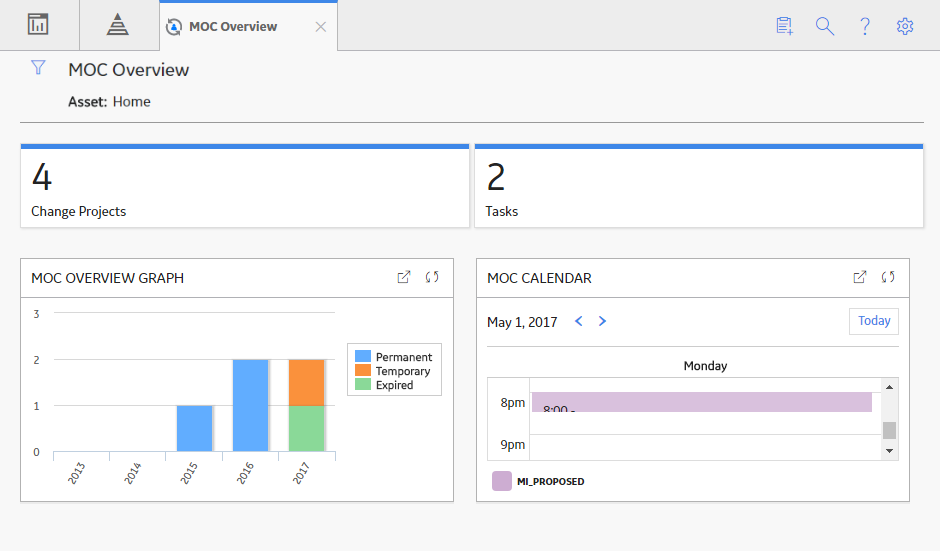
The MOC Overview page appears. By default, on the MOC Overview page, the hierarchy level is set to Home and the information (i.e., the list of records, the graph, and the calendar) related to all Hierarchy Levels, including Change Projects and tasks that are not associated with any asset, appears. You can filter the information that appears on the page, based on a specific asset by selecting  in the upper-left corner of the page. When you select an asset, the information related to the selected asset and all assets within the hierarchy level appears.
The following tabs appear on the page:
-
Change Projects: Contains a list of Change Projects. The following columns of information appear in the section:
- Project ID: Contains the value from the Change Project ID field of the Change Project. You can select the link in the Project ID column to access the Change Project.
- Description: Contains the value that you entered in Description field to describe the Change Project.
- State: Contains the current state of the Change Project.
- Project Type: Contains the value that you entered in Change Type field to identify the type of Change Project.
-
Tasks: Contains a list of tasks. The following columns of information appear in the section:
- Task ID: Contains the value that identifies the task. You can select the link in the Task ID column to access the task in the Record Explorer.
- Description: Contains the value that you entered in the Task Description field to describe the task.
- State: Contains the current state of the Operations Task record.
- Assigned To: Contains the value in the Task Assigned To field of the Operations Task record.
- Next Date: Contains the value in the Next Date field of the Operations Task record.
The following graphs appear on the page:
-
MOC Overview Graph: Contains a bar graph that
displays the number of Change Projects in the selected hierarchy level,
for the last five years including the current year. The x-axis
represents years. The y-axis represents the number of Change Projects in
each of the following categories:
- Permanent: Represents the number of permanent Change Projects.
- Temporary: Represents the number of temporary Change Projects whose Change Valid Until values are greater than the current date.
- Expired: Represents the number of temporary Change Projects whose Change Valid Until values are lesser than the current date and the state of the project is not Finalized.
On the graph, you can pause on a section of the bar to view the number of projects for a specific change type in the specific year. In the upper-right corner of the graph, you can select
 to modify the appearance of the graph using standard graph
features.
to modify the appearance of the graph using standard graph
features. -
MOC Calendar: Contains a calendar that displays the tasks available for the selected hierarchy. The color of the horizontal bars representing the task on the calendar indicates the state of the task. The tasks are organized on the calendar based on the value in the Next Date field in the Operations Task records.
The following features are available in the calendar:
- You can select the horizontal bar for a task to access it in the Record Explorer.
- Next to the date, you can select
 or
or to view the schedule for other dates on the calendar. In the upper-right corner of the calendar, you can select the Today button to navigate to the current date.
 - Below the calendar, the list of states assigned to the tasks and the color code used for the corresponding states appear. You can select the state to view the tasks that are in the selected state for the specified date.
-
In the upper-right corner of the calendar, you can select
to view the calendar on a new page and access the following features:- In the upper-right corner of the page, you can select one of following buttons:
- Month: The calendar for the current month appears, displaying tasks that are due for each day in the current month.
- Week: The calendar for the current week appears, displaying tasks that are due for each day in the current week.
- Day: The calendar for the current date appears, displaying tasks due for the day. By default, this option is selected.
- In the left pane, the calendar for the current month appears. Above the calendar in the left pane, next to the month, you can select or to view the schedule for other months on the calendar.
- In the upper-right corner of the page, you can select one of following buttons:
MoC Workflow
This workflow provides the basic, high-level steps for using this module. The steps and links in this workflow do not necessarily reference every possible procedure.
- Create a Change Project, which stores the details of the change that you want to manage, including the type of change.
- Create the Change Project team that will manage the project.
- Add the Checklists that can identify potential areas of impact of the changes.
- Respond to Questions in each Checklist. Based on your response to the Questions, Exceptions are automatically created.
- Manage the Exceptions.
- Create tasks for Exceptions and assign each task to a user.
- As needed, create recommendations for Exceptions.
- Use state management for tasks to record the progress of tasks.
- Analyze the Change Project Summary to verify the percentage of Exceptions that are closed and the percentage of tasks that are in the Completed state.
- Use state management in Change Projects to finalize the project.