Overview
Overview of Datasets
A dataset is a fixed set of information that is stored as a Catalog item.
More Details
Datasets contain information that can be viewed and modified in a grid. While queries return the most current information in the database, a dataset displays the same information until it is modified manually. For example, you might use a dataset to store information from an external system so that the data can referenced or used to create graphs in GE Digital APM.
When a dataset is created, a data type is defined for each column to indicate the type of data that can be stored in cells in that column. When you create or modify a dataset, if you attempt to enter data that conflicts with the data type defined for that column, the data will not be retained. The following types of data can be stored in a dataset:
- Character : Stores alphanumeric data. Cells in columns of this data type will appear as text boxes in which you can enter letters, numbers, and symbols.
- Numeric : Stores numeric data. Cells in columns of this data type will appear as text boxes in which you can enter numbers.
-
Date
: Stores date and time data in the format MM/DD/YYYY. Cells in columns of this data type will display the
 button, which can be selected to access a calendar from which a date can be selected. You can also enter dates directly into cells.
 - Logical : Stores the value True or False. Cells in columns of this data type will appear as text boxes in which you can enter the value True or False.
You can create new datasets manually within GE Digital APM , or by importing a Microsoft Excel file (.xls or .xlsx), an XML file (.xml), or a text file (.txt or .csv).
After you create a dataset, you can access it, modify it, use it to create graphs, and export it as a Microsoft Excel file, an XML file, or a text file.
About Creating Datasets by Importing Files
You can create a new dataset in GE Digital APM by importing a Microsoft Excel file (.xls or .xlsx), an XML file (.xml), or a text file (.txt or .csv).
When importing a dataset, if you specify a Data Type for a column and that column contains values that are not supported by the selected Data Type, the entire column will be excluded from the dataset.
When importing a file, in the Modify Columns section, if you select the check box in the Unique Value column for a given column and the file that you are importing has the same value in multiple cells within that column, only the first row with a unique value will be imported into the dataset.
About Importing an Excel File
Microsoft Excel files with the file extension .xls or .xlsx can be imported to create a dataset. In a Microsoft Excel file, data is organized within grids, and can contain multiple worksheets. When importing a Mircrosoft Excel file, a dataset can be created only from a single worksheet. If you want to import multiple worksheets from a Microsoft Excel file, you must create a new dataset for each worksheet.
About Importing an XML File
Extensible Markup Language (XML) files that have the file extension .xml can be imported to create a dataset. XML files can be created in text editors, such as Notepad and Microsoft Word, but can also be opened and viewed in an Internet browser.
When importing an XML file, the following data types are supported:
- string: Used for columns that contain alphanumeric values. Columns of this type will be imported using the Character data type.
- double: Used for columns that contain numeric values and may include a - (negative sign) and decimal. Columns of this type will be imported using the Numeric data type.
- dateTime: Used for columns that contain date and time values. Date values should use the format YYYY-MM-DD, and time values should use the 24-hour time format THH:MM:SS (e.g., T14:30:23). Columns of this type will be imported using the Date data type.
- boolean: Used for columns that contain logical data. Data in these columns should be limited to the following values: True, 1, False, and 0. Columns of this type will be imported as a Logical data type.
Each row of the dataset is contained with a Table tag. The attributes within the Table tag correspond to the column names defined via the xs:attribute tags.
About Importing a Text File
Text files with the extension .txt or .csv can be importet to create a dataset. These files contain lines of data that are delimited, or separated, by punctuation marks, with rows of data separated by line breaks.
GE Digital APM accepts the following characters as delimiters:
- , (comma).
- ; (semicolon).
- | (pipe character).
To maintain the structure of the dataset, delimiters must be used throughout the file, even for cells that do not contain values. To identify an empty cell, you would need to include two consecutive delimiters (e.g., A,B,,D,E).
About Dataset Modification
After you access a dataset, or before you save when creating a dataset manually in GE Digital APM or creating a dataset by importing a file, you can modify the dataset. It is important to understand GE Digital APM's capabilities and limitations when modifying datasets.
Details
On the page displaying a dataset, the dataset is displayed as a grid. You can specify column names only during the creation of a dateaset; once the dataset is created, the number of columns in the dataset and the names of those columns cannot be altered.
If you need to modify the information contained in a dataset, you can do so in the following ways:
- Modify the data in a cell.
- Add rows.
- Delete rows.
- Move a column by selecting it and dragging it to the desired position.
After a dataset exists in GE Digital APM, if you need to modify the column structure or the data type of a column, you can perform the following steps:
- Export the dataset.
- Perform the necessary modifications.
- Import the updated file to create a new dataset.
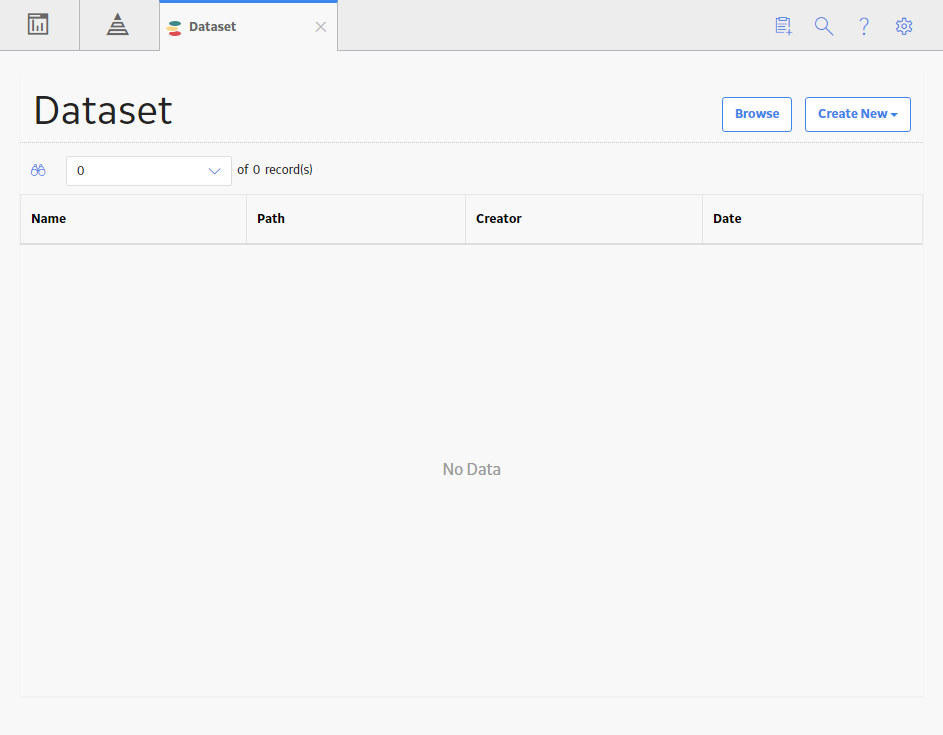
Access the Dataset Page
Procedure
Create a Dataset in GE Digital APM
About This Task
The following instructions describe how to create a dataset manually within GE Digital APM. You can also create a dataset by importing a file.
Procedure
- In the upper-right corner of the page, select Create New, and then select Manual.
The New Dataset page appears, displaying the Modify Columns section.
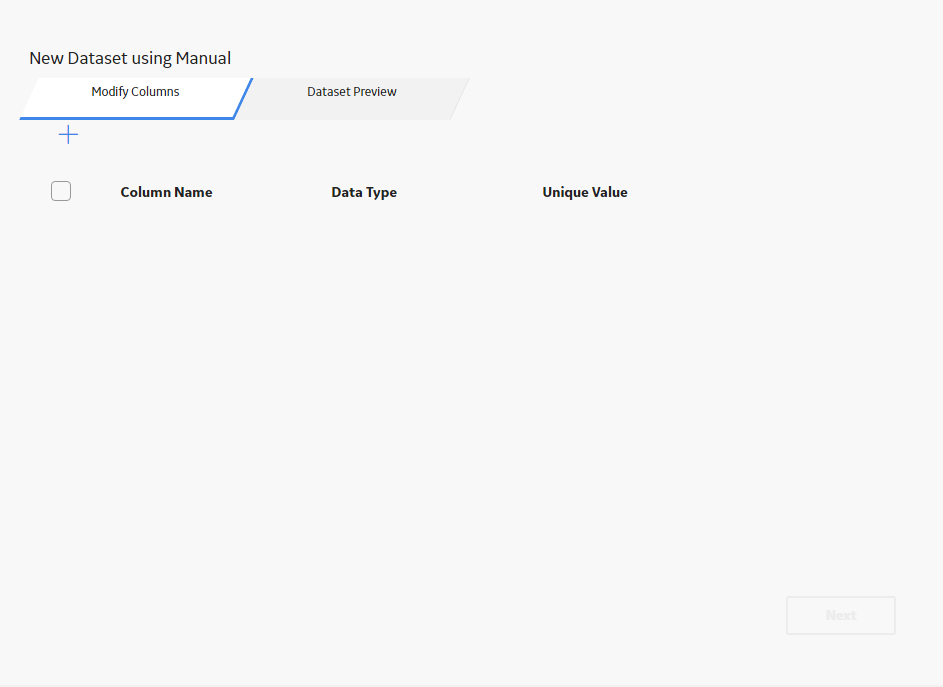
- To create a new column, select
 .
.A new row appears in the grid.
- In each cell in which you wish to enter data, select the cell, and then enter the data.Note:
- At any time, you can create a new row by selecting .
- The value that you enter in a cell must correspond to the data type that you selected for the column in which it appears.
- At any time, you can create a new row by selecting
Create a Dataset by Importing a File
About This Task
The following instructions describe how to create a dataset by importing a file. You can also create a dataset manually within GE Digital APM .
Procedure
- To import an Excel file:
- Select Next.
The Modify Columns section appears, displaying a grid.
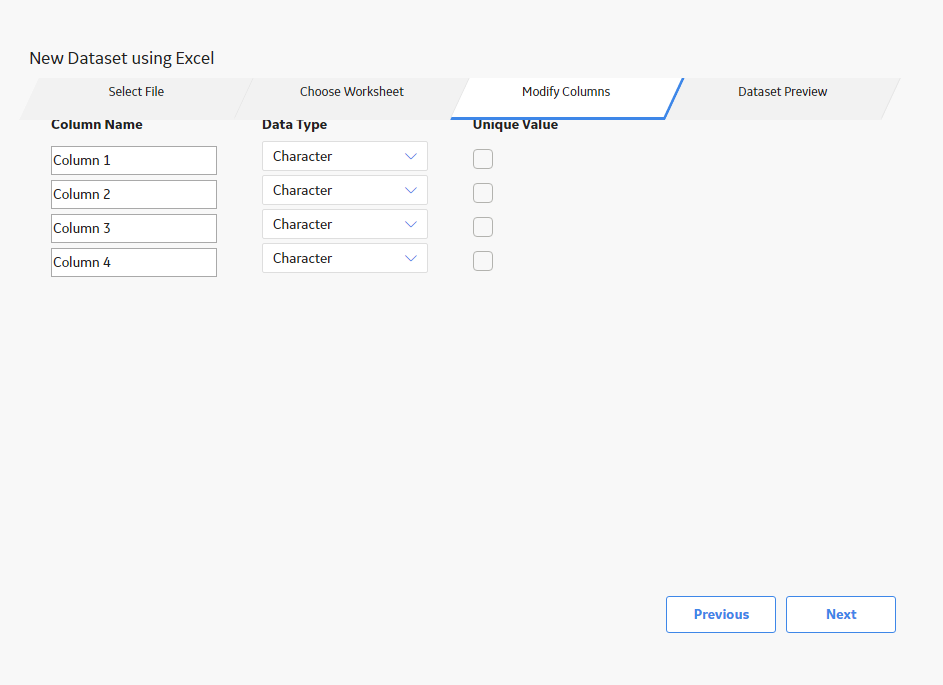
- Select Next.
- To import an XML file:
- Select Next.
The Modify Columns section appears, displaying a grid.
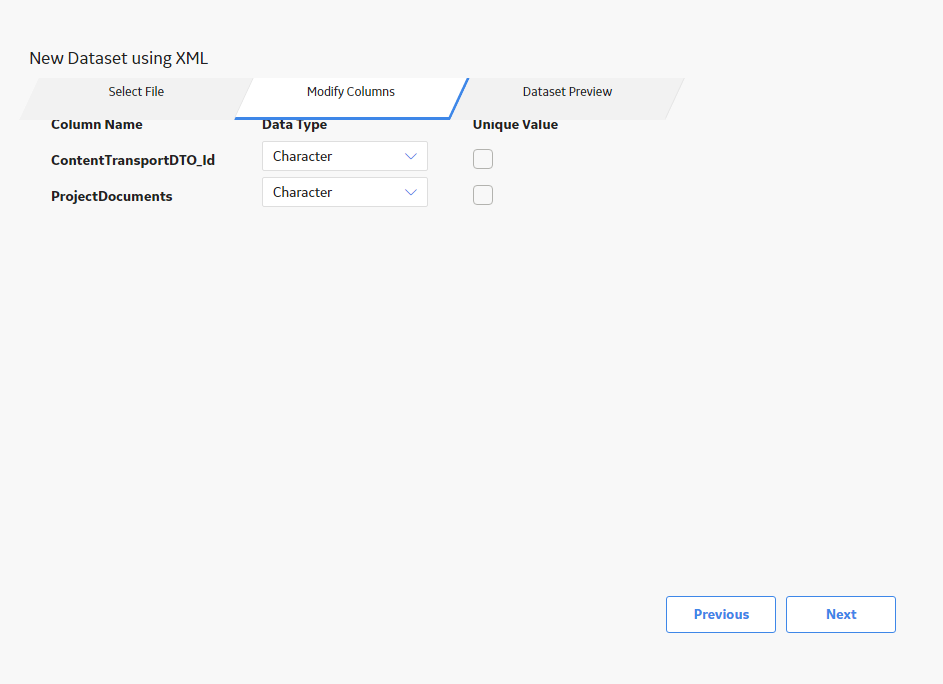
- Select Next.
- To import an text file:
- Select Next.
The Modify Columns section appears, displaying a grid.
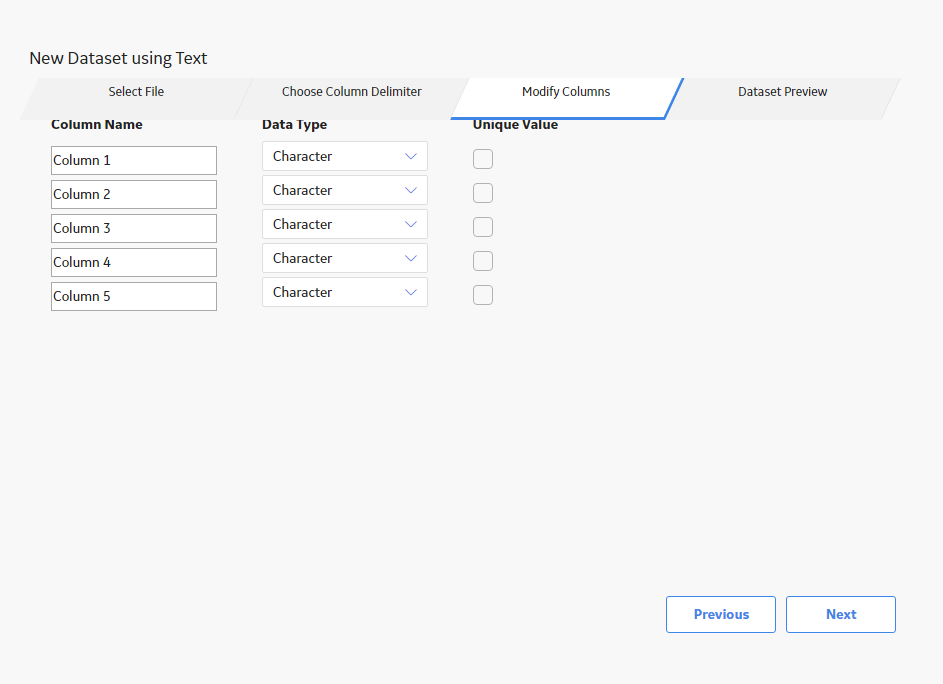
- Select Next.
Access a Dataset
Procedure
- To access a dataset via the grid on the Dataset page:
- If you want to filter the datasets displayed in the grid, select
 , and then, in the boxes that appear in the grid, enter information in the box in any column to limit the results displayed to datasets whose column values contain the information entered.
 - In the grid, select the dataset that you want to access.
A new page appears, displaying the selected dataset.
-or-
To access a dataset via the Catalog:
- In the upper-right corner of the Dataset page, select Browse.
The Select a dataset from the catalog window appears.
- On the left side of the window, navigate to the folder that contains the dataset that you want to view.
On the right side of the window, in the grid, the datasets in the selected folder appear.
- In the grid, select the dataset that you want to access, and then select Open.
A new page appears, displaying the selected dataset.
- If you want to filter the datasets displayed in the grid, select
Modify a Dataset
Procedure
-
Access a dataset.
- To delete a row, in the row that you want to delete, select Delete.
- To add a row to the dataset, select .
- To modify the value in any cell below the column headings, select the cell, and then modify the value.
Note: Any value within a cell that has been modified since the last interim save will be surrounded by a green box. At any time, you can select to revert the dataset to the condition it had before the last interim save. At any time, you can select
  to perform an interim save, which will not overwrite the previously saved Catalog item.
Save a Dataset
Before You Begin
Saving a dataset is the final step of the process when you create a dataset in GE Digital APM , create a dataset by importing a file, or modify a dataset. To save a dataset, you should follow one of those procedures, and then complete the steps described in this topic.
Procedure
- If you are creating a dataset:
- In the upper-right corner of the page, select .
- In the upper-right corner of the page, select
- If you are modifying a dataset and want to overwrite that dataset's previously saved data:
- In the upper-right corner of the page, select .The dataset is saved.
- In the upper-right corner of the page, select
- If you are modifying a dataset and want to save the modified dataset as a new Catalog item:
- In the upper-right corner of the page, select
 .
.
- In the upper-right corner of the page, select
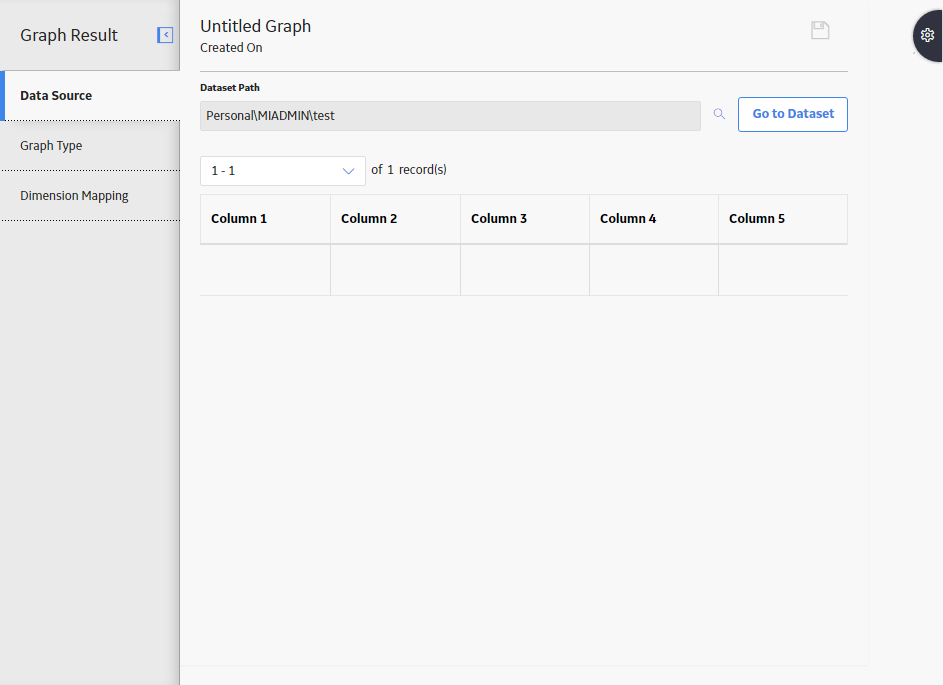
Create a Graph from a Dataset
Procedure
- In the upper-right corner of the page, select
 , and then select Create Graph.
A new page appears, displaying the dataset in the Data Source workspace.
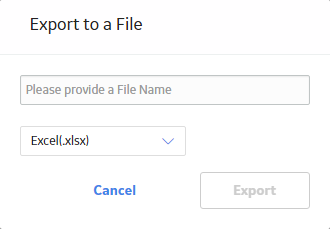
Export a Dataset
Procedure
- In the upper-right corner of the page, select , and then select Export to a File.
The Export to a File window appears.