Deployment

Upgrade or Update Process Data Integration (PDI) to V4.3.0.7.0

Before You Begin

The following tables outline the steps that you must complete to upgrade this module to GE Digital APM GE Digital APM. These instructions assume that you have completed the steps for upgrading the basic GE Digital APM system architecture.

These tasks may be completed by multiple people in your organization. We recommend, however, that the tasks be completed in the order in which they are listed.

Procedure

Deploy Process Data Integration (PDI) for the First Time

Before You Begin

The following table outlines the steps that you must complete to deploy and configure this module for the first time. These instructions assume that you have completed the steps for deploying the basic GE Digital APM system architecture.

These tasks may be completed by multiple people in your organization. We recommend, however, that the tasks be completed in the order in which they are listed.

This GE Digital APM module is not available in the APM Now environment.

Note: These steps assume that your system architecture contains only one Process Data Integration Server and one OPC Server. If your system architecture contains more than one Process Data Integration Server and OPC Server, you must install and configure the Process Data Integration Service on each Process Data Integration Server machine.
StepTaskNotes
1Ensure that your OPC Server and process historian are configured according to the PDI system requirements.This step is required.
2Review the server roles that are configured for the Process Data Integration Server in the GE Digital APM testing environment, and then configure roles on your Process Data Integration Server accordingly.This step is required.
3Assign Security Users to one or more of the Process Data Integration Security Groups and Roles.This step is required.
4

In GE Digital APM, configure a connection to the OPC-compliant system from which you want to retrieve data.

This step is required.
5On the Process Data Integration Server, install the Process Data Integration Service.

This step is required.

We recommend that the OPC Server is the same machine as the Process Data Integration server. However, if it is a separate machine, refer to the PDI system requirements for information on additional configuration that is required.

6

On the Process Data Integration Server, modify the Process Data Integration Service configuration file to specify your OPC Server, the GE Digital APM Server, GE Digital APM database, and login credentials.

This step is required.
7On the Process Data Integration Server, start the Process Data Integration Service.

This step is required.

When you start the service, tags from the configured process historian are imported automatically into the GE Digital APM database as OPC Tag records.

You may review the log files for this service at C:\ProgramData\Meridium\Logs.

8

On the GE Digital APM Server, configure the Meridium Notification Service for PDI.

This step is required.
9On the GE Digital APM  Server, start or restart the Meridium Notification Service.

This step is required.

You may review the log files for this service at C:\ProgramData\Meridium\Logs.
10Review the Process Data Integration data model to determine which relationship definitions you will need to modify to include your custom equipment and location families.This step is required only if you store equipment and location information in families other than the baseline Equipment and Functional Location families.
11

In GE Digital APM, link OPC Tags to related assets (i.e., equipment and functional locations).

This step is required.
12Complete various PDI administrative user tasks as necessary to manage the OPC Tags imported into GE Digital APM.This step is required.

Process Data Integration Server Roles

The following server roles are configured on the Process Data Integration Server in the GE Digital APM test environment.

Note: Roles and features can be added via the Add Roles and Features Wizard on a Windows Server machine. To add roles and features, in Server Manager, on the Manage menu, select Add Roles and Features to open the wizard. Select role-based or feature based installation and then continue through the wizard.

In the Server Roles section:

  • Application Server

In the Role Services section for the Application Server:

  • .NET Framework 4.5
  • TCP Port Sharing
  • Windows Process Activation Service Support

    • Message Queuing Activation, and all features
    • Named Pipes Activation, and all features
    • TCP Activation, and all features

Configure the Process Data Integration Service

About This Task

To use Process Data Integration, you must configure the Process Data Integration Service by modifying the file Meridium.PDI.Service.exe.config on the GE Digital APM Process Data Integration Server. If you installed the Process Data Integration Service in the default location, you can locate this file in the folder C:\Program Files\Meridium\Services.

Some modifications can be made using the APM System Administration tool and other modifications must be made by opening the file in an application that you can use to modify XML script (e.g., Notepad). The following instructions provide details on making all required modifications at one time, using both the APM System Administration tool and a text editor.

Note: This configuration file defines several endpoints on the Process Data Integration Server with URLs and ports that must be accessible from the GE Digital APM Server. You should ensure that your firewalls are configured to allow this access.

Procedure

  1. On the GE Digital APM Process Data Integration Server, access the APM System Administration tool
  2. In the APM System Administration window, in the Configuration section, select the PDI Service link.

    Some contents of the Meridium.PDI.Service.exe.config file appear to the right of the Configuration section.

  3. In the OPCDA and OPCHDA boxes, enter the values that identify your OPC Server.

    The following table contains the default values that identify the OPC Servers for the process historians that have been tested by GE Digital APM. We recommend, however, that you contact the third-party distributor of your process historian software to confirm the values that you should use for your system configuration.

    Process HistorianOPCDAOPCHDA
    OSIsoft® PI ServerOSI.DA.1OSI.HDA.1
    Matrikon Simulation toolMatrikon.OPC.Simulation.1Matrikon.OPC.Simulation.1
    IP21Aspen.Infoplus21_DA.1N/A
    MatrikonOPC HDA Server for IP21*Matrikon.OPC.IP21.1Matrikon.OPC.IP21.1
    Honeywell Uniformance® Process History Database (PHD)OPC.PHDServerDA.1OPC.PHDServerHDA.1

    *In the GE Digital APM testing environment, IP21 and MatrikonOPC for IP21 are installed on separate machines.

  4. In the OPCDAHOST and OPCHDAHOST boxes:
    • If the Process Data Integration Service and OPC software are installed on the same machine, leave these text boxes empty.

      -or-

    • If the Process Data Integration Service and OPC software are installed on different machines, enter the name or IP address of your OPC Server. Note that we do not recommend this configuration. For additional information, refer to the PDI system requirements.
  5. In the Tag Sync Interval box, replace the example value with the frequency (in hours) at which you want the tag synchronization to occur.
  6. In the Initial Tag Sync Time box, replace the example value with the date and time (in UTC) that you want the first scheduled tag synchronization to occur.
    Note: This value must be specified using the ISO 8601 standard for UTC date formats (i.e., the letters T and Z must be included), for example, 2014-01-01T04:00:00Z.
  7. In the Max Sync Time box, replace the example value with the maximum length of time (in hours) that you want to allow the tag synchronization to run.
    Note: The purpose of this setting is to stop a synchronization that is running significantly longer than expected (e.g., because it encountered an error) so that the synchronization will start over at the next scheduled time. Therefore, the maximum synchronization time that you allow should be longer than the length of time that it takes for tags to synchronize under normal circumstances and should account for known factors that may extend the synchronization time (e.g., network connection speed).
  8. At the bottom of the APM System Administration window, select the Save button.

    Your changes are saved to the file Meridium.PDI.Service.exe.config. You must now open the actual file to complete the service configuration.

  9. Select the Open File link.
  10. Within the <meridiumConnections> tags, uncomment the example connection tag by deleting <!--EXAMPLE: and the corresponding --> from the beginning and end of the string.
  11. Within the <meridiumConnections> tags, modify the attributes as described in the following table.
    Within this attribute...Make this changeNotes
    connection name
    Replace CONNECTION 1 with a name to identify the connection to the database.

    This value is used only by the configuration file. If you are configuring connections to multiple data sources, each connection name must be unique.

    applicationServer

    Replace APPSERVER_NAME with the name or IP Address of the GE Digital APM Server on which the data source specified in the datasource attribute is configured.

    None
    datasource Replace DATASOURCE_NAME with the name of the GE Digital APM database to which you want to connect.

    The data source value is case sensitive and should be typed exactly as it is defined for the GE Digital APM Server in the Data Sources section of Operations Manager.

    userId
    Replace SERVICE_USER_NAME with the User ID of the Security User whose credentials should be used to log in to the specified GE Digital APM database.
    The user you specify should be a member of the MI Process Data Integration Service Security Group.
    password

    Replace PaSsWoRd with the password for the specified user.

    Do not delete the ! in front of the password. This symbol is not part of the password itself. Instead, this symbol will cause the password to be encrypted automatically when the service is restarted.
    Important: If you need to change the password for the specified user, you should first stop the Process Data Integration service. Then, after changing the user’s password, update the password in this configuration file and restart the service. If you change the user’s password without restarting the service, the account will become locked.
    xiServers Replace OPC System1 with the value that exists in the OPC System ID field in an OPC System record in the GE Digital APM database. If multiple OPC System records exist to identify multiple OPC Servers, you can specify multiple values and separate them with a semicolon (e.g., "OPC System1;OPC System2").
  12. Save and close the file.

    When the Process Data Integration Service is started or restarted, your settings will be applied and the initial tag synchronization will occur.

Install the Process Data Integration Service

About This Task

The following instructions provide details on installing the Process Data Integration Service using the GE Digital APM Server and Add-ons installer.

Procedure

  1. On the machine that will serve as the Meridium Process Data Integration Server, access the GE Digital APMM distribution package, and then navigate to the folder \\Setup\Meridium APM Server and Add-ons.
  2. Double-click the file Setup.exe.

    The Welcome screen appears.

  3. Select Next.

    The License Agreement screen appears.

  4. Read the License Agreement and, if you agree, select the I accept the terms of the license agreement check box. Then, select Next.

    The Select Installation Location screen appears.

  5. Select Next to accept the default location.

    The Select the features you want to install screen appears.

  6. Select the Meridium Process Data Integration Service option.
    Note: While additional options are available for selection, these options are not meant to be installed on the Process Data Integration Server. These instructions assume that you want to install only the Meridium Process Data Integration Service software. When this software is installed, the GE Digital APM System Administration Tool will also be installed automatically.
  7. Select Next.

    GE Digital APM performs a check to make sure that your machine contains the required prerequisites for the features that you want to install.

    • If one or more prerequisites are missing on the machine, a dialog box will appear, explaining which prerequisites are missing. If this occurs, close the installer, install the missing prerequisite, and then run the installer again.
    • If all the prerequisites for the selected components are installed on the machine, or you have selected components that do not require any prerequisites, the Complete the Installation screen appears.
  8. Select Install.

    The Setup Status screen appears, which displays a progress bar that shows the progress of the installation process. After the progress bar reaches the end, a message appears, indicating that your server is being configured. After your server is configured, the Installation is Complete screen appears.

    You can also select to optionally launch the APM System Administration tool when the installer window closes.

  9. Select Finish.

Results

The installation is complete.

Upgrade the Process Data Integration Service

Procedure

  1. On the machine that will serve as the Meridium Process Data Integration Server, access the GE Digital APM  distribution package, and then navigate to the folder \\Setup\Meridium APM Server and Add-ons.
  2. Select the file setup.exe.

    A message appears, asking if you want to allow setup.exe to make changes to your machine.

  3. Select Yes.

    The Meridium APM Server and Add-ons installer appears, displaying the Preparing Setup screen. The Preparing Setup screen contains a progress bar that indicates when the installer is ready to upgrade the components on your machine.


    When the progress bar reaches the end, a message appears, asking if you want to upgrade your server.

  4. Select Yes.

    The Setup Status screen appears, displaying a progress bar that indicates the status of the upgrade process. After the progress bar reaches the end, the Maintenance Complete screen appears.

    You can also select to optionally launch the APM System Administration tool when the installer window closes.

  5. Select Finish.

Results

The upgrade is complete.

Configure the Meridium Notification Service for PDI

About This Task

For the Process Data Integration service to work correctly, you must configure the Meridium Notification Service by modifying the file Meridium.Service.Notification.exe.config on the GE Digital APM Server.

Procedure

  1. On the GE Digital APM Server, navigate to the folder where the Meridium Notification Service files are installed. If you installed the software in the default location, you can locate these files in the folder C:\Program Files\Meridium\Services.
  2. Open the file Meridium.Service.Notification.exe.config in an application that you can use to modify XML script (e.g., Notepad).
  3. If you have not done so already, complete any necessary basic configuration for the Meridium Notification Service.
  4. Within the <notification> tags, within the <notificationSettings>tags, uncomment the following text string (i.e., delete the <!-- and -->):

    <!-- <add key="server3" serverType="external" endPointName="pdiService"/> -->

Configure Multiple Data Sources

About This Task

For each unique GE Digital APM Server and data source combination that exists in your architecture, you must specify a separate connection string in the PDI Service configuration file. For example, if your system architecture contains two GE Digital APM Servers writing to the same database, regardless of whether the same or different data source names are specified on each, you need to configure two connection strings.

Procedure

  1. Configure the first connection by modifying the attributes within <meridiumConnections> tags, as described in the instructions for configuring the Process Data Integration Service.
  2. Copy the text within the <meridiumConnections> tags (e.g., <connection name="CONNECTION 1" applicationServer="" datasource="DATASOURCE_NAME" userId="SERVICE_USER_NAME" password="!PaSsWoRd" />)
  3. Directly after the text that you copied (after the />), paste the copied text.
  4. Modify the attributes as needed.
    Note: The connection name that you specify in each connection string must be unique.
  5. Repeat these steps for each required connection.

Configure Multiple Process Data Integration and OPC Servers

Depending on your specific system architecture, you may have multiple Process Data Integration and OPC Server machines.

The following diagram illustrates multiple OPC Servers in the standard configuration where the OPC Server is the same machine as the Process Data Integration (PDI) Server (i.e., the OPC Server software is installed on the PDI Server).


The following diagram illustrates multiple OPC Servers in an alternative configuration where the OPC Servers are separate machines from the PDI Servers.


In either of these scenarios, when you complete the first-time deployment steps for PDI, you must install and configure the Process Data Integration Service on each Process Data Integration Server machine.

Whether the OPC Servers are the same machine as the Process Data Integration Servers or not, in the GE Digital APM application, you will create an OPC System record for each OPC Server (e.g., OPCServer1 and OPCServer2). Then, when you configure the Process Data Integration Service, you must specify the appropriate OPC Server record in the xiServers attribute within the meridumConnections tags. For example, the connection string on each machine might look like this:

  • On the first Process Data Integration Server: <connection name="EXAMPLE_CONNECTION" applicationServer="APPSERVER_NAME" datasource="DATASOURCE_NAME" userId=" SERVICE_USER_NAME" password="!PaSsWoRd" xiServers="OPCSystem1" />
  • On the second Process Data Integration Server: <connection name="EXAMPLE_CONNECTION" applicationServer="APPSERVER_NAME" datasource="DATASOURCE_NAME" userId="SERVICE_USER_NAME" password="!PaSsWoRd" xiServers="OPCSystem2" />

Create a PDI Connection

Procedure

  1. Access PDI Systems , and then select New Connection.
    The PDI Systems: [New Connection] workspace appears.
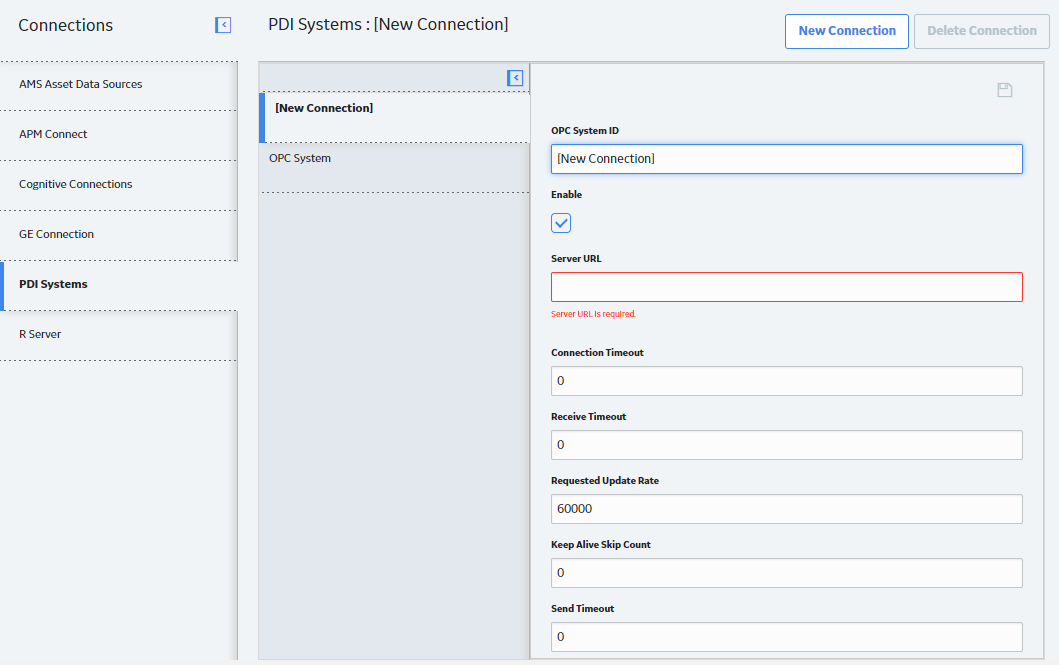

  2. On the PDI Systems: New Connection tab, complete the following fields in the [New Connection] section on the OPC Systems Record.
    • OPC System ID
    • Enable
    • Server URL
    • Connection Timeout
    • Receive Timeout
    • Requested Update Rate
    • Keep Alive Skip Count
    • Send Timeout
  3. Select .

Results

The PDI connection is created.