Webspace
Creating Shortcuts
Using a Custom Hyperlink Command to Open a Web Page
Procedure
- Open a web page in an editor.
- Choose the editor's Insert Hyperlink option.
-
Enter the address of the host, followed by the desired hyperlink parameters. Refer to the Summary of Command-line Options for a full list of available options. For example, to pass user in command line, enter:
http://WebspaceServerName/ProficyWebspace/iFIX.html?user=user_name - Save the page.
Modifying the Default Settings on the Start Menu Option
These steps describe how to modify the default settings on the Start menu for the Windows Desktop Client. Be aware that the install path for Webspace changed in version 6.0. If you have any shortcuts configured, you will need to update them to use the correct path. For instance, the previous version of the Webspace Client installed to the C:\Program Files (x86)\Proficy\Proficy Webspace Client\Client\ folder. In Webspace 6.2, the path for the client is C:\Program Files (x86)\Proficy\Proficy Webspace\Client folder.
Procedure
- On the Start menu, point to Programs > Proficy Webspace > Proficy Webspace.
- Right-click the Webspace Client and select Properties. The Webspace Client Properties dialog box appears.
-
On the Shortcut tab, in the Target field, add parameters you want to include after the path to Proficy.exe. Refer to the Summary of Command-line Options for a full list of available options. For example, this option will open the Windows Desktop Client with a server named MyServer, and includes command-line options for each program.
For iFIX:
For a specific picture, specify -r IFIX /ppicname.grf. Be aware that iFIX 5.5 and higher versions do not support the /ppicname.grf parameter in the command line."C:\Program Files (x86)\Proficy\Proficy Webspace\Client\Proficy.exe" -h MyServer -c -a iFIX -r IFIX /puserscreen.grfFor CIMPLICITY:"C:\Program Files (x86)\Proficy\Proficy Webspace\Client\Proficy.exe" -h MyServer -c -a CimView -r CIMVIEW "c:\screens\userscreen.cim" - Click OK to save your changes.
Creating a Desktop Shortcut for Windows Desktop Client
Be aware that the install path for Webspace changed in version 6.0. If you have any shortcuts configured, you will need to update them to use the correct path. For instance, the previous version of the Webspace Client installed to the C:\Program Files (x86)\Proficy\Proficy Webspace Client\Client\ folder. In Webspace 6.2, the path for the client is C:\Program Files (x86)\Proficy\Proficy Webspace\Client folder.
Procedure
- Right-click on the desktop, and select New and then Shortcut. The Create Shortcut dialog box appears.
- In the Create Shortcut dialog box, browse to the Webspace executable file: "C:\Program Files (x86)\Proficy\Proficy Webspace\Client\Proficy.exe"
-
Add parameters after the path to Proficy.exe. Refer to the Summary of Command-line Options for a full list of available options. For example, this option will open the Windows Desktop Client with a server named MyServer, and includes command-line options for each program.
For iFIX:
For a specific picture, specify -r IFIX /ppicname.grf. Be aware that iFIX 5.5 and higher versions do not support the /ppicname.grf parameter in the command line."C:\Program Files (x86)\Proficy\Proficy Webspace\Client\Proficy.exe" -h MyServer -c -a iFIX -r IFIX /puserscreen.grfFor CIMPLICITY:"C:\Program Files (x86)\Proficy\Proficy Webspace\Client\Proficy.exe" -h MyServer -c -a CimView -r CIMVIEW "c:\screens\userscreen.cim" -
Type a name for the shortcut and click Finish.
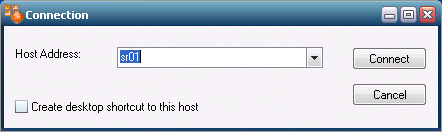
Tip: You can also create a Desktop shortcut automatically from the Connection dialog box. When you click on the Start menu, and point to Programs > Webspace Client > Webspace Client, a dialog box appears similar to the following figure. You can select the Create Desktop Shortcut to this Host option, as shown in the following dialog box.