Working With Microapps

About Microapps and Predix Development

Microapps are typically single-page Web applications with GUIs that address specific tasks to produce results. For example, you can create microapps to register users for training, or report system status or device space allocations.

With AppHub, you can combine microapps into a unified UI with a single point of entry. You can use the provided microapp reference applications to easily start building microapps using Node.js. Additionally, you can load any existing microapps into the AppHub content area. AppHub includes the index.html for each microapp in the content section in its template, and proxies any further resource requests directly to the microapp itself.

Microapp Approach

A single-page application uses Asynchronous JavaScript (AJAX) requests and HTML5 to create fluid and responsive user interactions without constant page reloads. However, much of this work running in a browser occurs as complex state transitions following the Model View Controller architecture (see Modern Web Application for more information):
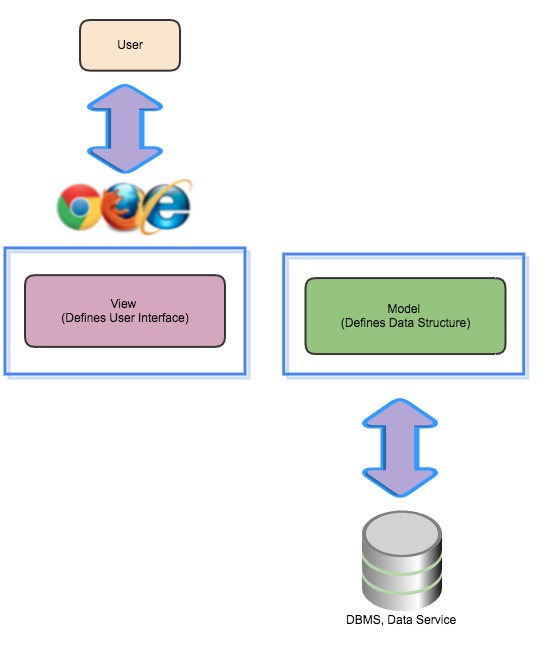
  • There are global state changes (such as going offline in a real time application) .
  • There are delayed results from AJAX requests that get returned at some point from back end operations
  • There are changes to the Model function as values change.
  • There are Domain Object Model (DOM) events that cause small state changes in the View function.
  • There are changes to the Controller function that cause state changes in the View function..

The microapp approach implements a conventional single-page application as a suite of microservices. Microservices are atomic, self-contained services that typically perform a single operation on a back-end system, such as a retrieving a customer record.

Figure: Microapp Approach

This means that microapps provide a range of capabilities that can be focused on specific tasks. For example, end users benefit from a View function that is tailored to their specific requirements.

Using Custom Microapps

You can create your own custom microapps or port existing microapps and easily integrate them with AppHub.

About This Task

AppHub provides a seed microapp that you can use to easily start building your own custom microapps. The seed microapp is a blank stub that you can use as a starting point for custom microapp development. You can also port existing microapps that fit AppHub technical requirements.

Before You Begin

To complete the following steps, be sure to log into the same Cloud Foundry environment you used to create your UAA and AppHub service instances.

Procedure

  1. Clone the repository for the seed microapp into your current working directory, change to the root directory of the cloned project, and check out the master branch.
    git clone https://github.com/predix/apphub-microapp-seed.git
    cd <seed-microapp-name>
    git checkout master
    Note: For more details, see the README files in the seed microapp repo.
  2. Develop your microapp in the coding language of your choice, or modify and port an existing microapp.
    Keep the following points in mind:
    • The index page for your microapp should be similar to this boilerplate HTML, and should not include <html> and <body> tags.
    • Do not use CORS (cross-origin resource sharing).
    • The look and feel of your microapp should be compatible with that of AppHub.
    Note: When developing or porting microapps, always use relative URLs with no leading slashes. In AppHub, a path is prepended to microapp URLs to distinguish them from \the other microapps running in the same instance. The HTML tag <script src="foo/bar"> loads correctly in AppHub, while the tag <script src="/foo/bar"> generates an error, because the path cannot be correctly prepended with AppHub URL information.
  3. Navigate to the root of the folder and install dependencies.
    npm install
    npm run bower
  4. Confirm that the buildpack, configuration details, and environment variables for your microapp are correctly listed in manifest.yml, and then in the services section, list the Predix services that your microapp uses, specifically the UAA and AppHub instances that you previously created.
    Note: The services listed in manifest.yml are automatically bound to your AppHub instance when you push the microapp to Cloud Foundry.
    ---
    applications:
      - name: my-apphub-microapp-react-px-polymer-example
        buildpack: https://github.com/cloudfoundry/heroku-buildpack-nodejs.git
        memory: 512M
        stack: cflinuxfs2
        instances: 2
        path: .
        command: node server
        services:
          - my-microapp-seed-px-react-ge-twitter-uaa
          - my-microapp-seed-ge-twitter-apphub
    
        env:
          NODE_ENV: 'production'
          REQUEST_LIMIT: 500kb
          SESSION_SECRET: mySecret
          COOKIE_NAME: myCookie
          SWAGGER_API_SPEC: /spec
  5. Start the NodeJS development server with Webpack middleware.
    npm run dev
  6. To confirm that the microapp is running locally, in a web browser, navigate to http://localhost:9000.
  7. Test client-server connectivity.
    npm test
    • test:client: Use this option for client-side testing using Jest with snapshots and code coverage.
    • test:server: Use this option for server-side testing using Mocha with code coverage.
  8. Build the microapp client and server for production.
    npm run dist
  9. From the root directory of your microapp, push your microapp to Cloud Foundry, and then confirm that the microapp is listed among the other apps in your Cloud Foundry environment.
    cf push
    cf apps

What To Do Next

You can now configure your microapp to AppHub. For more information, see app-hub-microapps.html#concept_9af7d6de-1a30-46cd-a9f6-9572c8444679.

About AppHub Microapp Configuration

After you create microapps, you must perform a few configuration tasks to associate them to your AppHub service instance.

You can choose to use ARCS (App Registry and Configuration Service) or a different configuration service to associate your microapps to your AppHub service instance. To make configuration requests, you use RESTful APIs for ARCS or your selected configuration service to configure microapps, tenants, themes, retrieval tokens, and so on. When you use ARCS as your configuration service, you can also make configuration settings by using the Settings microapp.

ARCS provides you with the ability to:

  • Configure and persist microapp information.
  • Configure and persist tenant configurations, for example, UAA, app name, logo, custom headers, themes, and so on.
  • Configure and persist microapp-to-tenant mapping.
  • Configure and persist microapp navigation information.
  • Configure and persist preferences.
  • Configure and persist details to retrieve user information.
  • Create users for UAA instances at the tenant level.
  • Map microapps to users or groups.
  • Grant or restrict microapp access at the tenant level.

Adding and Configuring Microapps

The Settings microapp, a UI that you can use to configure services via ARCS, will be available with the GA release of AppHub. With the beta release of AppHub, you can use ARCS from the command line or import a dedicated Postman collection to add and configure microapps.

Note: For details on supported ARCS endpoints, see the API documentation.

Procedure

  1. Copy the value of the predix_apphub_config_uri attribute in your AppHub service key, and use it for the {{arcsURL}} value in the next steps.
    cf service-key <apphub-service-instance-name> <apphub-service-key-name>
  2. POST your microapp to {{arcsUrl}}/apps with the correct header and body information.
    For example, to configure the react-polymer-px reference microapp:
    curl -X POST \
      {{arcsURL}}/apps \
      -H "authorization: Bearer {UAA_CLIENT_TOKEN}" \
      -H "content-type: application/json" \
      -H "predix-zone-id: {APPHUB_SERVICE_ZONE_ID}" \
      -d '[{	
    		"uri": "/apps/polymer-react",
    		"id": "polymer-react",
    		"host": "https://apphub-microapp-react-px-polymer-example.run.aws-usw02-pr.ice.predix.io",
    		"path": "/polymer-react",
    		"template": "/index.html",
    		"location": "main",
    		"navService": null,
    		"items": [{
    				"label": "Polymer-React-Seed",
    				"path": "/polymer-react/#"
    			}
    		],
    		"order": 4,
    		"default": false
    	}
    ]'
  3. Navigate to the AppHub URL listed in your AppHub service key, log in with your UAA user credentials, and verify that your microapp is properly configured and associated with your AppHub instance.