Get Started With AppHub

AppHub Service Setup

Specific accounts and software are required before you can complete the tasks needed to set up the AppHub service.

Before You Begin

Accounts

To use Predix services, you must have the following accounts.

Software
The following software is required to set up the AppHub service.
Table 1. Common Tools for Cloud Development
SoftwareVersionDescription
Cloud Foundry CLILatest stable binary versionYou use the Cloud Foundry CLI to deploy and manage applications and services. Download the latest stable binary from https://github.com/cloudfoundry/cli#downloads.
GitLatestDownload Git from https://git-scm.com/downloads.
Note: The command-line syntax provided throughout this documentation is for Macintosh or Linux environments. To use the same syntax in Windows environments, use Git Bash.

About AppHub Authentication

Authentication for the AppHub service is controlled by the designated trusted issuer and is managed by the User Account and Authentication (UAA) web service, in the same manner as for other Predix platform services. You must set up a UAA service instance as the trusted issuer before you can set up the AppHub service. For more information, see About the User Account and Authentication Security Service.

Task Roadmap

Complete these tasks to set up the AppHub service.

#Task Information
1(Optional) Configure your proxy settings.Depending on your location and network configuration, you might need to configure your proxy settings to access remote resources. See t_defining_proxy_connections_to_remote_resources.html#task_97cc6304-e168-459d-9952-a45708ff8361.
2Create a UAA trusted issuer.See Creating a Predix UAA Service Instance and Service Key.
3Create an OAuth2 client.See Creating an OAuth2 Client for AppHub.
4Create an AppHub service instance.See app-hub-get-started.html#task_dps_bvr_4cb.
6Create an AppHub service key.See app-hub-get-started.html#task_w2d_qms_4cb.

Creating a Predix UAA Service Instance and Service Key

About This Task

You can create up to 10 instances of the UAA service in your space. If you need additional instances, you must delete an older unused instance and create a new one.

Procedure

  1. Use the Cloud Foundry CLI to log into Cloud Foundry.
    cf login -a <API_Endpoint>
    Note: If you are a GE employee, you must use the cf login --sso command to log into Cloud Foundry. After you enter your SSO, you will receive a one-time passcode URL. Copy this URL and paste it in a browser to retrieve your one-time passcode. Use this code with the cf command to complete the CF login process.

    Depending on your Predix.io registration, the value of <API_Endpoint> is one of the following:

    • Predix US-West

      https://api.system.aws-usw02-pr.ice.predix.io

    • Predix US-East

      https://api.system.asv-pr.ice.predix.io

    • Predix Europe

      https://api.system.aws-eu-central-1-pr.ice.predix.io

    For example,

    cf login -a https://api.system.aws-usw02-pr.ice.predix.io
  2. Create a new predix-uaa service instance.
    cf create-service predix-uaa <service-plan> <uaa-instance-name> 
    -c '{"adminClientSecret":"<admin-client-secret>"}'

    where:

    • cf is an alias for the cloud foundry CLI command.
    • <service-plan> is the service plan you want to select for your UAA instance.
    • <uaa-instance-name> is the name you want to use for your UAA instance, for example, my-uaa-instance.
    • -c is used to specify additional parameters. <admin-client-secret> is the character string you want to use as the client secret for your UAA instance.
    Note: Cloud Foundry CLI syntax can differ between Windows and Linux operating systems. See the Cloud Foundry help for the appropriate syntax for your operating system. For example, to see help for the create service command, run cf cs.
    Your UAA instance is created with:
    • A client identifier (admin).
      Note: An admin client is created for bootstrap purposes. You can create additional clients to use with your application.
    • The client secret that you specified when you created the service.
  3. Create a new predix-uaa service key for the instance.
    cf create-service-key <uaa-instance-name> <uaa-instance-name>-service-key

    where:

    • cf is an alias for the cloud foundry CLI command.
    • <uaa-instance-name> is the name you previously specified for your UAA instance.
    • <uaa-instance-name>-service-key is the name you want to use for your UAA instance's service key, for example, my-uaa-instance-service-key.
  4. View the service key details.
    cf service-key <uaa-instance-name> <uaa-instance-name>-service-key
  5. To confirm successful UAA service instance creation, open a web browser, navigate to the dashboardUrl value in your UAA service key, and log into the UAA Dashboard with the admin client ID and client secret you defined for your new instance.

Creating an OAuth2 Client for AppHub

After you create a UAA service instance, you must create an OAuth2 client to manage user authentication and authorization for AppHub and create UAA users.

About This Task

You use the Client Management tab of the UAA Dashboard to create an OAuth2 client for AppHub, and then use the User Management tab to create users.

Procedure

  1. In the Predix.io Console view, select the space in which you created your UAA service instance.
  2. In the Service Instances page, select your UAA instance, and then select the Configure Service Instance option.
  3. Log into the UAA Dashboard with your admin client secret, and then select the Client Management tab.
    The Client Management tab has two views, Clients and Services . The Services view displays only the services bound to the UAA instance that you are currently confguring.
  4. Complete the Create Client form.
    FieldDescription
    Client IDSpecify a name for the OAuth2 client you are creating, for example, apphub-oauthclient.
    Authorized Grant TypesSelect the following grant types:
    • authorization_code: The client directs the resource owner to UAA, which in turn directs the resource owner back to the client with the authorization code.
    • client_credentials: The OAuth2 endpoint in UAA accepts the client ID and client secret and provides access tokens.
    • refresh_token: Refresh tokens are credentials used to obtain access tokens. For this grant type, UAA provides a refresh token that you can then use to obtain a new access token when the current access token becomes invalid or expires, or to obtain additional access tokens with identical or narrower scope.

    For more information on grant types, see RFC 6749.

    Client SecretSpecify the client secret. Be sure to make note of this password, which cannot be retrieved if lost.
    Confirm Client SecretRe-enter the client secret.
    Redirect URISpecify a URI (Unique Resource Identifier) to which to redirect the client after login or logout. When you use UAA as the service provider for your external identity provider. this value is provided for the /oauth/authorize and /logout endpoints.

    The Redirect URI value is required when you use the authorization_code grant type. This grant type uses the Redirect URI value as the endpoint or callback for your application that requires user authorization code.

    Unique Resource Identifiers consist of:
    • Access protocol, such as http or https
    • Domain or IP address
    • Access port, such as 80 or 443
    • Path

    When you create an OAuth2 client for AppHub, set Redirect URI to http://localhost:3000.

    ScopesScopes are permissions associated with an OAuth client to control user access to a resource through an application for the authorization_code grant type. By default, the admin client is assigned all required scopes. You can add scopes based on client requirements at creation time, or modify these settings later on.

    When you create an OAuth2 client for AppHub, the uaa.user scope is assigned by default. Do not add any other scopes at this time.

    For a list of available scopes, see Scopes Authorized by the UAA.

    AuthoritiesAuthorities are permissions for the client_credentials authorization grant type. These permissions are associated with an OAuth2 client when an application or API accesses a resource with its own credentials without user involvement.

    By default, the admin client is assigned all required authorities. You can add authorities based on client requirements at creation time, or modify these settings later on.

    When you create an OAuth2 client for AppHub, the uaa.user authority is assigned by default. Do not add any other authorities at this time.

    The list of authorities matches the list of scopes. For a list of available UAA scopes, see Scopes Authorized by the UAA.

    Note: Admin clients are not assigned the authority to change the user password by default. To change the user password, you must add the uaa.admin authority to your admin client.
    Auto Approved Scopes(Optional) These are scopes that can be automatically approved for the client without explicit approval from a resource owner. When you create an OAuth2 client for AppHub, leave this field empty.
    Allowed Providers(Optional) These are the names of the external identity providers, if any. This field is required if you use external identity providers with UAA as a service provider. When you create an OAuth2 client for AppHub, leave this field empty.
    Access Token Validity(Optional) This is the access-token expiration time in ms. When you create an OAuth2 client for AppHub, leave this field empty.
    Refresh Token Validity(Optional) This is the refresh-token expiration time in ms. When you create an OAuth2 client for AppHub, leave this field empty.
  5. Click Save, and then in the User Management tab, click Create User.
  6. Complete the New User form.
    FieldDescription
    Regular UserChoose this option to create local users in your UAA instance when you are not using an external identity provider (IdP).
    Shadow UserChoose this option to create local users in UAA that correspond to users defined in your external IdP. This is useful if you need to create a whitelist to authenticate only a subset of users set up in your identity provider. For more information, see configuring a new IdP.
    User NameSpecify a username. If you are creating a shadow user, this value must match the user name defined in your IdP.
    EmailSpecify an email address. If you are creating a shadow user, this value must match the email address defined in your IdP.
    PasswordSpecify a password. Administrators can set password policies. For more information, see create-pswd-policies.html#task_gdk_f43_fx.

    This option is not required if you are creating a shadow user.

    Given Name(Optional) Specify the user's first name.
    Family Name(Optional) Specify the user's last name.
    OriginSpecify the IdP to which this user is configured. This option is available only when you create a shadow user.
    GroupsWhen you create an OAuth2 client for AppHub, leave this field empty.

    For more information on groups, see uaas-managing-users.html#task_vgj_vcy_1x.

    ActiveSelect this option to allow the newly created user to log in.
    VerifiedSelect this option to verify this user with an autogenerated email invitation sent from UAA at the time of account creation.

Creating a Predix AppHub Service Instance

Before You Begin

To complete this task, you must first create a UUA service instance, create an OAuth2 client, and add users.

Procedure

  1. Use the Cloud Foundry CLI to log into Cloud Foundry.
  2. Copy the required JSON payload template in the following example, add appropriate values, and save the file.
    {
        "uaa": {
            "uaaUri": "",
            "clientID": "",
            "clientSecret": ""
        },
        "routeInfo": {
            "hostName": "",
            "shared": true/false,
            "context": ""
        },
        "appConfigURL": "",
        "customHeader": {},
        "applicationChrome": true/false,
        "apphubKey": ""
    }
    Table 2. JSON Payload Values
    KeyValueRequired
    uaaArray of uaaUri, clientID, and clientSecretn/a
    uaaUriThe URI of your UAA service instance.Yes
    clientIDThe login username for the UAA client.Yes
    clientSecretThe client secret for the UAA client.Yes
    routeInfoArray of hostName, shared, and contextn/a
    hostNameThe host server for your UAA instance. Specify a string that includes only alphanumerics, hyphens, and underscores.Yes
    sharedtrueor false.Yes
    contextIf shared is set to true, this value must also be set to true. If not, this value is optional and can be left blank.Yes if shared is set to true, No otherwise.
    appConfigURLThe URL for any service that returns the JSON payload required to AppHub to render the UI. If not specified, this value defaults to ARCS.

    For more information about ARCS, see app-hub-microapps.html#concept_9af7d6de-1a30-46cd-a9f6-9572c8444679.

    No
    customHeaderIf specified, this value must be a valid JSON object.No
    applicationChrometrue or false.Yes
    apphubKeyThe service key for your AppHub instance.No
  3. Create a new predix-apphub service instance.
    cf create-service predix-apphub <service-plan> <apphub-instance-name> -c <payload.json>

    where:

    • cf is an alias for the cloud foundry CLI command.
    • <service-plan> is the service plan you want to select for your AppHub instance. The available plans for AppHub are Beta and Standard.
    • <apphub-instance-name> is the name you want to use for your app instance, for example, my-apphub-instance.
    • -c is used to specify additional parameters. <payload.json> is the fully qualified path to the JSON file you created in the previous step.
    Note: Cloud Foundry CLI syntax can differ between Windows and Linux operating systems. See the Cloud Foundry help for the appropriate syntax for your operating system. For example, to see help for the create service command, run cf cs.

Creating an AppHub Service Key

About This Task

You can retrieve your AppHub service instance details by creating a service key. You can then update your OAuth client with the information that you retrieve.

Procedure

  1. Use the Cloud Foundry CLI to log into Cloud Foundry.
  2. Create the AppHub service key.
    cf create-service-key <apphub-instance-name> <apphub-instance-name>-service-key

    where:

    • <apphub-instance-name> is the name of your AppHub service instance.
    • <apphub-instance-name>-service-key is the name of the AppHub service key.
    Note: Cloud Foundry CLI syntax can differ between Windows and Linux operating systems. See the Cloud Foundry help for the appropriate syntax for your operating system. For example, to see help for the create service command, run cf cs.
  3. View your newly created AppHub service key.
    cf service-key <apphub-instance-name> <apphub-instance-name>-service-key
  4. Log into the UAA Dashboard for your UAA service instance, and then in the Client Management tab, select the OAuth2 client you created for your AppHub instance and add the following details from your AppHub service key:
    • Scope: The value of the oauth-scope attribute.
    • Auto Approved Scope: The value of the oauth-scope attribute.
    • Authorities: The value of the oauth-scope attribute.
    • Redirect URI: The value of the predix_apphub_url attribute.
  5. Confirm that your AppHub service instance is authorized as a service within your UAA client. If needed, in the Choose Service box, add the instance manually.
    Figure: UAA Dashboard
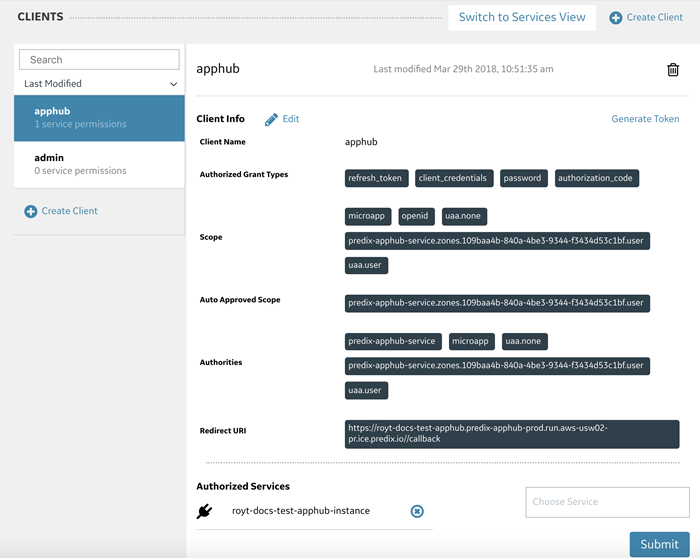
  6. Copy the value of the oauth-scope attribute from your AppHub service key, and then in the User Management tab, paste the value into the Groups field for each user.
  7. Navigate to the predix_apphub_url value from your AppHub service key and log in as one of the UAA users you previously created.
    An AppHub page appears with only the default Settings microapp configured if you are using ARCS as your backend configuration service. For more information about ARCS, see app-hub-microapps.html#concept_9af7d6de-1a30-46cd-a9f6-9572c8444679.

What To Do Next

You can now add microapps and configuration settings to your AppHub instance. For more information, see About AppHub Microapp Configuration.