Get Started
Analytics Framework Service Setup
Like other Predix platform services, authentication access to Analytics Framework is controlled by the designated trusted issuer and managed by the User Account and Authentication (UAA) web service. A UAA service instance must be already set up as the trusted issuer before getting started with the Analytics Framework service.
If you want to create a new Analytics Framework service instance, start with Task Roadmap: Setting Up Analytics Framework Service Instance.
Integrating with Analytics Framework
The Predix Analytics Framework service can be integrated with Time Series and/or Asset Data services to provide reading/writing data capability. If you want to integrate these services together, create your Predix Asset and Time Series service instances before creating your Analytics Framework service instance. Once completed, you can run cf update-service command to configure these services to be used together. The following configuration parameters must be added to "dependentServices" list and added to UAA client ID for scheduler (either scope or authorities or both)
| Service | Required Value | Information |
|---|---|---|
| Predix Asset | Predix asset zone id | Provide the dependent Predix Asset service instance zone id. The zone id can be found by running the command cf service <asset-instance-name> --guid |
| Predix Time Series | Predix timeseries zone id | Provide the dependent Predix Time Series service instance zone id. The zone id can be found by running the command cf service <timeseries-instance-name> --guid |
For more information about configuration changes needed when integrating with Predix Asset and Time Series, see Updating an Analytics Framework Service Instance and Configuring an OAuth2 Client for Predix Asset and Time Series Integration.
Task Roadmap: Setting Up Analytics Framework Service Instance
A task roadmap provides the recommended order of steps to complete a process and serves as a planning guide. Use the following roadmaps as a guide for creating your Analytics Framework service instance.
This service can be created either using the Predix console or from the command line.
Prerequisites
| No. | Task | Information |
|---|---|---|
| 1. | Familiarize yourself with Predix platform concepts | See What is Predix Platform? |
| 2. | Set up your Predix development environment | See Task Roadmap: Predix Development Environment Setup |
| 3. | Create the Predix Hello World application if you do not have your own application. | See Creating and Deploying a Simple Web App to Cloud Foundry Tip: You will later bind your service instance to an app to provision service details in the VCAP_SERVICES environmental variable. Cloud Foundry runtime uses the VCAP_SERVICES environment variable to communicate with a deployed application about its environment |
| 4. | Configure the trusted issuer. | See Creating a UAA Service Instance Tip: () service is the authorization server that Predix platform services use for authentication. The maximum number of instances that you can create in your space is 10. As a best practice, use the same instance with each of your services. |
Task Roadmap: Setting Up an Analytics Framework Service Instance
| No. | Task | Information |
|---|---|---|
| 1. | Create the service instance |
Note: The Analytics Framework requires three dedicated OAuth2 clients to fully manage service features. Save the client id and client secret values provided during service creation for future use.
|
| 2. | Review the OAuth2 client recommendations | See OAuth2 Client Recommendations for Analytics Framework Service |
| 3. | Create the OAuth2 clients | See Creating an OAuth2 Client |
| 4. | Configure the OAuth2 clients to manage authentication for the service | See
|
| 5. | (Optional, only if integrated with Predix Asset and/or ) Update the dependent services list | See Updating an Analytics Framework Service Instance |
| 6. | Bind your application to the service instance | See Binding an Application to an Analytics Framework Instance |
| 7. | Create a service key for access when outside the Cloud Foundry environment | See Creating Service Keys |
| 8. | Verify the binding and retrieve the environment variables values | See Verifying the Binding |
About the Postman Collections for Analytics Services
You can use Postman to test your analytics service REST API requests.
Sample requests for all analytics services APIs can be found in the Postman collections provided for your use. These Postman collections can be used as is or customized to test your service REST API requests when developing your application. Follow the instructions at https://github.com/PredixDev/predix-analytics-sample/tree/master/postman to import these collections and to configure your Postman environment to connect to your service instances.
OAuth2 Client Recommendations for Analytics Framework Service
The Analytics Framework requires two dedicated OAuth2 clients to fully manage all service features. You can use the UAA Dashboard (Client Management tab) or the UAA command-line interface (UAAC) to create and configure a client for the framework.
is the identity management service used to authenticate users and register OAuth2 clients for Predix platform. It acts as an OAuth2 provider, issuing tokens for client applications to use when acting on behalf of Predix cloud users. Before using any Predix platform service, you must first set up a service instance to act as your trusted issuer. All access to the Predix service will be authenticated by its designated trusted issuer.
When you create the service instance, an admin client is created for bootstrap purposes. While you can use this admin client to manage your Analytics Framework service instance, you will need a total of two clients to manage all features effectively. It is recommended you use two dedicated OAuth2 clients to manage the Analytics Framework service and features.
As part of service instance creation, you will provide three separate client id and client secret values.
- Analytics Framework client: The OAuth2 client for the framework service instance. You can use the
adminclient for the UAA instance acting as the authenticator for the Analytics Framework service instance, or create a new dedicated client. - Scheduler feature client: A dedicated OAuth2 client for the scheduler feature. Save the client id (Runtime client id) and client secret (Runtime client secret) values for future use.
Whenever a new OAuth2 client is created, the client is assigned default scopes and authorities. You will configure the additional authority and scope settings specific to the framework as a separate step. For example, each client requires specific Authorized Grant Types and Refresh Token Validity settings be configured.
For more information and instructions, see Creating an OAuth2 Client.
Passing Configuration Parameters Using a File
When creating or updating an Analytics Framework service instance, you can pass the configuration parameters in a file instead of as a single line.
For example, when creating the Analytics Framework instance, your configuration file may resemble the following.
{
  "trustedIssuerIds": [
    "<uaa_instance_issuerId>"
  ],
  "runtimeClientId": "<my_runtime_client_id>",
  "runtimeClientSecret": "<my_runtime_client_secret>",
  "predixAssetZoneId": "<my_predix_asset_zone_id>",
  "predixTimeseriesZoneId": "<my_predix_timeseries_zone_id>"
}
When using this method you can pass the path to the file after the -c command when using either create or update. For example:
cf update-service <my_service_instance> -c myFile.txtCreating an Analytics Framework Service Instance
Create a new service using Predix console as follows. Alternatively, you can create the service from the command line.
Procedure
Using the Command Line to Create an Analytics Framework Service Instance
Create a new service instance using the command line as follows. Alternatively, you can create the service from Predix Console using the New service instance page.
Before You Begin
Ensure you have completed all Prerequisites described in Task Roadmap: Setting Up Analytics Framework Service Instance.
Create an Analytics Framework service instance as follows.
The following command assumes you want to configure framework optional features (that is, scheduler) and are integrating with Predix Asset and Time Series services. Omit any values not required for your environment. This command is not additive, the configuration parameters must contain the complete configuration details, including information previously configured that remains unchanged.
cf create-service predix-analytics-framework <plan> <my_framework_instance> -c '{ "trustedIssuerIds": [ "<uaa_instance_issuerId>" ], "runtimeClientId": "<my_runtime_client_id>", "runtimeClientSecret": "<my_runtime_client_secret>", "predixAssetZoneId": "<my_predix_asset_zone_id>", "predixTimeseriesZoneId": "<my_predix_timeseries_zone_id>"}'
Where
| Feature | Parameter | Description | |
|---|---|---|---|
| 1. | trustedIssuerIds | The trusted issuer ids for your UAA instance. | |
| 2. | Scheduler | runtimeClientId | Non-admin UAA client id to be used for running scheduled jobs. Should have non-expiring refresh token. You can create a dedicated UAA client. If you are creating this client for the first time, see Configuring an OAuth2 Client for Scheduler Using UAAC. |
| 3. | Scheduler | runtimeClientSecret | Corresponding UAA client secret to be used to generate tokens for running scheduled jobs. Both (2) and (3) are required to configure scheduler feature. |
| 4. | Predix Asset integration | predixAssetZoneId | Predix Zone ID for the dependent Predix Asset instance. Is needed only if your runtime uses a Predix Asset model for running orchestrations. You can look up the zone id by running: "cf service <my_asset_instance> --guid". |
| 5. | Predix Time Series integration | predixTimeseriesZoneId | Predix Zone ID for the dependent Predix Time Series instance. Is needed only if your runtime uses Predix Time Series as a data source when running orchestrations. You can lookup the zone id by running: "cf service <my_timeseries_instance> --guid". |
Configuring an OAuth2 Client for Analytics Framework
Analytics Framework requires three dedicated OAuth2 clients to fully manage all service features. Configure the OAuth2 clients to manage authentication for the service.
Before You Begin
The OAuth2 clients should be already created. For more information, see OAuth2 Client Recommendations for Analytics Framework Service.
About This Task
When you create a new OAuth2 client, the client is assigned default scopes and authorities. You must add additional authorities or scopes that are specific to Analytics Framework service. When using the UAA Dashboard to create additional clients, the client is created with the default client_credentials grant type. Some required authorities and scopes are automatically added to the client.
Use UAA Dashboard to configure the OAuth2 clients with additional authorities and scopes that are specific to Analytics Framework service. For detailed steps describing how to use UAA Dashboard, see Updating the OAuth2 Client for Services.
To use UAA command-line interface (UAAC) to configure the clients, see Configuring an OAuth2 Client for Scheduler Using UAAC.
Procedure
Configuring an OAuth2 Client for Scheduler Using UAAC
Before You Begin
This procedure uses the UAA Command Line Interface (UAAC). For more information on installing UAAC, see https://github.com/cloudfoundry/cf-uaac.
About This Task
The service provides an optional scheduler feature that must be configured separately if you plan to schedule an orchestration execution request (also called a job). When scheduling a job in a multi-tenant environment, the request must contain an OAuth2 token with sufficient privileges to schedule and execute the job.
In a multi-tenant environment, a tenant is an application or a group of users that share resources such as data, configuration, and user management. The tenants are logically isolated but physically integrated. That means even if the tenants use the same underlying resources, their data is isolated from each other. All users of a tenant have specific privileges to access the resources associated with that tenant. Each tenant can potentially use multiple service instances. The service instances are specific to the tenant.
When a scheduled job is triggered, the scheduler makes a REST API call to the job execution endpoint configured in the job request body. If the job execution endpoint is secured by OAuth2, the scheduler must be trusted with an OAuth2 client that is authorized to access the job execution endpoint
To configure authorization for job execution with refresh_token, the process is as follows:
Procedure
Configuring an OAuth2 Client for Predix Asset and Time Series Integration
About This Task
When a service scope is protected by UAA, the scope controls what type of access is allowed to the service. All scopes for the service being integrated together must be registered with UAA.
Update your JSON Web Toke (JWT) to include the following scopes:
analytics.zones.<analytics-framework-instance-id>.user
timeseries.zones.<timeseries-service-instance-id>.ingest
timeseries.zones.<timeseries-service-instance-id>.query
timeseries.zones.<timeseries-service-instance-id>.user
predix-asset.zones.<asset-data-service-instance-id>.user
The OAuth2 client uses an authorization grant to request an access token. OAuth2 defines four grant types. Based on the type of authorization grant used, you must update your OAuth2 client to generate the required JWT. For more information on how the OAuth2 client is created, see Creating an OAuth2 Client. For detailed steps to update the OAuth2 token to access your service instance, see Updating the OAuth2 Client for Services.
Validating an OAuth2 Client for Scheduler
Before You Begin
A dedicated OAuth2 client for scheduler must be already set up as described in Configuring an OAuth2 Client for Scheduler Using UAAC.
Procedure
Updating an Analytics Framework Service Instance
You can update your Analytics Framework service instance to add functionality by running the cf update-service command with the new configuration parameters.
These parameters can also be provided in a text file. For an example, see Passing Configuration Parameters Using a File.
To update your existing Analytics Framework service instance, choose from the following.
cf env command on the application bound to the service. Client secrets will not be shown.- To add the scheduler feature, supply the
runtimeClientIdandruntimeClientSecretparameters as shown. The following example assumes thetrustedIssuerIdsparameter was supplied when your Analytics Framework instance was created.cf update-service predix-analytics-framework <plan> <my_service_instance> -c '{"trustedIssuerIds": [ "<uaa_instance_issuerId>" ], "runtimeClientId": "<my_runtime_client_id>", "runtimeClientSecret": "<my_runtime_client_secret>" }' - To add Predix Asset service, Time Series service, and scheduler feature, supply the
runtimeClientId,runtimeClientSecret,predixAssetZoneId, andpredixTimeseriesZoneIdparameters as shown.cf update-service predix-analytics-framework <plan> <my_service_instance> -c '{"trustedIssuerIds": [ "<uaa_instance_issuerId>" ], "runtimeClientId": "<my_runtime_client_id>", "runtimeClientSecret": "<my_runtime_client_secret>", "predixAssetZoneId": "<my_predix_asset_zone_id>", "predixTimeseriesZoneId": "<my_predix_timeseries_zone_id>"}' - If you are using external data sources during orchestration execution and your external data service is authenticated by credentials other than the OAuth2 token used in the orchestration request, supply the
externalServiceparameters as shown. If not provided, access to the external data source defaults to the OAuth2 token used in the orchestration request.cf update-service predix-analytics-framework <plan> <my_service_instance> -c '{"trustedIssuerIds": ["<uaa_instance_issuerId>", "<uaa_instance2_issuerId>"], "predixTimeseriesZoneId": "<my_predix_timeseries_zone_id>", "predixAssetZoneId": "<my_predix_asset_zone_id>", "externalServiceUaaUrl": "<uaa_url>", "externalServiceClientId": "<client_id>", "externalServiceClientSecret": "<client_secret>", "externalServiceUsername": "<username>", "externalServicePassword": "<password>", "externalServiceCustomHeaders": ["header1:value1", "header2:value2"]}'
Where
| Parameter | Description |
|---|---|
<plan> | The plan associated with a service. |
<my_service_instance> | The name of your service instance. |
<uaa_instance_issuerId> |
|
"predixTimeseriesZoneId", "predixAssetZoneId" | If integrating with Predix Asset and Time Series services, provide their IDs. |
"runtimeClientId", "runtimeClientSecret" | Values used during the job execution by the Predix Analytics Scheduler to obtain the OAuth2 token in order to authenticate the job execution. Set up an OAuth2 client in your trusted issuer and provide the client credentials. |
A set of "externalService" parameters | Used to define credentials for external data sources.
|
cf env command is run.Creating Service Keys
You can create service keys in order to retrieve service details needed to access the Analytics Framework APIs from outside the Cloud Foundry environment.
About This Task
- Bind – Bind an existing application running in Cloud Foundry to your Analytics Framework instance, then retrieve service details from VCAP_SERVICES environmental variable. See Binding an Application to an Analytics Framework Instance.
- Create Service Keys – To access the API for your service instance when outside the Predix cloud environment, create a service key and retrieve the service details needed. Use the following steps.
Procedure
Binding an Application to an Analytics Framework Instance
Binding your Analytics Framework service instance to your application provisions connection details in the VCAP_SERVICES environment variable. Cloud Foundry runtime uses VCAP_SERVICES environment variable to communicate with a deployed application about its environment.
Before You Begin
The application must have been deployed (cf push) to Cloud Foundry. If you do not have an application of your own, you can create the Predix Hello World app and use that.
About This Task
- Bind – Bind an existing application running in Cloud Foundry to your Analytics Framework instance, then retrieve service details from VCAP_SERVICES environmental variable. Use the following steps.
- Create Service Keys – Create a service key and retrieve the service details needed to access the UI and the API for your service instance when outside the Predix cloud environment. See afs-get-started.html#task_5f8f5acf-6e2d-463f-bfde-5bd32a2fba16.
To bind the service instance to your application, enter the following command.
cf bind-service <app_name> <my-framework-instance>Your application is bound to <my-framework-instance>, and a message similar to the following is returned:
Binding service <my-framework-instance> to app <app_name> in org <org_name> / space <space_name> as [email protected]...
OK
TIP: Use 'cf restage' to ensure your env variable changes take effect
To unbind the service instance from your application, enter the following command.
cf unbind-service <app_name> <my-framework-instance>Verifying the Binding
After an application is bound to the service, you can retrieve details about the instance from VCAP_SERVICES environmental variable.
Before You Begin
Your Analytics Framework service instance is already bound to your application. See Binding an Application to an Analytics Framework Instance.
cf env <app_name>Messages similar to the following are returned, depending upon how your service instance is configured.
System-Provided:
{
 "VCAP_SERVICES": {
  "predix-analytics-framework": [
   {
    "credentials": {
     "catalog_uri": "<catalog_uri>",
     "config_uri": "<config_uri",
     "configurations": {
      "predix_asset_zone_id": "<my_asset_zone_id>",
      "predix_timeseries_zone_id": "<my_timeseries_zone_id>",
      "runtime_client_id": "<my_runtime_client_id>",
      "trusted_issuer_ids": "<my_trusted_issuer_id>"
     },
     "execution_uri": "<execution_uri>",
     "monitoring_uri": "<monitoring_uri>",
     "scheduler_uri": "<scheduler_uri>",
     "zone-http-header-name": "Predix-Zone-Id",
     "zone-http-header-value": "<my_predix_zone_id>",
     "zone-oauth-scope": "analytics.zones.<my_predix_zone_id>.user"
    },
    "label": "predix-analytics-framework",
    "name": "<my_framework_instance>",
    "plan": "Tiered",
    "provider": null,
    "syslog_drain_url": null,
    "tags": [],
    "volume_mounts": []
   }
  ]
 }
}
You can retrieve the following Analytics Framework service instance details from the VCAP_SERVICES environment variable.
| Parameter | Description |
|---|---|
| catalog_uri | Contains the URI for this Analytics Framework service instance |
| config_uri | Contains the URI for this Analytics Framework Configuration microservice instance. This base URI should be used for all Configuration API calls (where the endpoint starts with "/api/<version_number>/config") |
| predix_asset_zone_id | The dependent Predix Asset service instance zone id. |
| predix_timeseries_zone_id | The dependent Predix Time Series service instance zone id. |
| runtime_client_id | The non-admin UAA Client ID being used for running scheduled jobs. |
| trusted_issuer_ids | |
| execution_uri | Contains the URI for this Analytics Framework Execution microservice instance. This base URI should be used for all Execution API calls (where the endpoint starts with "/api/<version_number>/execution") |
| monitoring_uri | Contains the URI to analytics monitoring microservice. This base URI should be used for Monitoring API calls (where the endpoint starts with "/api/<version_number>/monitoring") |
| scheduler_uri | Contains the URI for this Analytics Framework Scheduler microservice instance. This base URI should be used for all Scheduler API calls (where the endpoint starts with "/api/<version_number>/scheduler") |
| zone-http-header-name | Name of the header to include in any Analytics Framework service request |
| zone-http-header-value | Value of the header to include in any Analytics Framework service request |
| zone-oauth-scope | This scope is required in the end-user token to access a specific Analytics Framework instance |
Obtaining an OAuth2 Access Token for Analytics Services
Predix services are protected by UAA. You must use an Authorization header to pass the OAuth2 access token when issuing REST requests to your service instance. Follow this process to obtain an OAuth2 access token.
Issue the following REST API request.
POST <uaa_instance_issuerId>Where <uaa_instance_issuerId> is the issuerId of the trusted issuer (UAA instance) provided when the service instance was created. For example, https://13fa0384-9e2a-48e2-9d06-2c95a1f4f5ea.predix-uaa.run.aws-usw02-pr.ice.predix.io/oauth/token.
The request should contain the following header.
- Header name: "
Authorization" - Header value: “
Basic <Base64(client_id:client_secret)>”Where <
Base64(client_id:client_secret)> is the Base64-encoded string containing the<client_id>:<client_secret>. For example, if<client-id>is my-client-id and<client-secret>is my-client-secret, the base-64 encoded string my-client-id:my-client-secret becomesbXktY2xpZW50LWlkOm15LWNsaWVudC1zZWNyZXQ=. The entire header value becomes "Basic bXktY2xpZW50LWlkOm15LWNsaWVudC1zZWNyZXQ=".
The request body should be URL-encoded. Its contents depend on the authorization grant type you have configured in your UAA instance.
- Client Credential Type
-
For a client credentials grant type, the body must contain the following:
grant_type=client_credentials.
- Password Grant Type
-
For a password grant type, the body must contain the following:
grant_type=passwordusername=<my_user_name>password=<my_password>
The response will contain the following structure.
{
  "access_token":<generated_access_token>,
  "token_type":"bearer",
  "expires_in":3600
}
You must use the <generated_access_token> value in the header of the REST requests made to the service.
Configuring REST Request Headers
The Analytics Framework service REST API endpoints provide a JSON interface for passing data. The application makes HTTPS requests to these API interfaces.
About This Task
All REST requests must contain the following headers for multi-tenant support (provided by Predix UAA Service). Whenever the application makes a call to the service, these headers identify which tenant the application belongs to and must be configured as follows.
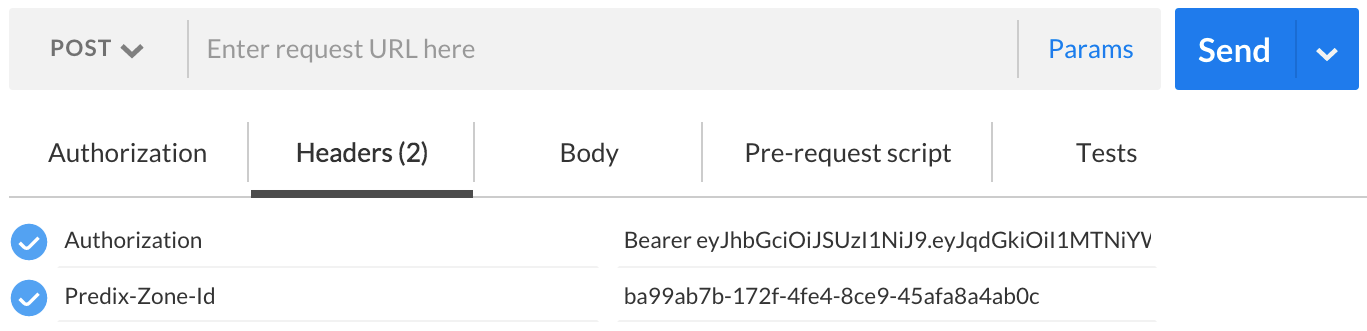
- UAA Authorization
-
- Header name: "
Authorization" - Header value: "Bearer <token obtained from trusted issuer>". For more information, see Obtaining an OAuth2 Access Token for Analytics Services.
- Header name: "
- Predix Zone
-
- Header name: The
zone-http-header-namefrom the VCAP_SERVICES environment variable for your Analytics Framework instance. For example,Predix-Zone-Id. - Header value: The
zone-http-header-valuefrom the VCAP_SERVICES environment variable for your Analytics Framework instance. For example,ba99ab7b-172f-4fe4-8ce9-45afa8a4ab0c.
- Header name: The
The following figure shows an example of how to set up the headers for a REST request in Postman.
For information about retrieving VCAP environment variables, see Verifying the Binding.
Deleting an Analytics Framework Service Using REST APIs
You must first delete all subscription analytics from the Analytics Catalog before you delete the Analytics Framework service instance.