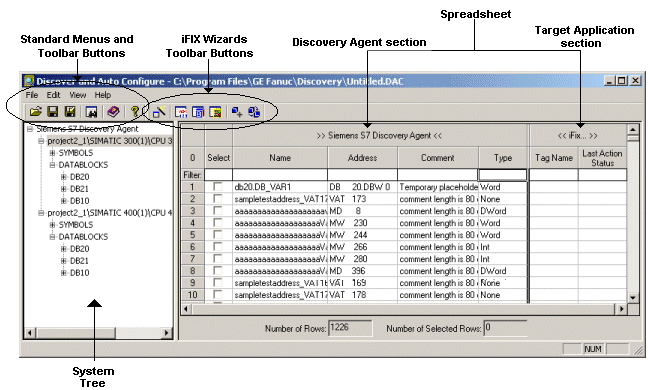
The Discover and Auto Configure application is composed of a system tree and a spreadsheet, as well as toolbars and menus. Using each of these components, you can search for and select the tags you want to add to your target application database, as well as define valid tag names and other tag features explicit to your target database. The following diagram shows examples of the different components with tag information extracted from a Siemens S7 project and iFIX as the target application.

Discover and Auto Configure Application
For more information about the standard toolbars and menus, refer to Toolbars and Menus.
When you are working in the spreadsheet, you may find that the number of extracted tags is too great to process in one sitting. Therefore, you have the opportunity to save your work and exit the application, then reopen the file and continue working on it at another time. If you make changes to the spreadsheet (for example, create tag names), and do not save your work before exiting the application, you are prompted to save your work as a .DAC file. For more information, see To save a .DAC file.
It is also possible that the source of your tag information has changed since you performed the tag extraction. If this is the case, you have the ability to rerun the Discovery Agent to extract the tag information from the source again. You can also use this feature to run the Discovery Agent tool on a new source to display the differences between them. For more information, see Rerunning the Discovery Agent for a Siemens .S7P Project or Rerunning the Discovery Agent for an OPC Server.
The Discover and Auto Configure provides a number of ways to search for tags displayed in the spreadsheet. Searching can be accomplished by using one of the following features:
The System Tree
The system tree displays the tags extracted by the Discovery Agent. The following diagram is an example of the system tree showing the tags extracted from a Siemens S7 project file. Tags extracted by the Siemens S7 Discovery Agent are categorized by the PLC programming software. The project file is separated into two programs according to the CPU information. Each program has a separate list for its symbols and datablocks. You can select the CPU level to display all symbols and datablocks for that CPU, or you can expand each level to select an individual symbol or datablock to display in the spreadsheet.

Discover and Auto Configure System Tree for a Siemens .S7P project
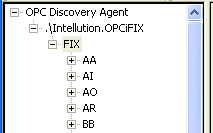
When you use the OPC Discovery Agent, the individual tag information does not automatically display in the system tree; only the top level initially displays. This is because when the Discover Agent retrieves all of the data from a remote machine the process can be slow due to large amounts of information. As you expand each level, the OPC Discovery Agent gets and displays the data for that level.
Remote OPC Server
The following figure displays an example of the system tree showing the tags extracted from a remote OPC server.

Discover and Auto Configure System Tree for a Remote OPC Server
When the information for a remote OPC server displays in the system tree, the remote machine name or TCP/IP address is appended to the OPC server name. In the above example, 3.26.61.47 represents the TCP/IP address of the remote machine that the OPC server resides on. When you use an OPC server located on a remote machine, the system tree display uses the format <ipaddress>\<OPC server name> or <machine name>\<OPC server name>. The remote machine name or TCP/IP address is entered in the Select Local or Remote OPC Server page of the Discovery Agent Selection Wizard.
Local OPC Server
The following figure displays an example of the system tree showing the tags extracted from a local OPC server.

Discover and Auto Configure System Tree for a Local OPC Server
When the information for a local OPC server displays in the system tree, the display format is <.>\<OPC server name>, where the period (.) represents the local machine. The local machine is selected in the Select Local or Remote OPC Server page of the Discovery Agent Selection Wizard.
The Spreadsheet
The Discover and Auto Configure spreadsheet displays the information about the tags you selected to display. In this spreadsheet, you can view the original tag information and select the individual tags you want to add to your database.
The spreadsheet is divided into two sections:
- The Discovery Agent section (left side of the spreadsheet)
- The Target Application section (right-side of the spreadsheet)
Each of these sections can be expanded and collapsed horizontally to show or hide the columns of tag information. Click the >> Discovery Agent << cell or the >> Target Application << cell to expand and collapse these sections.
The Discovery Agent Section
The Discovery Agent section of the spreadsheet displays the raw tag information as it exists in the source. The displayed columns depend on the source you extracted the tag information from. For more information, see the specific Discovery Agent help topics.
The Select column of check boxes is available for all Discovery Agents and target applications and affects both sections of the spreadsheet. For more information, see Selecting Tags to Add to the Database.
The Status column is also available for all Discovery Agents. This column name is different depending on the Discovery Agent you are using. When you rerun the Discovery Agent on the same source, the status of the tags is displayed as New, Not Found, Modified, or Blank. When you run the Discovery Agent on a new source, the status of all tags displays as New. The following table describes each of the statuses.
Tag Statuses
|
Status |
Description |
|
New |
A new tag found by the Discovery Agent during the extraction process that did not previously exist in the current system tree. NOTE: If you are running the Discovery Agent for the first time, all tag statuses are displayed as New. |
|
Not Found |
The tag name, which previously existed in the current system tree, was not found when the Discovery Agent was rerun on the source. |
|
Modified |
The tag, which previously existed in the current system tree, was found when the Discovery Agent was rerun, but some or all of the tag's information has been modified. |
|
(Blank) |
No change. |
NOTE: The status field is for information purposes only and does not affect your ability to add tags to or modify tags in the target database.
IMPORTANT: When
you are using the OPC or IGS Discovery Agent, the individual tag information
does not automatically display in the system tree; only the top level
initially displays. As you expand each level, the OPC or IGS Discovery
Agent gets and displays the data for that level. For this reason, the
OPC or IGS Item Status column may not display the status you expect.
Because the OPC or IGS Server is browsed only when requested (that is,
when a branch is expanded), when you rerun the OPC (or IGS) Discovery
Agent, the OPC or IGS Item Status field updates only those items already
displayed in the spreadsheet. When you browse for items for the very first
time, the status field will always display New, regardless of whether
there were changes to the OPC or IGS Server since the first time it was
browsed. Only those items already displayed in the spreadsheet show an
updated status.
The Target Application Section
The target application section of the spreadsheet displays the tag information the way it will appear in your database. The information in these columns is added automatically when you define the tags selected from the Discovery Agent section or can be entered manually. The displayed columns depend on the target application you are adding the tags to. For more information, see the specific target application help topics.
TIP: After you have added the tag(s) to the database, view the status of the tags in the target application section. If the tags were successfully added to the database, the Status column displays OK. A small red square in a cell indicates bad data. Hover the mouse pointer over the red square to display a pop-up explanation for the bad data. You can double-click in the cell and change the bad data to valid data, then update the tag information in the database.
Find
The Discover and Auto Configure provides a Find dialog box where you can enter search criteria to help you find the tag(s) you want. You can enter full words or enter a partial word in the search field; however, if you use only a partial word, such as "int", every instance of that letter combination is located.
You can search for the tag information that exactly matches the case entered in the search criteria. For example, if you enter your search criteria in lower case, the tag information must also be in lower case. You can also set the search criteria to match the contents of an entire cell; only the cell that exactly matches the search criteria is found.
The Find feature saves the last 10 searches in a list box, allowing you to repeat a search without having to re-enter your search criteria. As you enter more search items and exceed the limit of 10, the last item on the list is deleted.
Filter
The Discover and Auto Configure provides a filter row in the spreadsheet that removes items from the display that do not match the filter criteria. You can filter tag information based on one column or any combination of columns. Filtering begins as soon as you move the cursor to another cell or press enter. Wildcards are not supported.
Sort
The Discover and Auto Configure provides the ability to sort column information displayed in the spreadsheet by clicking on the column heading. Sorting the displayed data can make it easier to understand and find what you are looking for. All the data in the spreadsheet is sorted based on the values of the first sort column. Within that sort, the data is sorted based on the values of the second column, and so on.
You can sort the column values in both ascending and descending order. Ascending is the default. Ascending means that numeric data is sorted from lowest-to-highest and character data is sorted from A-to-Z. Descending means the numeric data is sorted from highest-to-lowest value and character data is sorted from Z-to-A.
Names that are surrounded by quotes are sorted separately from names that do not have quotes. That is, when sorted in ascending order, names with quotes are listed first; when sorted in descending order, names with quotes are listed last.
You can also sort the Select column of check boxes to group all selected tags together either at the beginning of the list (ascending) or at the end (descending).
Number of Rows
The Number of Rows field displays the total number of rows currently displayed in the spreadsheet.
Number of Selected Rows
The Number of Selected Rows field displays the total number of selected rows.


