Important: You do not have the latest version of Historian! You are missing out on the newest capabilities and enhanced security. For information on all the latest features, see the Historian product page. For more information on upgrades, contact your GE Digital sales agent or e-mail GE Digital Sales Support. For the most up-to-date documentation, go here.
Installing Historian Client Tools
About this task
The Historian Client Tools installation installs the following components by default:
Historian Client Tools
Historian Administrator
Historian Documentation and Help
OLE DB Driver and Samples
HDA Server
User API and SDK
Historian Client Access Assembly
Collector Toolkit
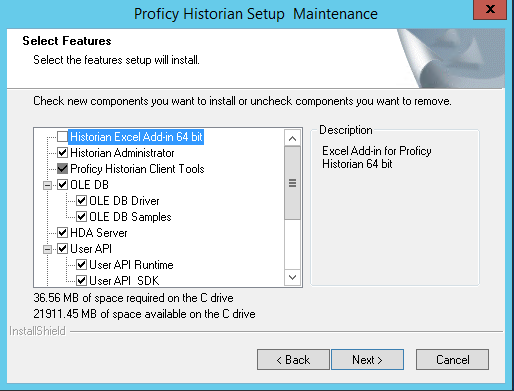
The Historian Excel Add-in 64-bit component is not selected in the Client Tools Select Features screen. You can select the check box for the Excel Add-in to install it at the same time as the Historian Client Tools. Otherwise, you can install it in a separate installation using the Install Historian screen.
Note: You can deselect the check boxes for all the components except the Historian Client Tools and Historian Client Access Assembly. However, if you deselect any of the components to install them at a later time, such as the Historian Administrator or HDA Server, when you re-run the installation, make sure you select all of the previously installed components in addition to the ones that you are installing, because any component that you do not select that was previously installed will be uninstalled during the later installation.
Procedure
Run the Historian install.
The Historian Splash screen appears.
If this screen does not appear, double-click the InstallLauncher.exe file on the ISO or DVD to display it.
Click the Historian Client Tools link.
The Select Features screen appears with the check box for Historian Client Tools selected.
By default, the check boxes for Historian Administrator, HDA Server, Historian Documentation & Help, OLE DB, and User API and SDK are also selected. If you do not want to install them at this time, deselect the check box(es) before continuing with the installation process.
Select the Proficy Historian Client Tools check box and click Next.
The Historian Server Security screen appears.
Select All Users to give all local and domain users full access to the Historian server. Or, select Specific User to add one user with full access to the Historian server.
Click Next.
The OPC Core Components screen appears briefly, and the installation proceeds.
Click Yes if you want to start the Historian services now, or click No if you want to apply software updates (SIMS) before starting Data Archiver.
Select Yes, I want to restart my computer now, and click Finish.