The Data Store Maintenance Screen
The Data Store Maintenance screen lets you read and modify the parameters of archives, data stores, global options, security, and alarms.
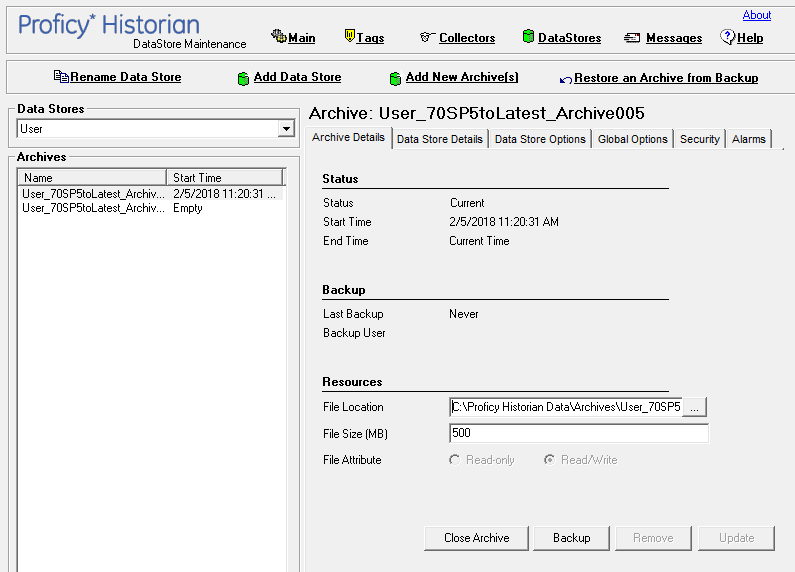
In the Archive Details Tab, on the left panel, you can see a list of all the archives in your system. To examine a particular archive, click the name of the archive. The parameter values for that archive are displayed in the Archive Details tab.
Action Buttons
| Button | Action |
|---|---|
| Close Archive | Manually close the current archive. |
| Backup | Back up a selected archive. Verify the file name and path and then click OK to save the file. |
| Remove | Remove an archive. First click an archive name to select it. Then click Remove. Clicking OK removes the archive file from the list of archives for the system, and places it in the \Archives\Offline directory. This does not delete the archive file from the system. An archive must be closed before it can be removed. |
| Update | Apply all parameter changes you have made on any tabs in this screen. If you want to cancel changes and return to the original values or settings, open a different screen and then return to the Data Store Maintenance screen. |
Archive Details Tab
In the Archive Details Tab, you can read or set the following parameters:
| Field | Displays |
|---|---|
| Status | The current operating state of the archive (Active, Current, Empty).
|
| Start Time | The time of the oldest sample in the archive. |
| End Time | The time the archive is automatically or manually closed. |
| Field | Displays |
|---|---|
| Last Backup | The date and time the last backup was performed on this archive. |
| Backup User | User name (at time of login to the Historian Administrator) of the person who performed the last backup of the archive. |
| Field | Displays |
|---|---|
| File Location | The path and name of the archive file. |
| File Size | The size (in MB) of the archive file. Note: Historian supports a maximum archive size of 256 GB per archive. |
| File Attribute | The attribute to set a closed archive to Read-only or Read/Write. Note: To create multiple archives at the same time, File Attribute must be set to Read/Write.
|
Data Store Details Tab
In the Data Store Details tab you can read or set the following Data Store settings:
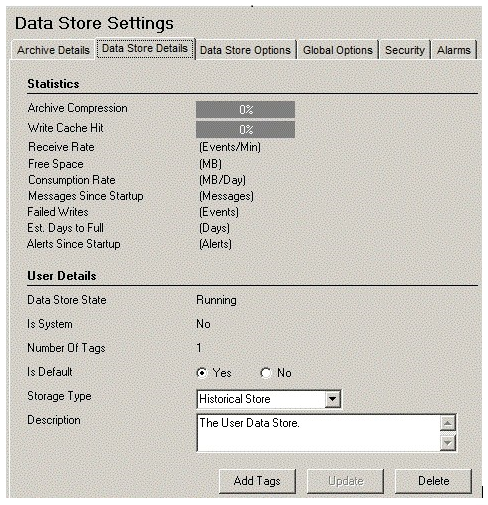
The Statistics and User Details sections display details about a data store. These details are also displayed in the Data Archiver statistics section on the main Historian Administrator.
| Field | Description |
|---|---|
| Archive Compression (% compression) | The current effect of archive data compression. If the value is zero, it indicates that archive compression is either ineffective or turned off. To increase the effect of data compression, increase the value of archive compression deadbands on individual tags in the Tag Maintenance screen to activate compression. In computing the effect of archive compression, Historian counts internal system tags as well as data source tags. Therefore, when working with a very small number of tags and with compression disabled on data source tags, this field may indicate a value other than zero. If you use a realistic number of tags, however, system tags will constitute a very small percentage of total tags and will therefore not cause a significant error in computing the effect of archive compression on the total system. |
| Write Cache Hit | The hit ratio of the write cache in percent of total writes. It is a measure of how efficiently the system is collecting data and should typically range from 95 to 99.99%. If the data is changing rapidly over a wide range, however, the hit percentage drops significantly because current values differ from recently cached values. More regular sampling may increase the hit percentage. Out of order data also reduces the hit ratio. |
| Receive Rate | How busy the server is at a given instant; the rate at which the server is receiving data from all collectors. |
| Free Space (MB) | How much disk space (in MB) is left in the current archive. |
| Consumption Rate (MB/day) | How fast you are using up archive disk space. If the value is too high, you can reduce it by slowing the poll rate on selected tags or data points or by increasing the filtering on the data (widening the compression deadband to increase compression). |
| Messages Since Startup | A count of system messages generated since the last startup. The system resets the value to zero on restart. The message database, however, may contain more messages than this number indicates. |
| Failed Writes | The number of samples that failed to be written. Since failed writes are a measure of system malfunctions or an indication of offline archive problems, the value shown in the display should be zero. If you observe a non-zero value, investigate the cause of the problem and take corrective action. The Historian also generates a message if a write fails. Note that the message only appears once per tag, for a succession of failed writes associated with that tag. For example, if the number displayed in this field is 20, but they all pertain to one Historian tag, you will only receive one message until the Historian tag is healthy again. |
| Est Days to Full (Days) |
How much time is left before the archive is full, based on the current consumption rate. At that point, a new archive must be opened (could be automatic). The Estimated Days Until Full field is dynamically calculated by the server and becomes more accurate as an archive gets closer to completion. This number is only an estimate and will vary based on a number of factors, including the current compression effectiveness. To increase the Days to Full, reduce the Consumption Rate as noted above. To ensure that collection is not interrupted, make sure that the Automatically Create Archives option is enabled in the Archive Maintenance screen (Global Options Tab). You may also enable Overwrite Old Archives if you have limited disk capacity. Enabling overwrite, however, means that some old data will be lost when new data overwrites the data in the oldest online archive. Use this feature only when necessary. |
| Alerts Since Startup | A count of system warnings or alerts generated since the last startup. A high value may indicate a problem of some kind. You should review the alerts and determine the probable cause. The count resets to zero on restart. The message database may contain more alerts than this number indicates. |
| Data Store State | The current state of the data store. The data store state is Running until you delete the data store. |
| Is System | Indicates whether this data store is the system data store. Note: By default, the System Data store is set as Is System. You cannot set any Historical data store to Is System. |
| Number of Tags | Displays the number of tags the data store contains. |
| Is Default (Yes/No) | Indicates whether the data store is the default store. Select Yes to set this data store as default data store. |
| Storage Type | Indicates whether the storage type is Historical or SCADA buffer. |
| Description | The description of the data store. |
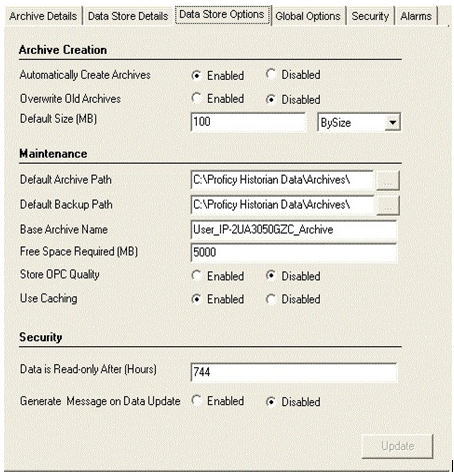
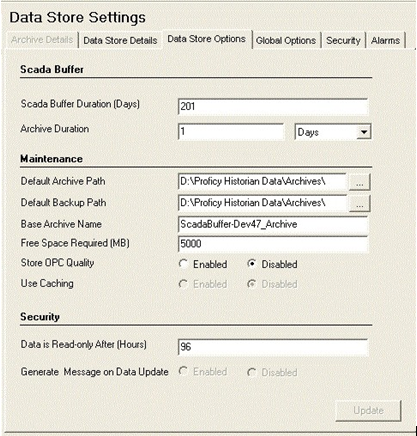
Data Store Options Tab
The Archive Creation/SCADA Buffer sections are different in the Data Store options tab for historical and SCADA buffer stores. If your data store is historical, the Archive Creation section is visible when you click the tab. The SCADA Buffer section is visible, if your data is SCADA buffer.
Click the Data Store Options tab to display the tabs in the following information:
Data Store Options tab for Historical Data Store
Data Store Options tab for SCADA Buffer Data Store
| Field | Description |
|---|---|
| Automatically Create Archives (Enable/Disable) | Select the appropriate button to enable or disable this function. When enabled, the server automatically starts a new archive in the default path directory whenever the current archive fills up. If disabled, no new data will be written to the archives once the default size has been reached. Note: If you plan to create multiple archives at the same time, then you must set Automatically Create Archives to Disabled.
|
| Overwrite Old Archives (Enable/Disable) | Select the appropriate button to enable or disable this function. When enabled, the system replaces the oldest archived data with new data when the default size has been reached. Since this action deletes historical data, exercise caution in using this feature. Be sure that you have a backup of the archive so that you can restore it later. Note: To create multiple archives at the same time, set Overwrite Old Archives to Disabled. If both Automatically Create Archives and Overwrite Old Archives are enabled, set ihArchiveFreeSpaceHardLimit to TRUE using the Historian APIs. |
| Default Size (MB) /Archive Duration (By Size/Days/Hours) |
Specifies the default size of a newly created archive or specifies the duration of a newly created archive in days or hours. If you select size, the archive will be set to a default size. The recommended default archive size is at least 500 MB for systems with 1000 tags or more. If you select days or hours from the drop-down list, the Archive Duration field is displayed in place of the Default Size field. If you select the duration by days, a new archive will be created after the selected number of days. If you select the duration by hours, a new archive will be created after the selected number of hours. |
| SCADA Buffer Duration (Days) | Indicates the maximum number of days the trend data can be stored. The maximum number of days is 200 days. . |
| Archive Duration (Days/Hours) | Indicates the days or hours for which the duration of the archive is set. |
| Field | Description |
|---|---|
| Default Archive Path | The path name to use for any newly created archives. If you change the path, the change takes effect the next time a new archive is created. Note: It is not recommended to use a period in the default archive path field. If a period is present in the default archive path, you will not be able to specify a default archive name. |
| Default Backup Path | The location to which the backup file will be saved. |
| Base Archive Name | A prefix that is automatically added to the file name all created archives. To change the prefix, enter a new text string and click the Update button. |
| Free Space Required (MB) | Indicates the remaining disk space required after a new archive is created. If the available space is less than the requirement, a new archive is not created. The default is 5000 MB. The Free Space Required field does not apply to alarm and event archives. The alarm and event archiver will continue writing to the alarm and event archive until the drive is full. If this occurs, the alarm and event archiver will buffer incoming alarm and event data until the drive has free space. An error will also be written to the Historian message log. |
| Store OPC Quality (Enabled/Disabled) | Stores the OPC data quality. Note: To create multiple archives at the same time, set Store OPC Quality to Disabled. |
| Use Caching (Enabled/Disabled) | When reading data from the archiver, some data is saved in the system memory and retrieved using caching. This results in faster retrieval as the data is already stored in the buffer. Enabling Use Caching option will retrieve data faster. Note: This option is not available for SCADA Buffer Data Stores. |
| Field | Description |
|---|---|
| Data is Read-only After (Hours) | The number of hours for data to be stored in a read/write archive. After the time expires, that portion of the archive file is automatically made read-only. Incoming data values with timestamps prior to this time are rejected. A single archive file, therefore, may have a portion made read-only, another portion that is read/write containing recently written data, and another that is unused free space. Note: Making an archive file read-only does not permit you to move the file in Windows File Explorer. To be able to move a read-only archive file, you must first remove the archive by selecting the file and clicking the Remove button on the Tab of the Archive Maintenance screen. The Archiver then releases its locks, which permits you to move the file at will. |
| Generate Message on Data Update (Enabled/Disabled) | If this option is enabled, an audit log entry will be made any time the value of a previously archived data point in the Historian archive is overwritten. This log entry will contain both the original and new values. Note: To create multiple archives at the same time, set Generate Message on Data Update to Disabled. This option is not available for SCADA Buffer Data Store. |
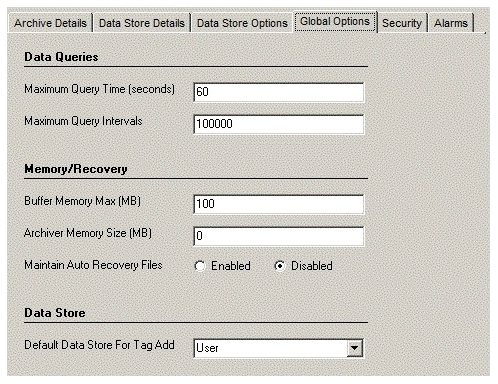
Global Options Tab
Click the Global Options tab to display the following Archiver settings:
| Field | Description |
|---|---|
| Maximum Query Time (seconds) | Specifies the maximum time that a data or message query can take before it is terminated. Use this setting to limit query time and provide balanced read access to the archiver. This applies to all query types. |
| Maximum Query Intervals | Specifies the maximum number of samples per tag that Historian can return from a non-raw data query. Use this setting to throttle query results for nonraw data queries. This setting does not apply to filtered data queries or raw data queries. If the number of returned samples exceeds the Maximum Query Interval, the query fails and no data is returned. |
| Buffer Memory Max (MB) | Displays the maximum memory buffer size that an archiver queue will use before starting to use disk buffering. The default is 100 MB. Note: You can monitor your collector data write queue using the Perftag_CollectorDataWriteQueueSize tag. If you find that the queue is exceeding 10,000 items, such as during a store and forward flush, increase the Buffer Memory Max size to 500 or more to maintain Historian performance. If you are upgrading from a previous version of Historian, the Buffer Memory Max will remain unchanged. Manually update the maximum memory buffer size to increase memory for write queues. |
| Archiver Memory Size (MB) | Specifies a target memory usage of the Data Archiver. Leaving the default of 0 allows the system to manage the memory usage. If the Data Archiver is running on a 32-bit operating system and you want to keep more data in memory you can set this number up to 1800 megabytes. If the Data Archiver is running on a 64-bit operating system, then leave the setting at 0, indicating it is system managed memory usage. Note: This setting applies to Data Archivers 6.0 version and later only. |
| Maintain Auto Recovery Files (Enabled/Disabled) | Ensures high availability of the latest archive (.iha) and Historian configuration (.ihc) files. When enabled, a copy of the latest .iha and .ihc file is made once every hour. These recovery files do not include alarms and event data. Note: These files are managed internally by Historian, and should not be used as backup files. To create multiple archives at the same time, set Maintain Auto Recovery Files to Enabled. By default, Auto Recovery Backup Files option is disabled on a 64-bit Windows system. On a large-scale system, disable the Auto Recovery Backup Files option for better performance. |
| Default Data Store For Tag Add | Indicates the name of the default data store to which tags are added. |
Security Tab
Click the Security tab to examine the Historian Server's security settings. The following Security options are displayed.
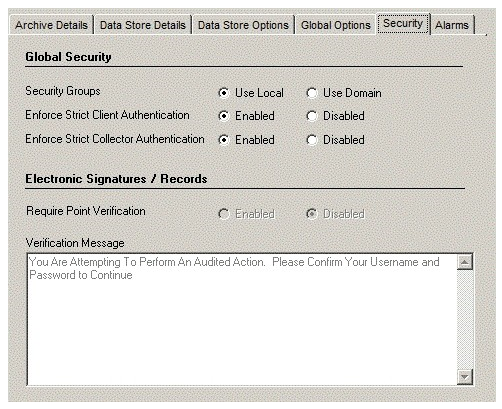
In the Security tab, you can read and/or set parameters for Electronic Signatures and Electronic Records and Global Security. The sections that follow explain these parameters in more detail.
| Field | Description |
|---|---|
| Security Groups | Indicates whether to Use Local or Use Domain security groups. If you select Use Local, create any security groups on your local computer. If you select Use Domain, create any security groups on your Windows domain. Refer to Implementing Security for information on how to create domain security groups. Note: To ensure a secure environment when using Historian security, do not create any local user accounts unless Historian is set up on a standalone computer and disable the Guest account. |
| Enforce Strict Client Authentication (Enabled/Disabled) | Indicates whether to use strict client authentication or not. If you enable this option, only clients using the security token based authentication protocol can connect. Clients using Historian versions prior to 6.0 and other Proficy software they connect to may not be able to connect unless they have the latest updates for that version. If you disable this option, clients of any version can connect if they use a valid user name and password. For more information, refer to Getting started with Historian > Implementing Strict Authentication. |
| Enforce Strict Collector Authentication (Enabled/Disabled) | Indicates whether to use strict collector authentication or not. If you enable this option, only collectors using the security token based authentication protocol can connect. Collectors using Historian versions prior to 6.0 and the other Proficy software they connect to may not be able to connect unless they have the latest updates for that version. If you disable this option, collectors of any version can connect. For more information, refer to Getting started with Historian > Implementing Strict Authentication. |
Alarms Tab
In the Alarms Tab, you can back up, purge, and restore alarms.

The Alarms tab contains the following action buttons. Click a button to perform the action indicated by the name.
| Field | Description |
|---|---|
| Backup Alarms | Back up alarms. You must specify the start and end time when backing up alarms. |
| Purge Alarms | Purge or delete the alarms. You must specify a start and end time. You can back up alarms before you delete them. |
| Restore | Restores backed up alarms by specifying the location of the backup file. |
In the Alarms tab, you can set the following parameters:
| Field | Description |
|---|---|
| Start Time | The start time that you want to define for backing up, purging or restoring alarms. The format is as follows: mm-dd-yyyy hh:mm:ss |
| End Time | The end time that you want to define for backing up, purging or restoring alarms. The format is as follows: mm-dd-yyyy hh:mm:ss |
| Select File | Click the Browse button on the right to navigate to the location of the file. |