New License Steps

Procedure

  1. Obtain a hardware key for products and options.
    Specify the following that you are ordering:
    • Part number for each product and feature.
    • Quantity of each product and feature.
    • If the hardware should be parallel or USB port.
      • There can be only one hardware key per computer.
      • You can attach a parallel port printer cable to a parallel port hardware key.
    • List of what products/options will be installed on each Server.

    The default hardware key configuration is that each hardware key will contain the set of licenses for every product and option purchased.

    You will receive a hardware key for each set of licenses.

    If you order 4 CIMPLICITY licenses and 3 Historian licenses, you will receive the following:
    No. of Keys Key Contains Licensing for
    3 CIMPLICITY and Historian
    1 CIMPLICITY

    Each key will contain that products/options according to your specifications.

    If you order 4 CIMPLICITY licenses and 3 Historian licenses and plan to run each on a different server, you will receive the following:
    No. of Keys Key Contains Licensing for
    4 CIMPLICITY
    3 Historian
    Important: You can attach only one key to a Server.
    When your order is fulfilled you will receive one or more CDs and hardware keys.
  2. Install your products and options.
    Follow the installation directions for each of your products.
  3. Attach the hardware key to the server.

    Attach one hardware key to either the parallel or USB port, depending on what you ordered.

    Type of Key Attach to a
    Parallel port Parallel port on the Server. You can then attach a parallel printer cable to the hardware key.
    USB USB port on the Server.
    Important: Attach the hardware key to the Server only after you install all of the licensed products.
  4. Review the license report.
    1. Click Start on the Windows task bar.
    2. Select (All) Programs>Common>License Viewer on the Start menu.
      The M4 License Viewer opens.

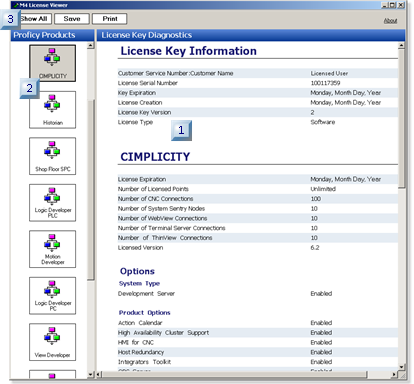
    License report tools are as follows.

    Tools Description
    1 The right pane in the M4 License Viewer displays the:
    • License key details.
    • Customer name
    • Serial number
    • Key expiration
    • License creation
    • License key version License type
    • License details for the selected product(s), including:
    • License expiration
    • Number of licensed points
    • Number of <option> nodes
    • Number of <option> connections
    • Enabled options.
    2 The left pane displays icons for each of your licensed products.

    Click an icon to select it and the details display in the right pane that correspond to the selected product.

    Note: You can click the Show All button on the M4 License Viewer toolbar to display details about all the licensed products on the same page
    3 Click any of the buttons on the M4 License Viewer toolbar to do the following:
    • Show All - Displays all of the details about all of the licensed products on the same page.
    • Save - Saves.
    • Prints - Prints the report that displays.
  5. Run your project(s) on the licensed server. Start any project on the licensed server.
    Important: If you start a project on a Server that does not have a license a message may warn you that no license is present, and the project will run in demonstration mode. Demonstration mode provides you with limited functionality, including no networking. Demonstration mode runs for a maximum of two hours. The actual time depends on which product is unlicensed.